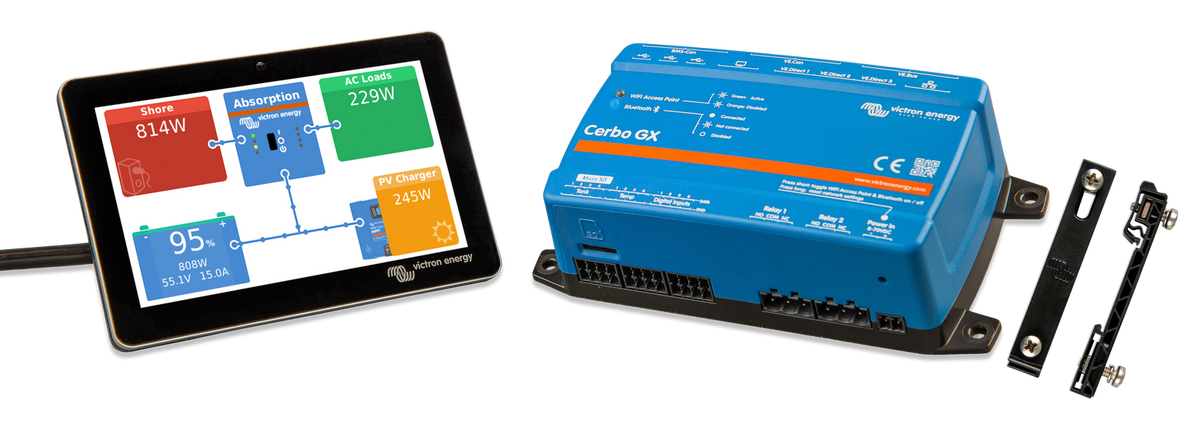
We love our Victron electronics, and it seems we're not alone. Increasingly, we're spotting Victrons on friends' boats, vessels we visit, and those we browse online. The Cerbo GX, with its touch display, has emerged as the face of Victron. While the Admiral doesn't particularly like that display and doesn't really understand why people put them in the most prominent locations of their beautiful boats, it's clear that people love them, and with good reason.
Behind the scenes, the Cerbo GX -whether or not it includes the Admiral's favorite display- is actually an impressive platform capable of much more than simply controlling your power systems and displaying animated arrows for current flow between batteries, inverters, and solar panels. With the right setup, the Cerbo GX can be transformed into a connected boat platform, enabling a wide range of features and functions, such as:
- A fully automated logbook that captures your journeys without you ever having to press a single button
- A wireless AIS and navigation server for popular apps like Navionics, iSailor, iNavX, and Aqua Map on your phones and tablets
- A MarineTraffic station that may give you free Professional or even Professional Plus Memberships that normally costs $700+ and $1400+ a year respectively (subject to your coverage area and MarineTraffic policies)
- Many more capabilities that are not explicitly covered in this article (weather station, anchor alarm and so on)
If you're interested in learning more about these capabilities, read on! However, I want to make it clear that I am not affiliated with Victron in any way and am not receiving any benefit from them for writing this article (see also the affiliate disclaimer in our About Page). I simply admire what they've done with the Cerbo GX and want to share ways to make it even better.
What is Cerbo GX?
Cerbo GX is a monitoring and control system developed by Victron Energy. It serves as a central hub for monitoring and controlling various devices related to your boat's power systems, such as battery banks, solar panels, generators, inverters, and more. While it does a great job in this regard, this article focuses on other ways to enhance the system's capabilities.
What's particularly clever about Victron's design is that they've built extensions for the software running on the Cerbo GX. By using a special version of their firmware (known as "Large"), users can access features that weren't necessarily envisioned or developed by Victron.
The Large firmware essentially allows turning the Cerbo GX into a boat platform that can run apps. As we've seen with the app stores of Apple and Google, creativity knows no bounds when developers are given access to a platform via an app store. While we're not quite there yet with this, it's a promising start.
Requirements
This app store is not as plug-and-play as a typical mobile app store. Getting started requires a certain level of technical expertise, and there is no uniform quality control. Additionally, there are some prerequisites that need to be met. While it's not overly difficult to get started, it's not exactly a purely plug-and-play experience either. If you're reasonably tech-savvy and open to experimentation, here's what you'll need:
- Obviously a Victron Cerbo GX as the platform
- NMEA 2000 or SeaTalkNG (which is basically the Raymarine equivalent of NMEA 2000) setup on your boat. If you have a Cerbo GX, chances are high that you also have a NMEA 2000 setup.
- Victron VE.Can to NMEA 2000 cable and (you may also need spur cables if you have a Raymarine SeaTalkNG network)
- Internet connectivity on your boat. Some of the above mentioned capabilities will work without Internet but many of the cool capabilities will require it, at least intermittently when you are at a dock, marina etc. If you don't have Internet, I highly recommend you to take a look at the articles I have written about Starlink.
Setting up Cerbo GX
The first step is to install the Cerbo GX and integrate it with your power system. Details of this installation is outside of the scope of this document. There are enough resources about this on the Internet should your marine electrician should do it for you.
Once the installation is complete and the Cerbo GX is integrated with your power system, you should be able to see it in your VictronConnect app with a Bluetooth connection. This will allow you to monitor and control your power system through the app.
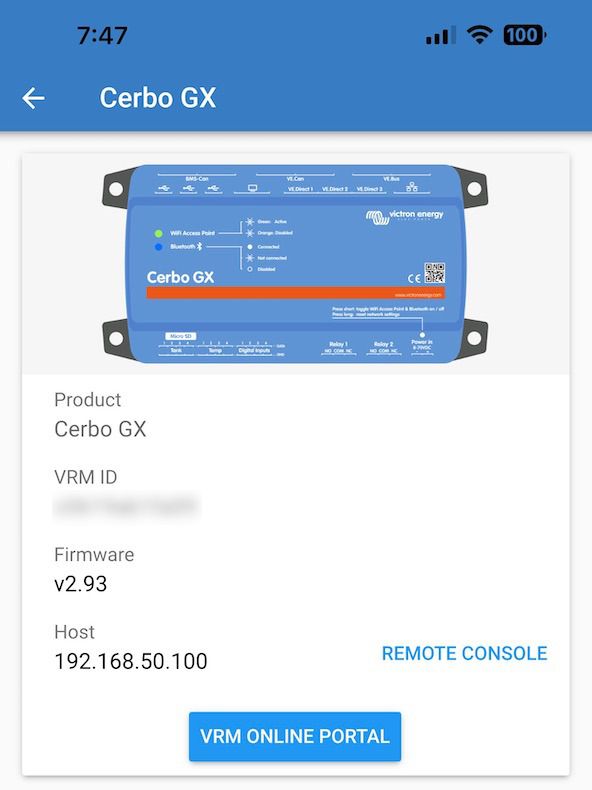
After you have established a Bluetooth connection with your Cerbo GX, you should take note of the IP address mentioned under Host in the VictronConnect app (192.168.50.200 in the above example). This IP address will be important for accessing the Cerbo GX's web interface. To access the web interface, click on Remote Console in the VictronConnect app. This will give you access to the Cerbo GX's web interface, which can be viewed on your phone in landscape mode.
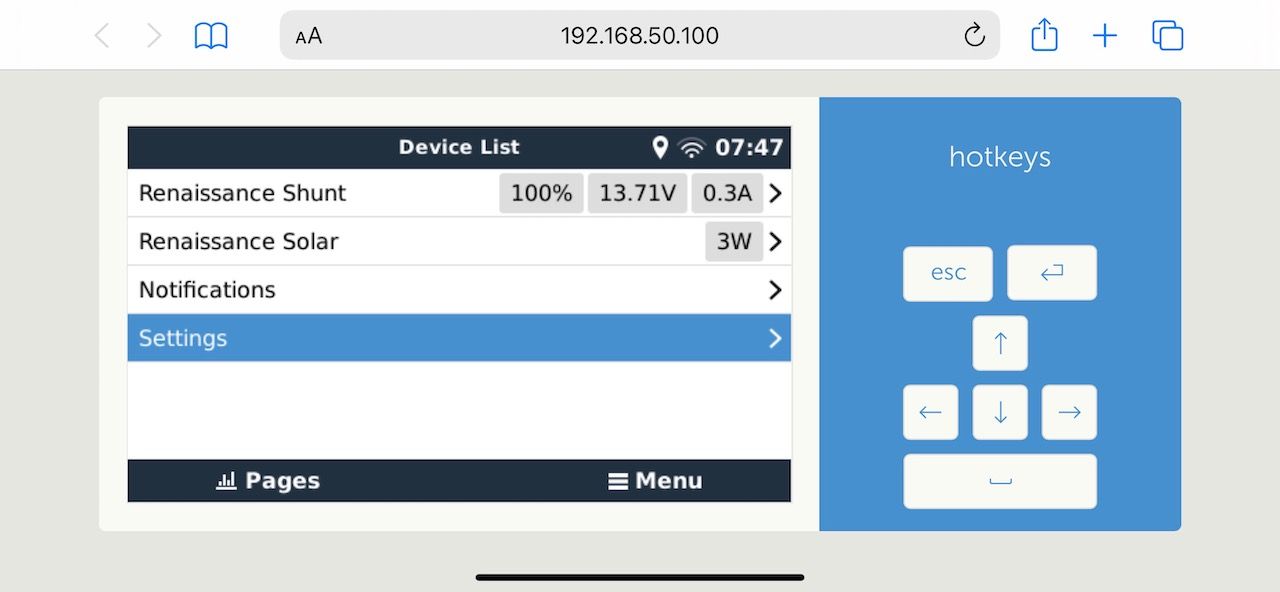
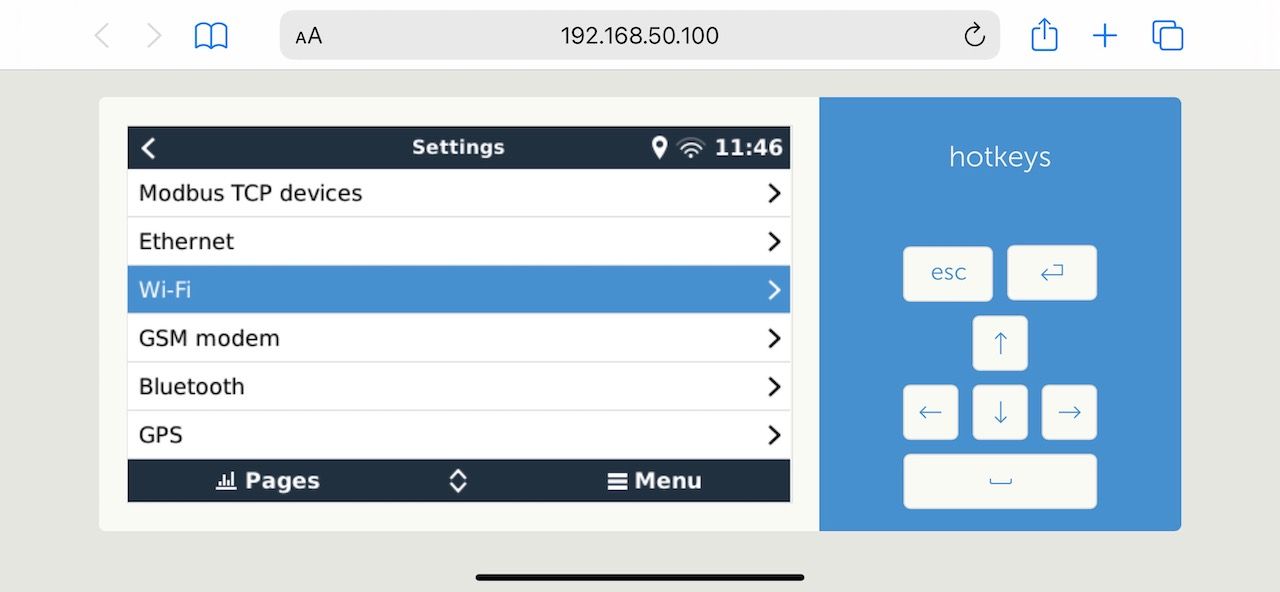
Configure Wireless for Cerbo GX
Once you can access the web interface, configure wireless and Internet access via Settings -> Wireless menu.
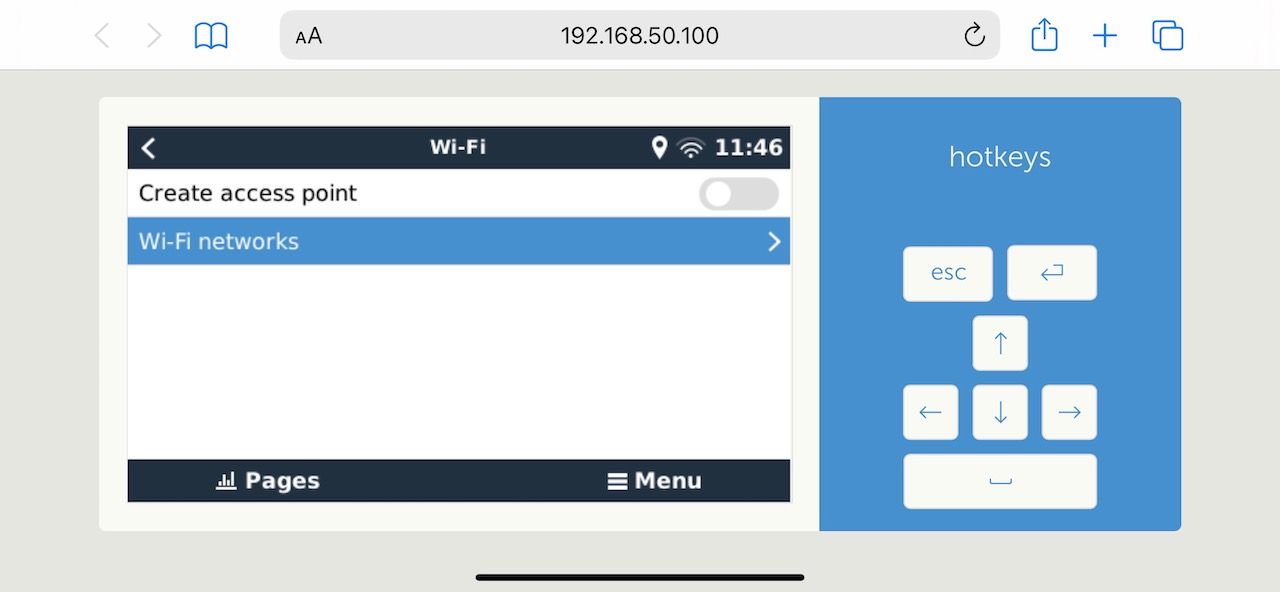
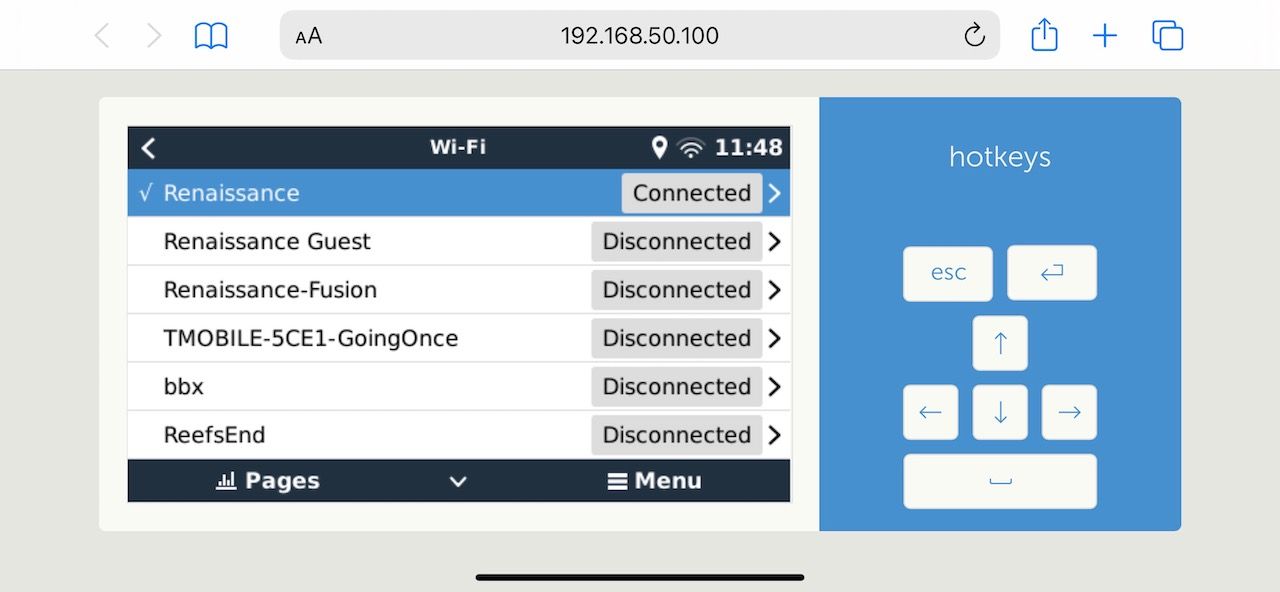
Configure Cerbo GX for Boat Wireless
Once you are connected to the boat's wireless network, it is recommended to disable the "Create access point" option to avoid any conflicts with other devices on the network.
Connect Cerbo GX to NMEA 2000
Once you have Cerbo GX working and connected to the Internet, you can connect it to your NMEA 2000 network using the VE.Can to NMEA 2000 cable. You may also need the spur cables mentioned above, depending on your boat's network.
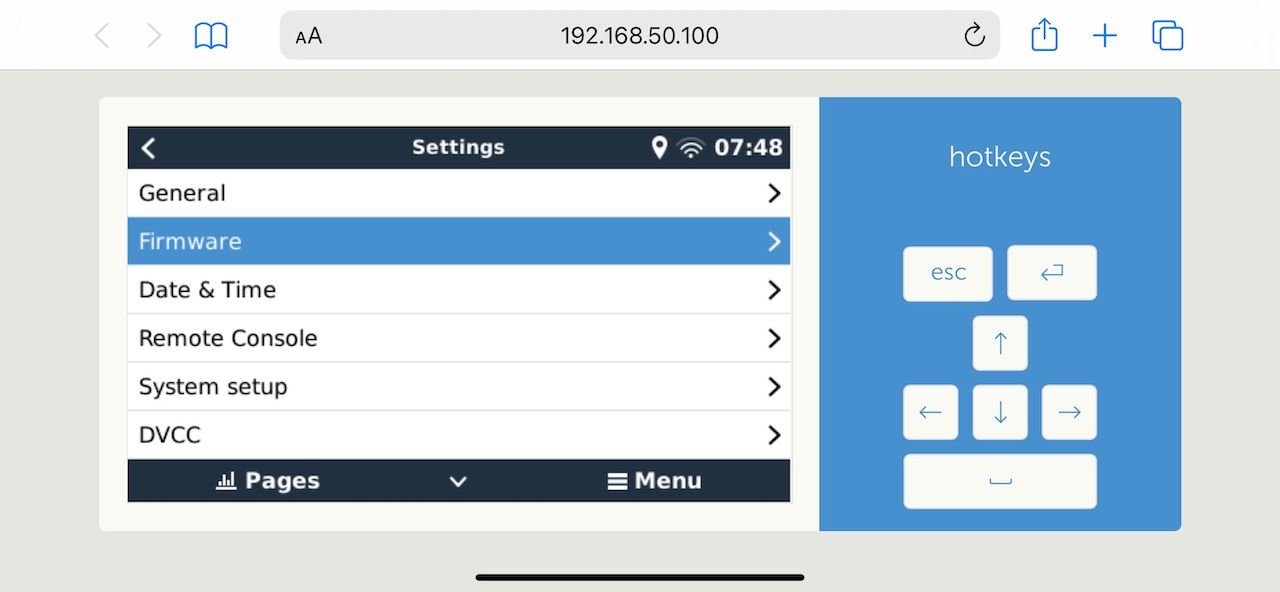
Configure Cerbo GX to use a Large Image
You are now ready to upgrade the firmware to include extended functions.
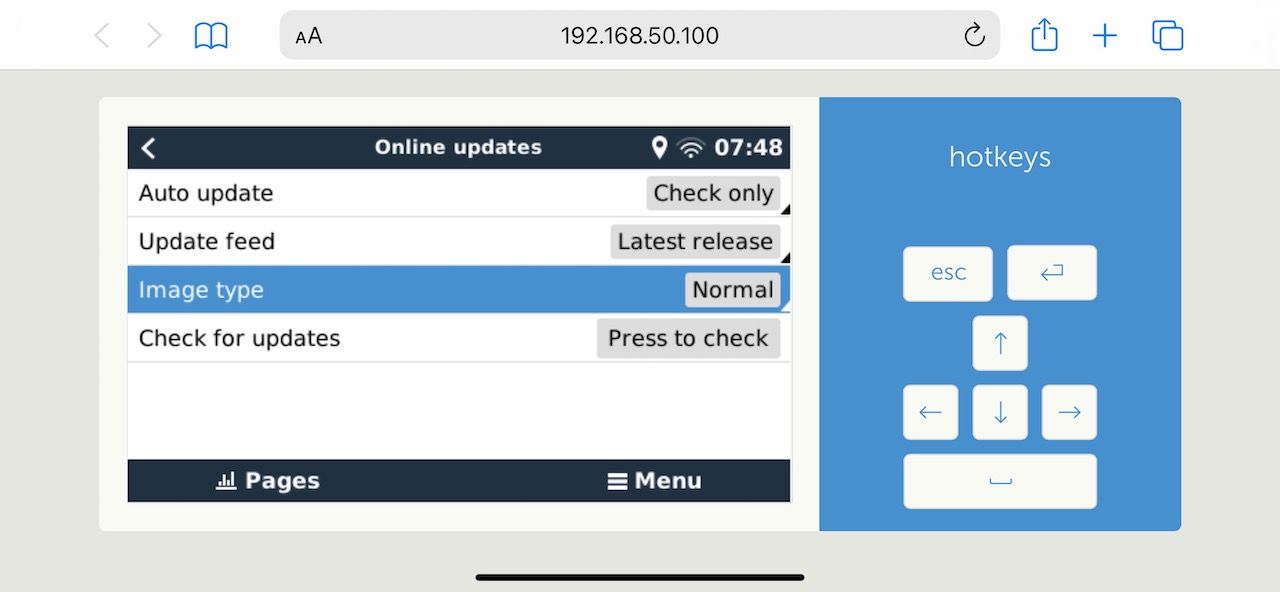
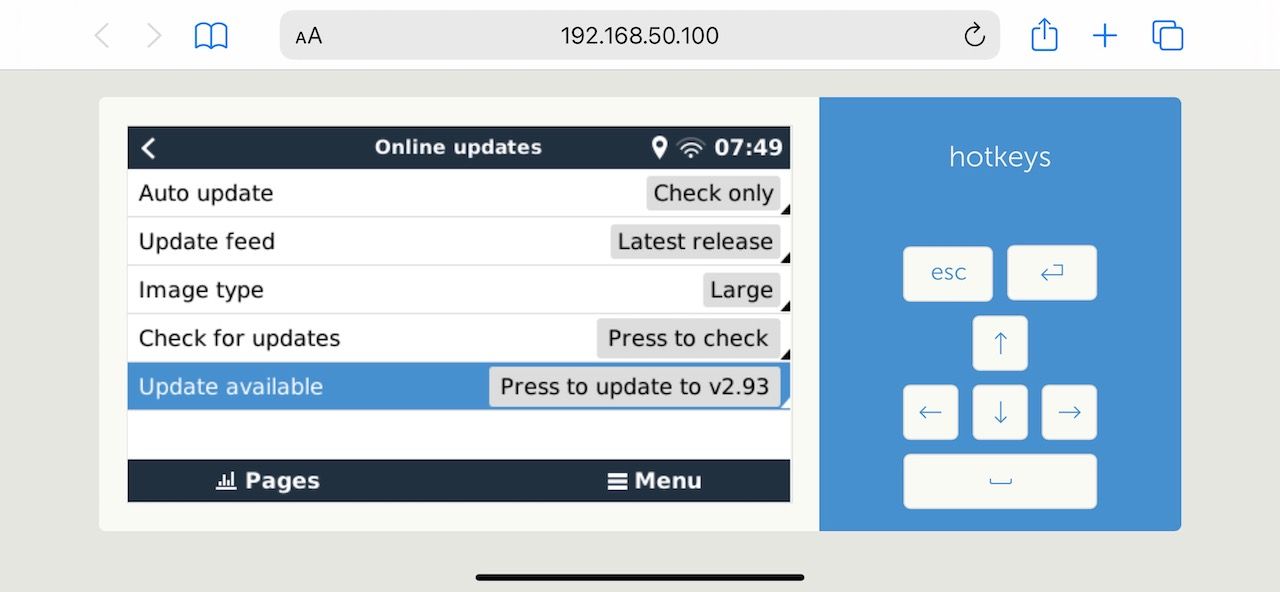
- Go to Settings -> Firmware -> Online updates -> Image Type and select Large
- Go back one screen, click Check for updates and then Press to update to v2.93 (note that the version will likely be different by the time you try this)

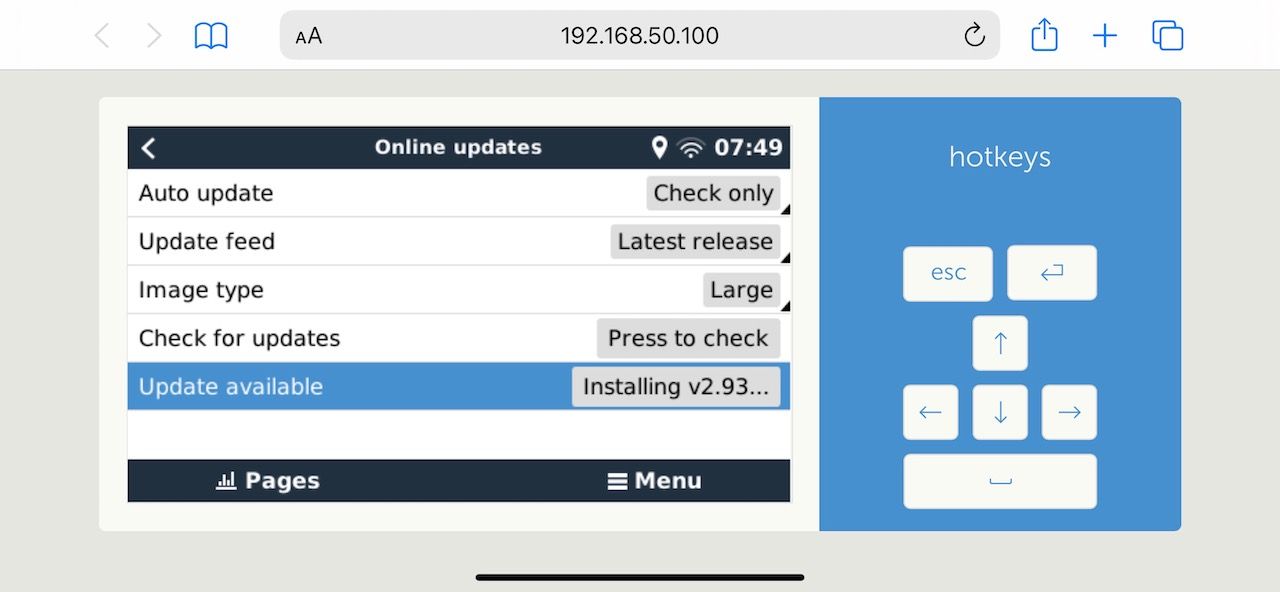
Steps to Change the Firmware to Large Image
Sit and wait until firware download completes and Cerbo GX reboots. This may take a while.
Enable Signal K on Cerbo GX
The large firmware comes with support for Signal K. But what exactly is Signal K? We will talk about it in more detail later, but for now, assume it is the basis of the app store we talked about.
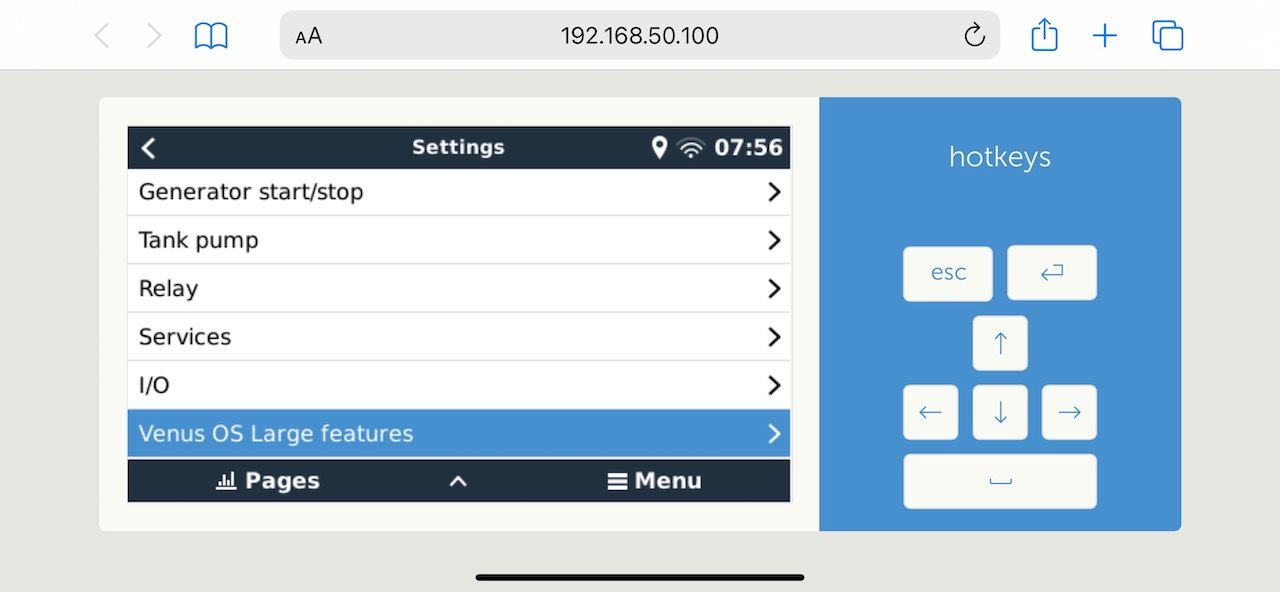
- Go to Settings -> Venus OS Large features
- Toggle Signal K to on
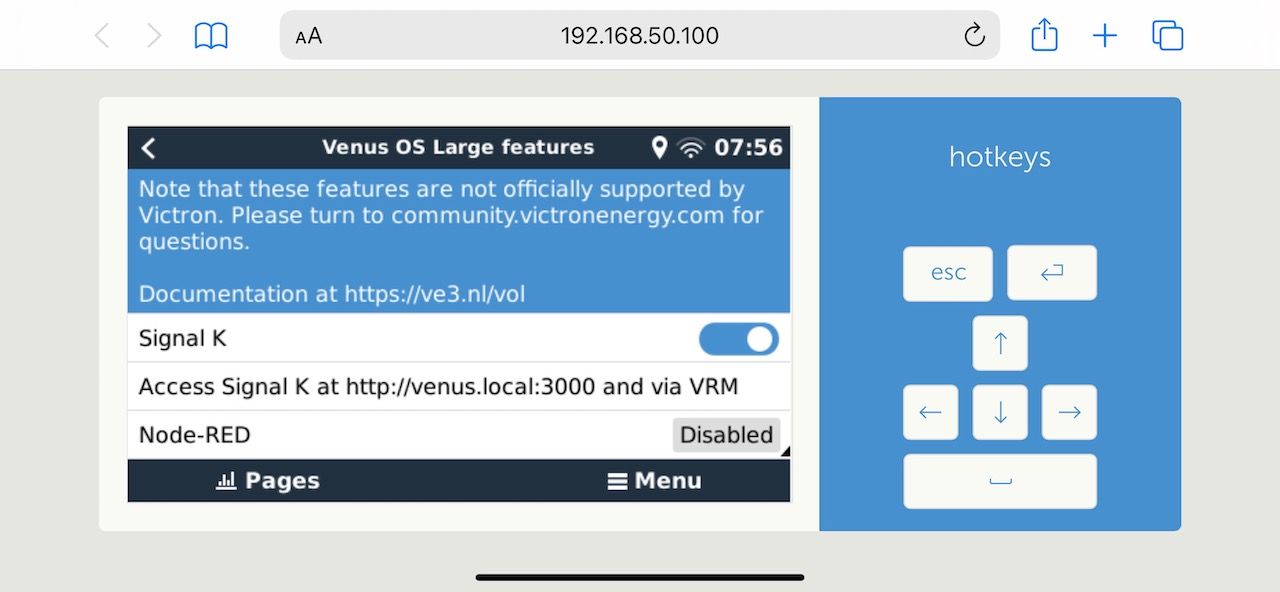
Go to the link shown on the screen, something like http://venus.local:3000. This should give you a page like this:
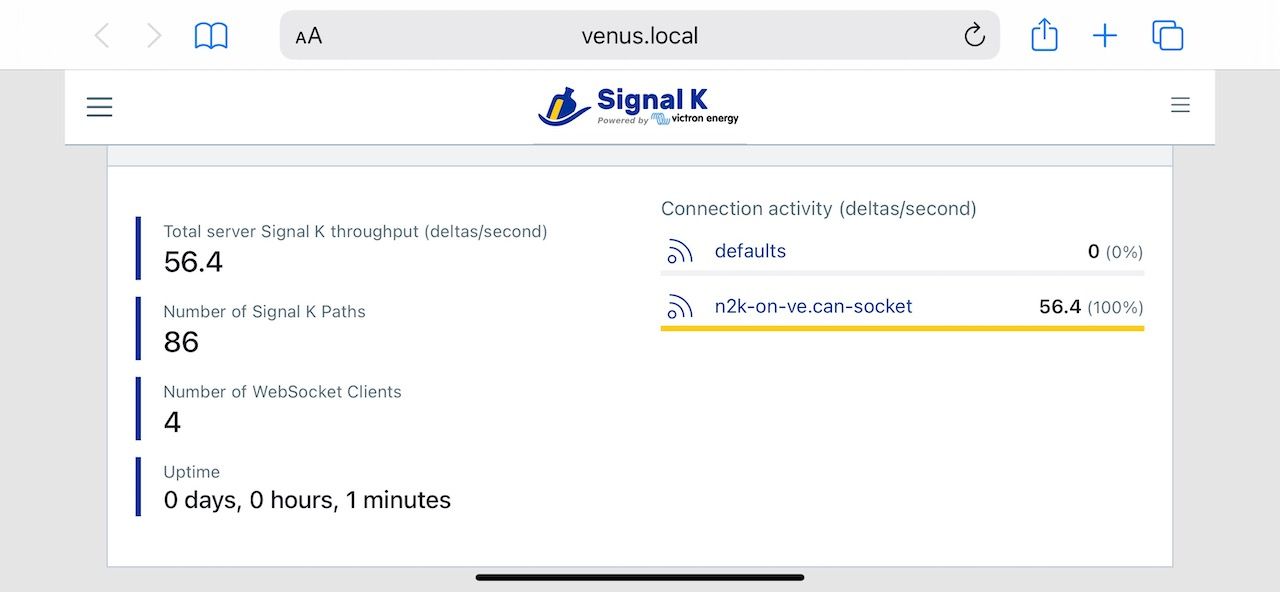
If you see this screen and n2k-on-ve.can-socket with a yellow line underneath, it means you have now enabled the app store on your Cerbo GX and you are also receiving traffic from your NMEA 2000 network. This is a big deal, well done!
So here is what you have now:
- A device that is always powered that can receive information about and monitor your power systems
- The same device receiving data from your boat network as well (depending on the types of instruments you have, GPS positions, AIS information, instrument data like wind speed & direction, water depth, temperature, etc.)
- Internet connectivity from the same device, which enables a bunch of online services
- A pluggable system that can be used to download apps and add-ons that do things with above data (IoB - Internet of Boats!)
Let's talk about this more.
What Exactly is Signal K?
Officially speaking, Signal K is an open-source marine data exchange standard designed for marine applications. It is obviously an accurate but quite boring explanation in my opinion. Here is my definition.
As all boat owners know, boats are complex and expensive hobbies, not to mention the countless different standards, specifications, and even measurements (did we just mention NMEA 0183, 2000, SeatalkNG, different connectors, and cables above?). Say you need a basic piece of software that could be easily written by a new college graduate in a couple of days. Let that piece of software go through all the hoops and hurdles (starting with specifications that cost thousands of dollars just to access), and it will take ten times longer than you would expect, with a price tag that has at least two or more zeroes at the end.
So, put simply, Signal K is a free and open platform developed by boaters for other boaters who want to build and share things with other boaters, bypassing many of the aforementioned hurdles. While developing Signal K applications requires relatively deep technical knowledge, using what has been developed does not require much (if any) technical know-how. Signal K makes building boat solutions easier for developers and more accessible for everyone else. It's the free and open-source app store for your boat! However, it's not all rosy, as you'll see below. Getting it to work properly still requires you to make a fair number of configuration changes, so it's not a plug-and-play system.
One major challenge with Signal K has been finding a platform that is accessible and easy to use for everyone. This was no easy task. We've had solutions ranging from Raspberry Pis and Interl NUCs to iKommunicate with a variety of different boards and modules to connect them to NMEA networks. However, these have often been too complex or too expensive for what they offered. While getting Signal K to run on a Cerbo GX is not the most trivial task, I don't think it is exceptionally difficult either (feel free to let me know in the comments if you think otherwise). With Cerbo GX already being a part of most modern boat systems, I believe we're getting close to crossing the chasm. Combined with Starlink, which I've talked about extensively in previous articles, I think this is a pretty amazing combination.
There is an entire debate on how reliable open source software or hobbyist software (or whatever you want to call it) can be for mission critical purposes like marine applications. This debate is not new, not unique to marine industry and will not be settled here (for context, this was the same debate from 1990s with the advancement of Linux, whether it could be used for mission critical applications - at least that question has been answered pretty clearly). I will not put any particular view on this, apart from saying that not everything on a boat is mission critical. Just make sure to use common sense and don't rely on a piece of crappy untested software for something you consider critical!
Getting Things Operational
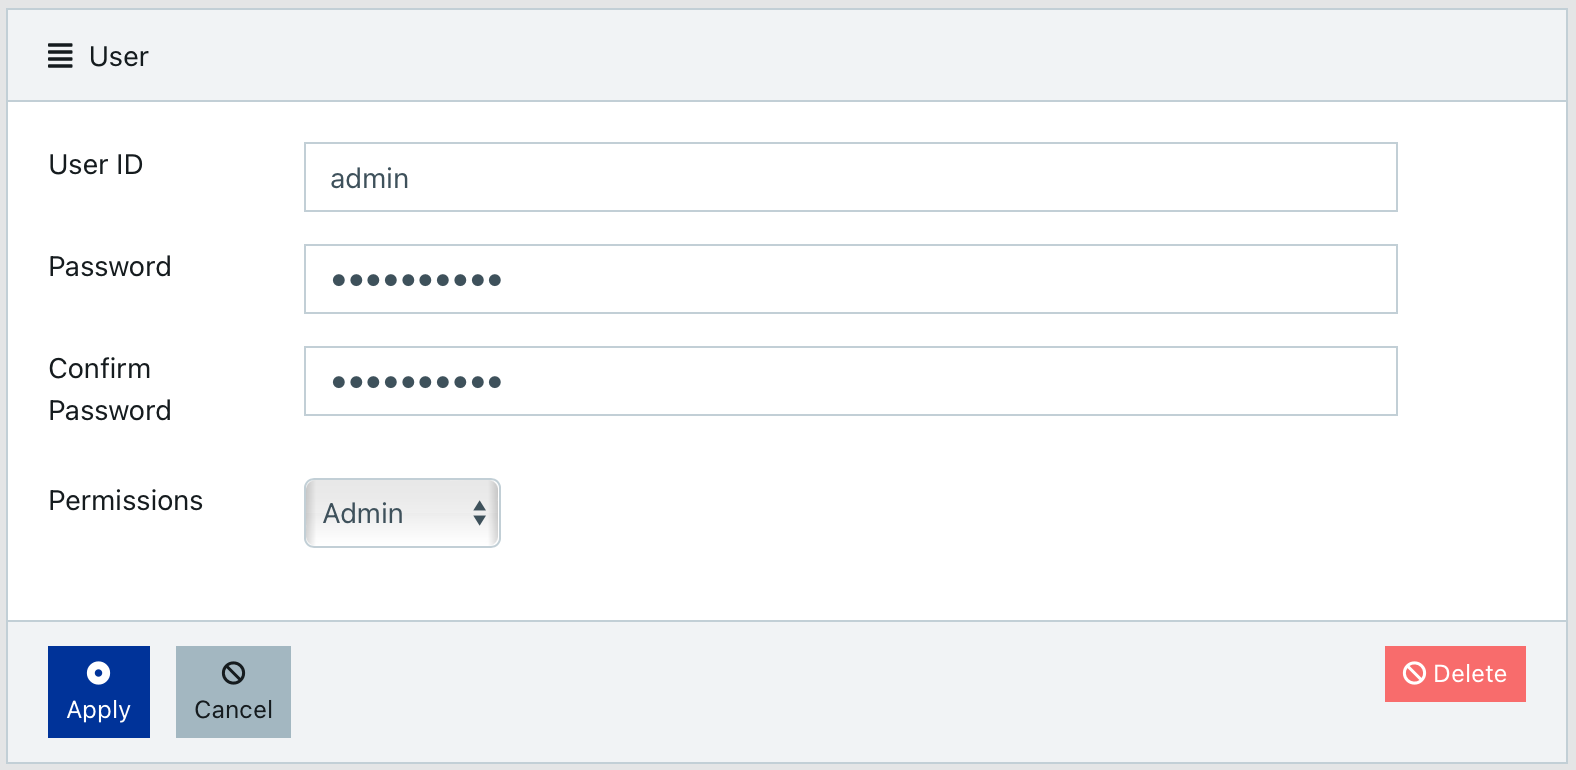
First step in any kind of a system that can access your boat network and power settings and the Internet is to secure it! From the Signal K dashboard (http://venus.local:3000), go to Security -> Users and create an admin user for Signal K and protect it with a secure password.
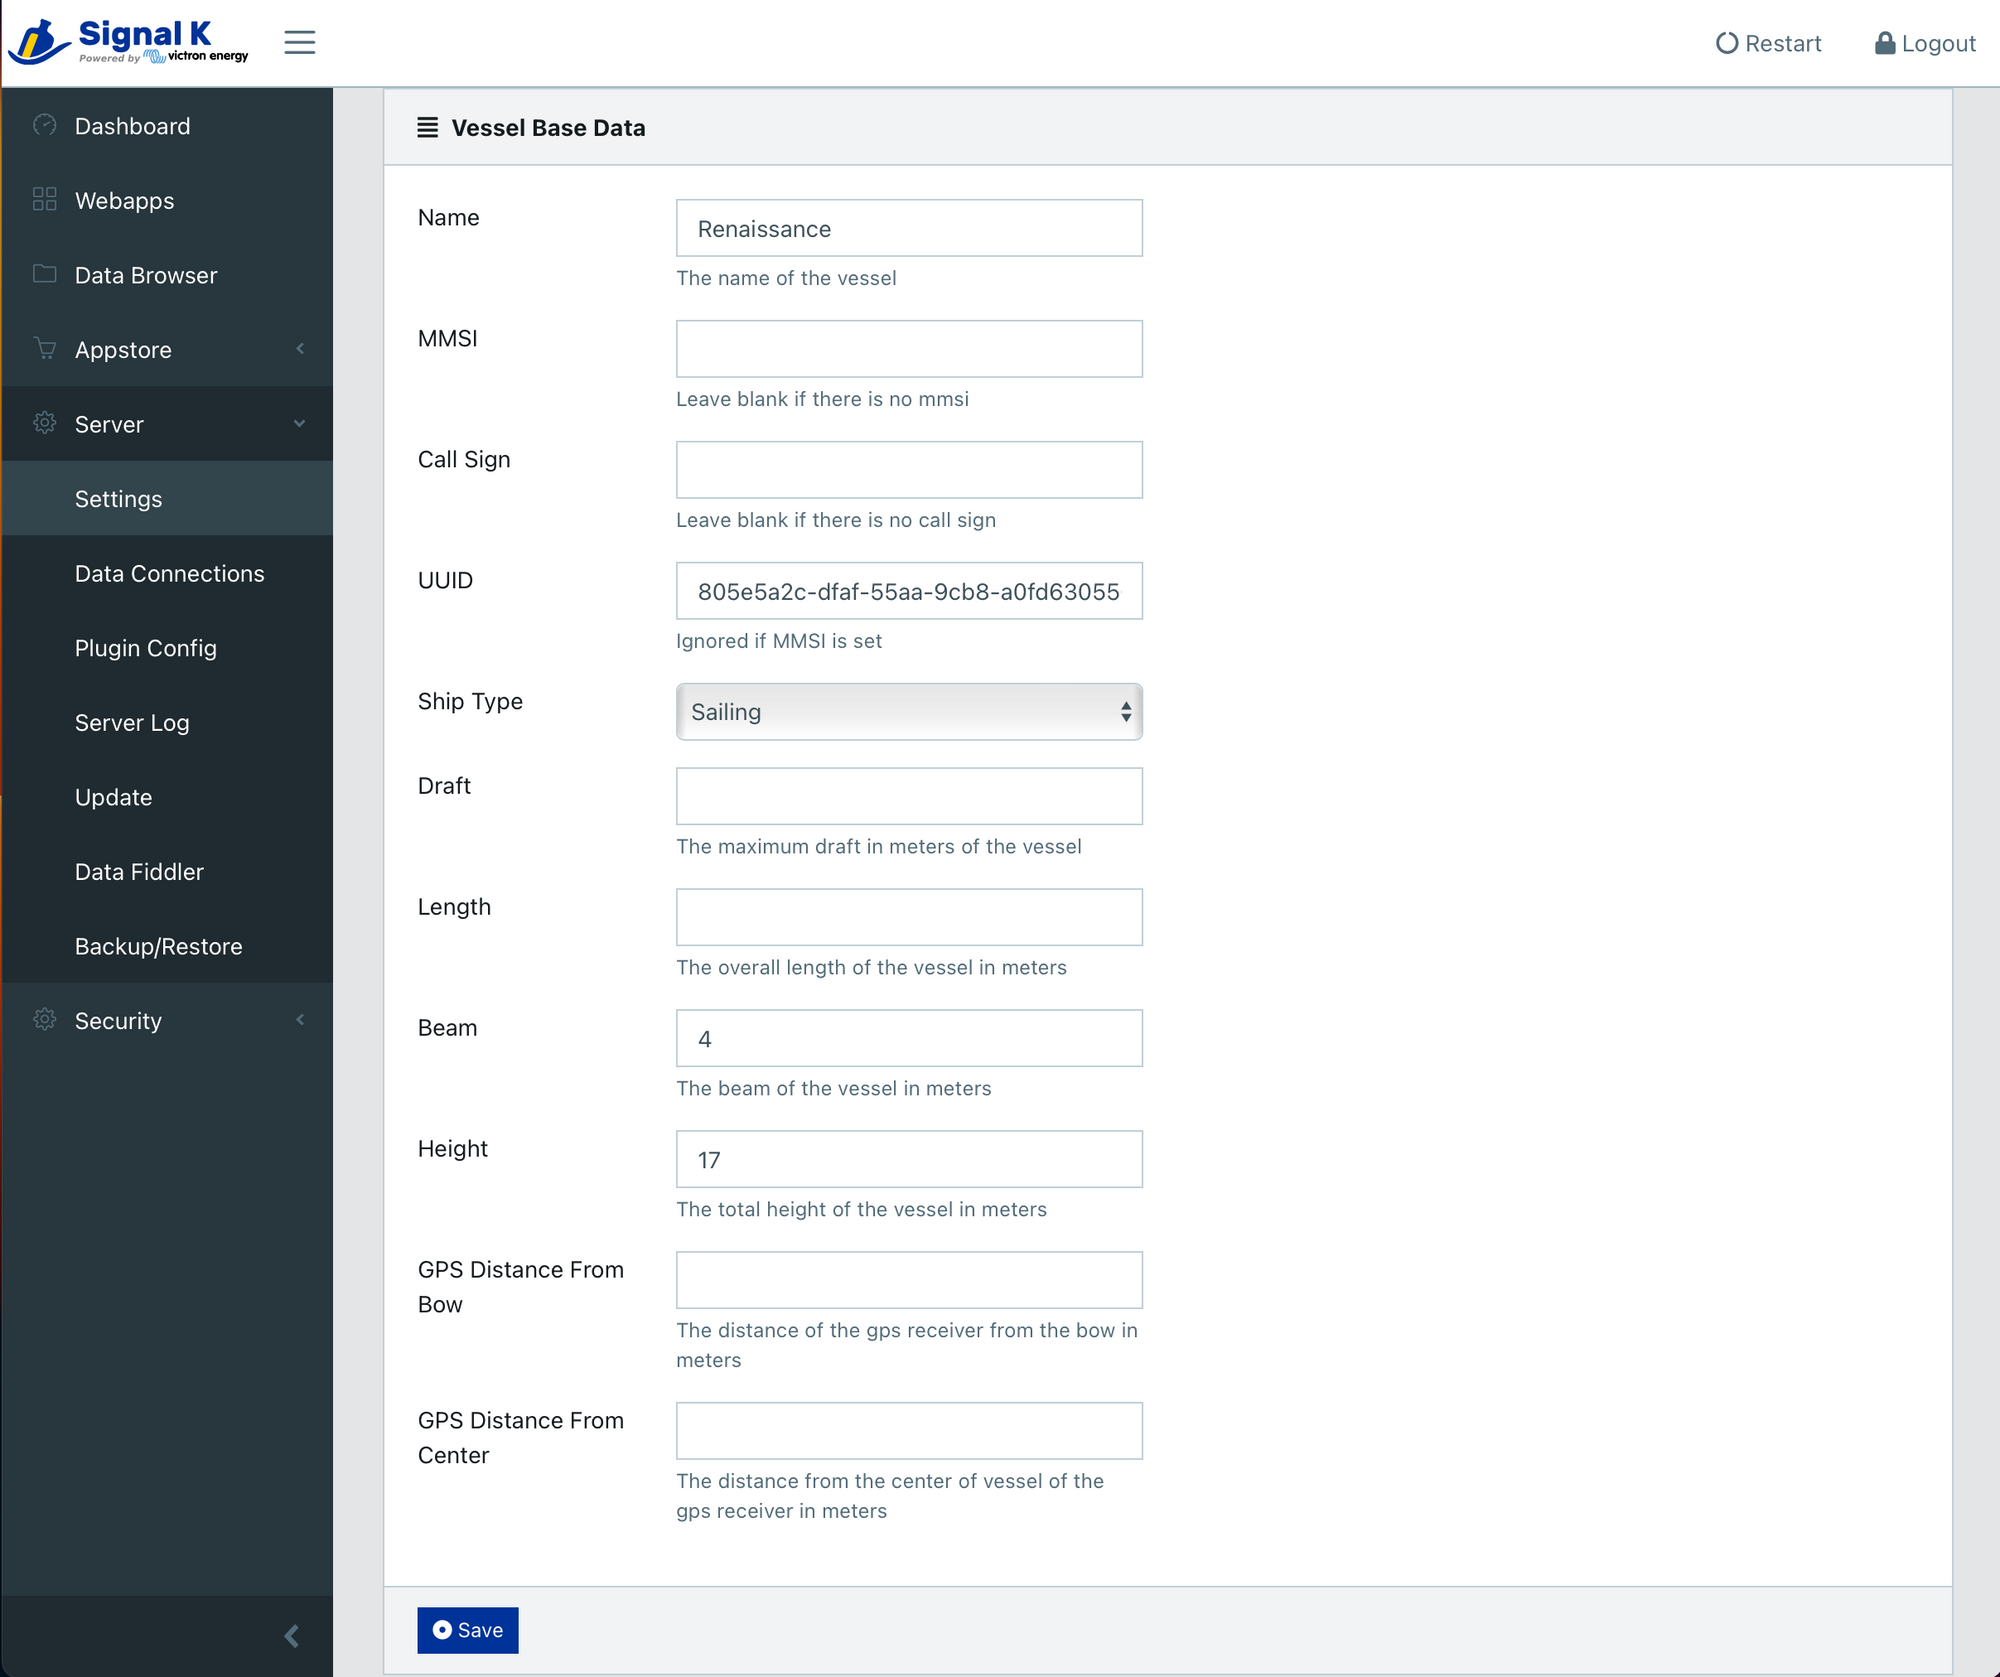
Go to Settings and enter some basic information about your boat.
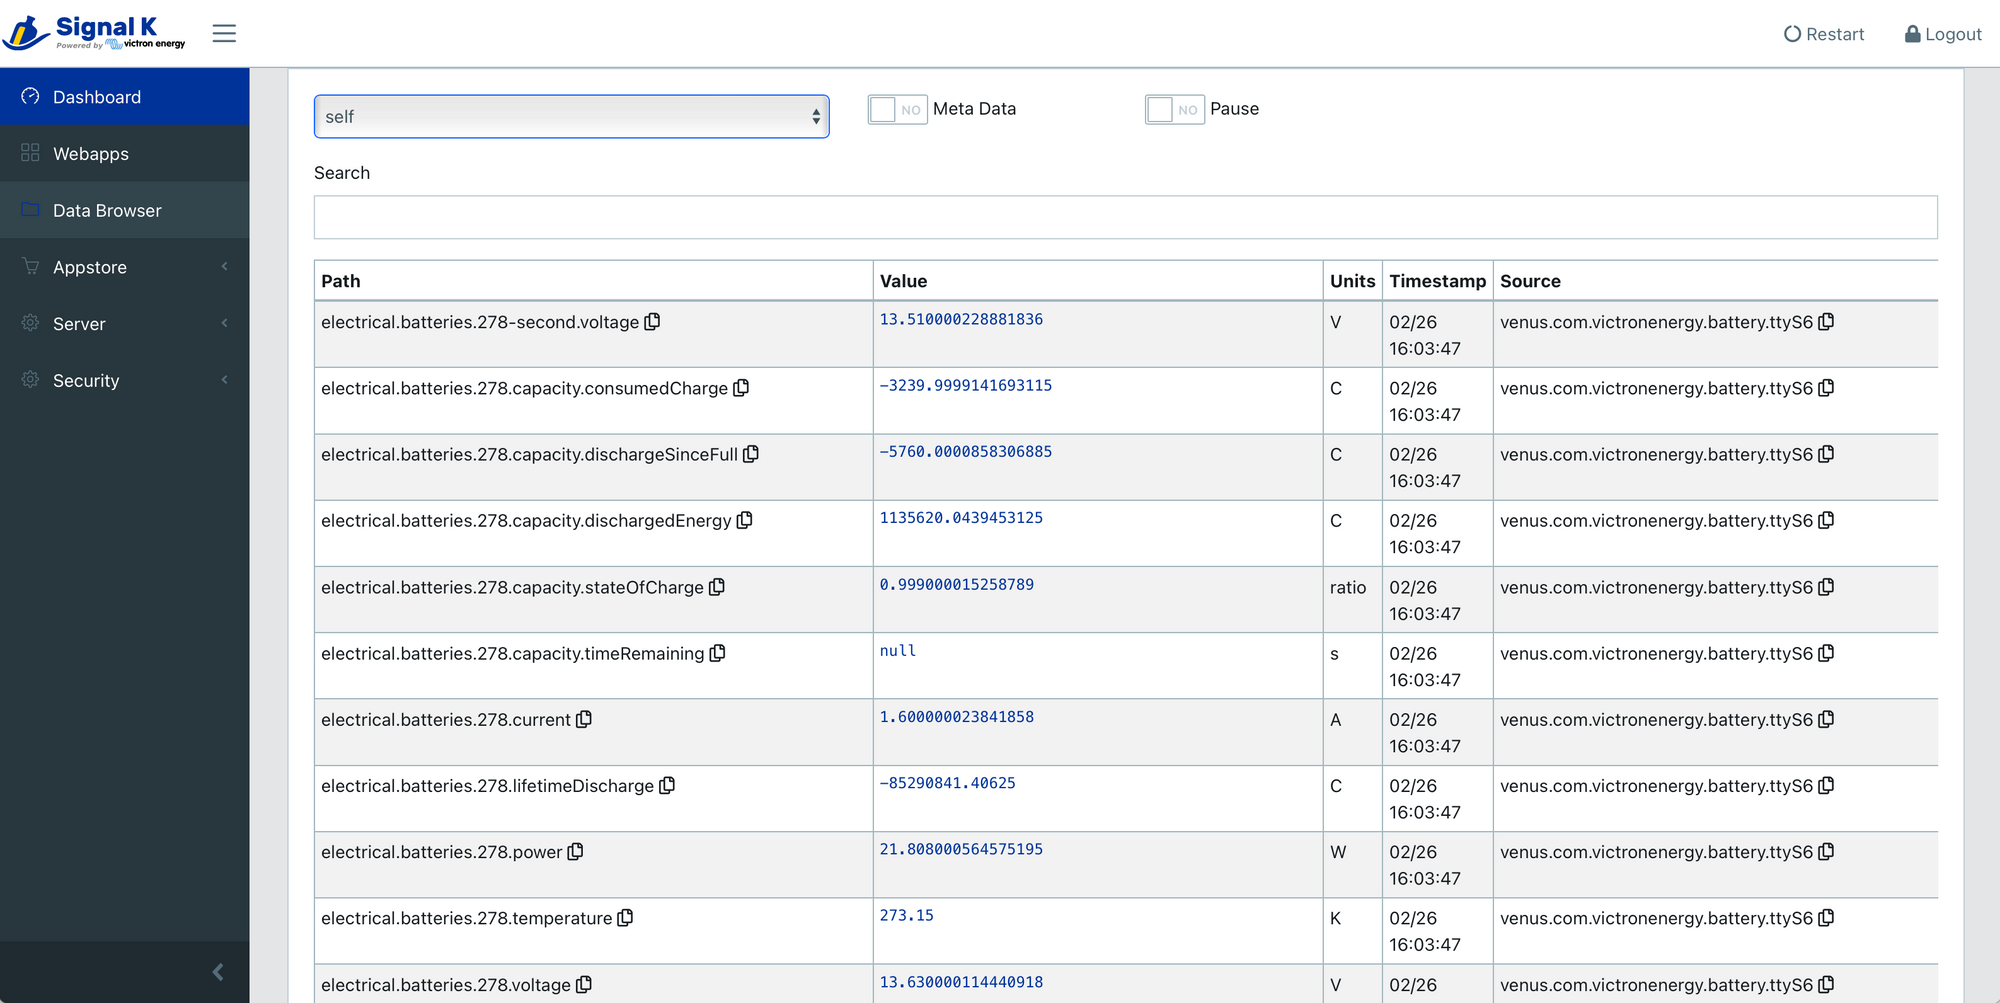
Signal K is now ready on your Cerbo GX. Go to Data Browser and select Self. You will see a bunch of data coming from your Cerbo GX and NMEA 2000 network.
AIS for Navionics, iSailor, iNavX and Aqua Map
Whatever chartplotter you may have, chances are high you are also using navigation app on your phone or tablet. If so, congratulations, by simply loading the large image to Cerbo GX and toggling Signal K on, you just got yourself a functioning wireless server for AIS and instrument data!
You can test it with Navionics or any other app that accepts connections over wireless (iSailor, iNavX, Aqua Map all do).
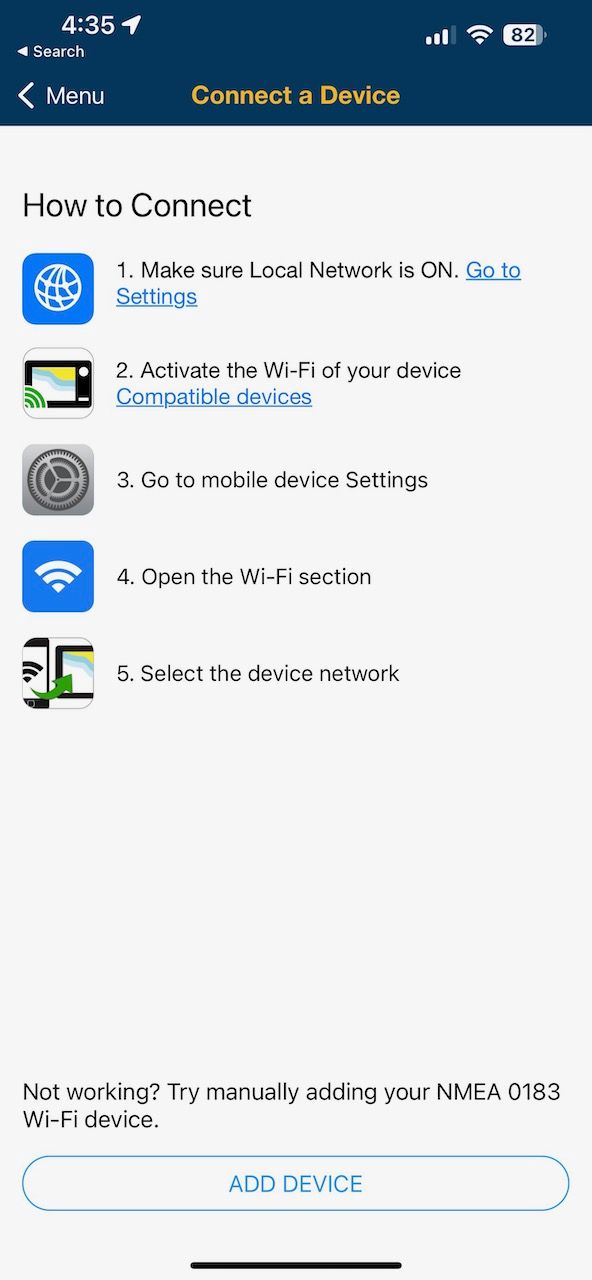
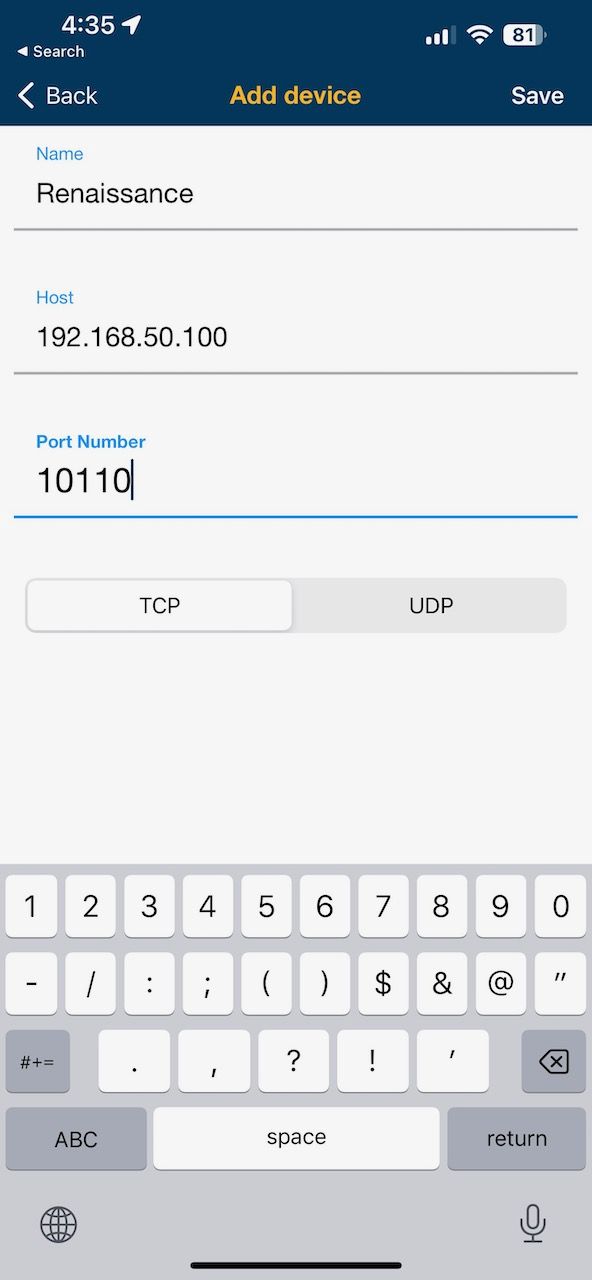
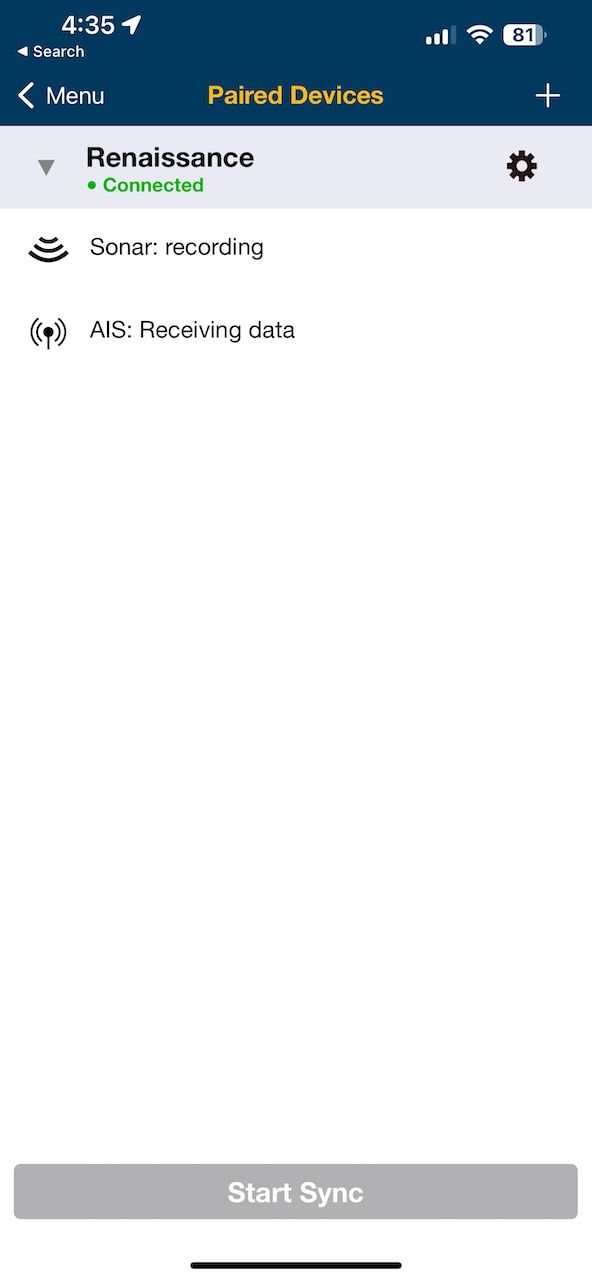
For Navionics, make sure that the phone or tablet it is running on is on the same wireless network as the Cerbo GX. Then go to Menu -> Paired Devices -> Add New Device in Navionics can configure it as follows:
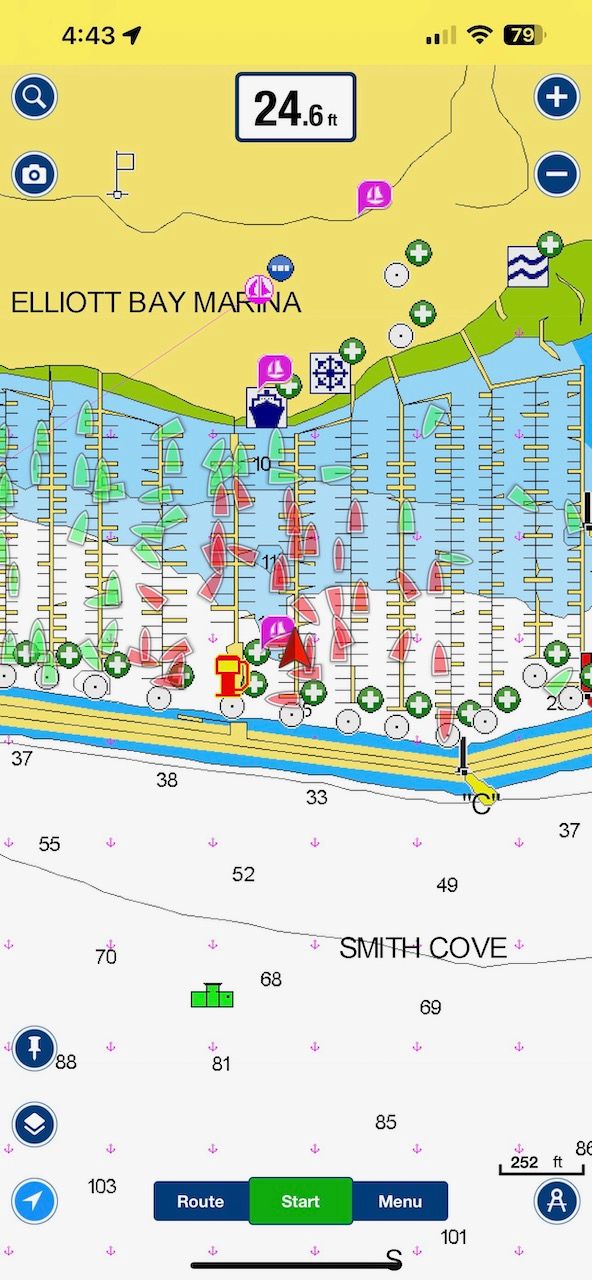
Depth and AIS targets on Navionics
It's pretty awesome, is it not!
Automated Trip Logging via Saillogger
Despite logging many miles each year, we often neglect to keep an accurate record of our travels due to busyness or laziness. But we do love remembering these memoeries and going back to those beautiful moments. We rely on our photos to reminisce about our adventures and cruises. Without a proper log, we risk losing or forgetting these memories.
I wanted to change that but I am too keenly aware of my laziness, and I quite detest regular chores (book & log keeping being one!)
This became somewhat acute before we sailed down to Mexico from San Francisco back in 2019. I really wanted to keep good records of that trip, but I knew I wouldn't. Not leaving things to chance, I wrote a piece of software to do it for us. After all, a boat with modern electronics is a reasonably intelligent beast. It knows where it is, its speed, heading, etc. It also knows very well when it moves or stops. There is little that it doesn't know (like when you stop in the middle of nowhere, did you anchor or pick up a mooring buoy, but we don't really want another HAL, do we?). So there is no real reason for us to keep writing things in a notebook; the boat itself could just keep the record for us. Sure enough, there are enough apps and such that do similar things, but none were intelligent enough for us. You need to start a trip, stop a trip, you may leave the boat with the app on your phone, but the boat stays behind, etc. I really wanted something on the boat that stays with the boat and is context and marine-aware, built specifically for boating.
So came Saillogger. It is a fully automated, maintenance-free and zero-effort trip logging application that solely relies on information coming from your boat. It logs your trips and places you stop at, captures statistics (how long you moved, how long you stayed in a particular anchorage, how many times you crossed international borders, etc), even animates your trips with a timelapse. I built it on Signal K. As I mentioned above, Signal K is an awesome platform to build things on. Now that your boat has become a connected boat, it literally is a 5 minute process to sign up (and Saillogger is a free service, though it costs a nominal fee for me to run). Here are the steps.
Create a Saillogger Account and Obtain Collector ID
Go to Saillogger.com and create an account for free:

Login to your account and go straight to Boat Details page.
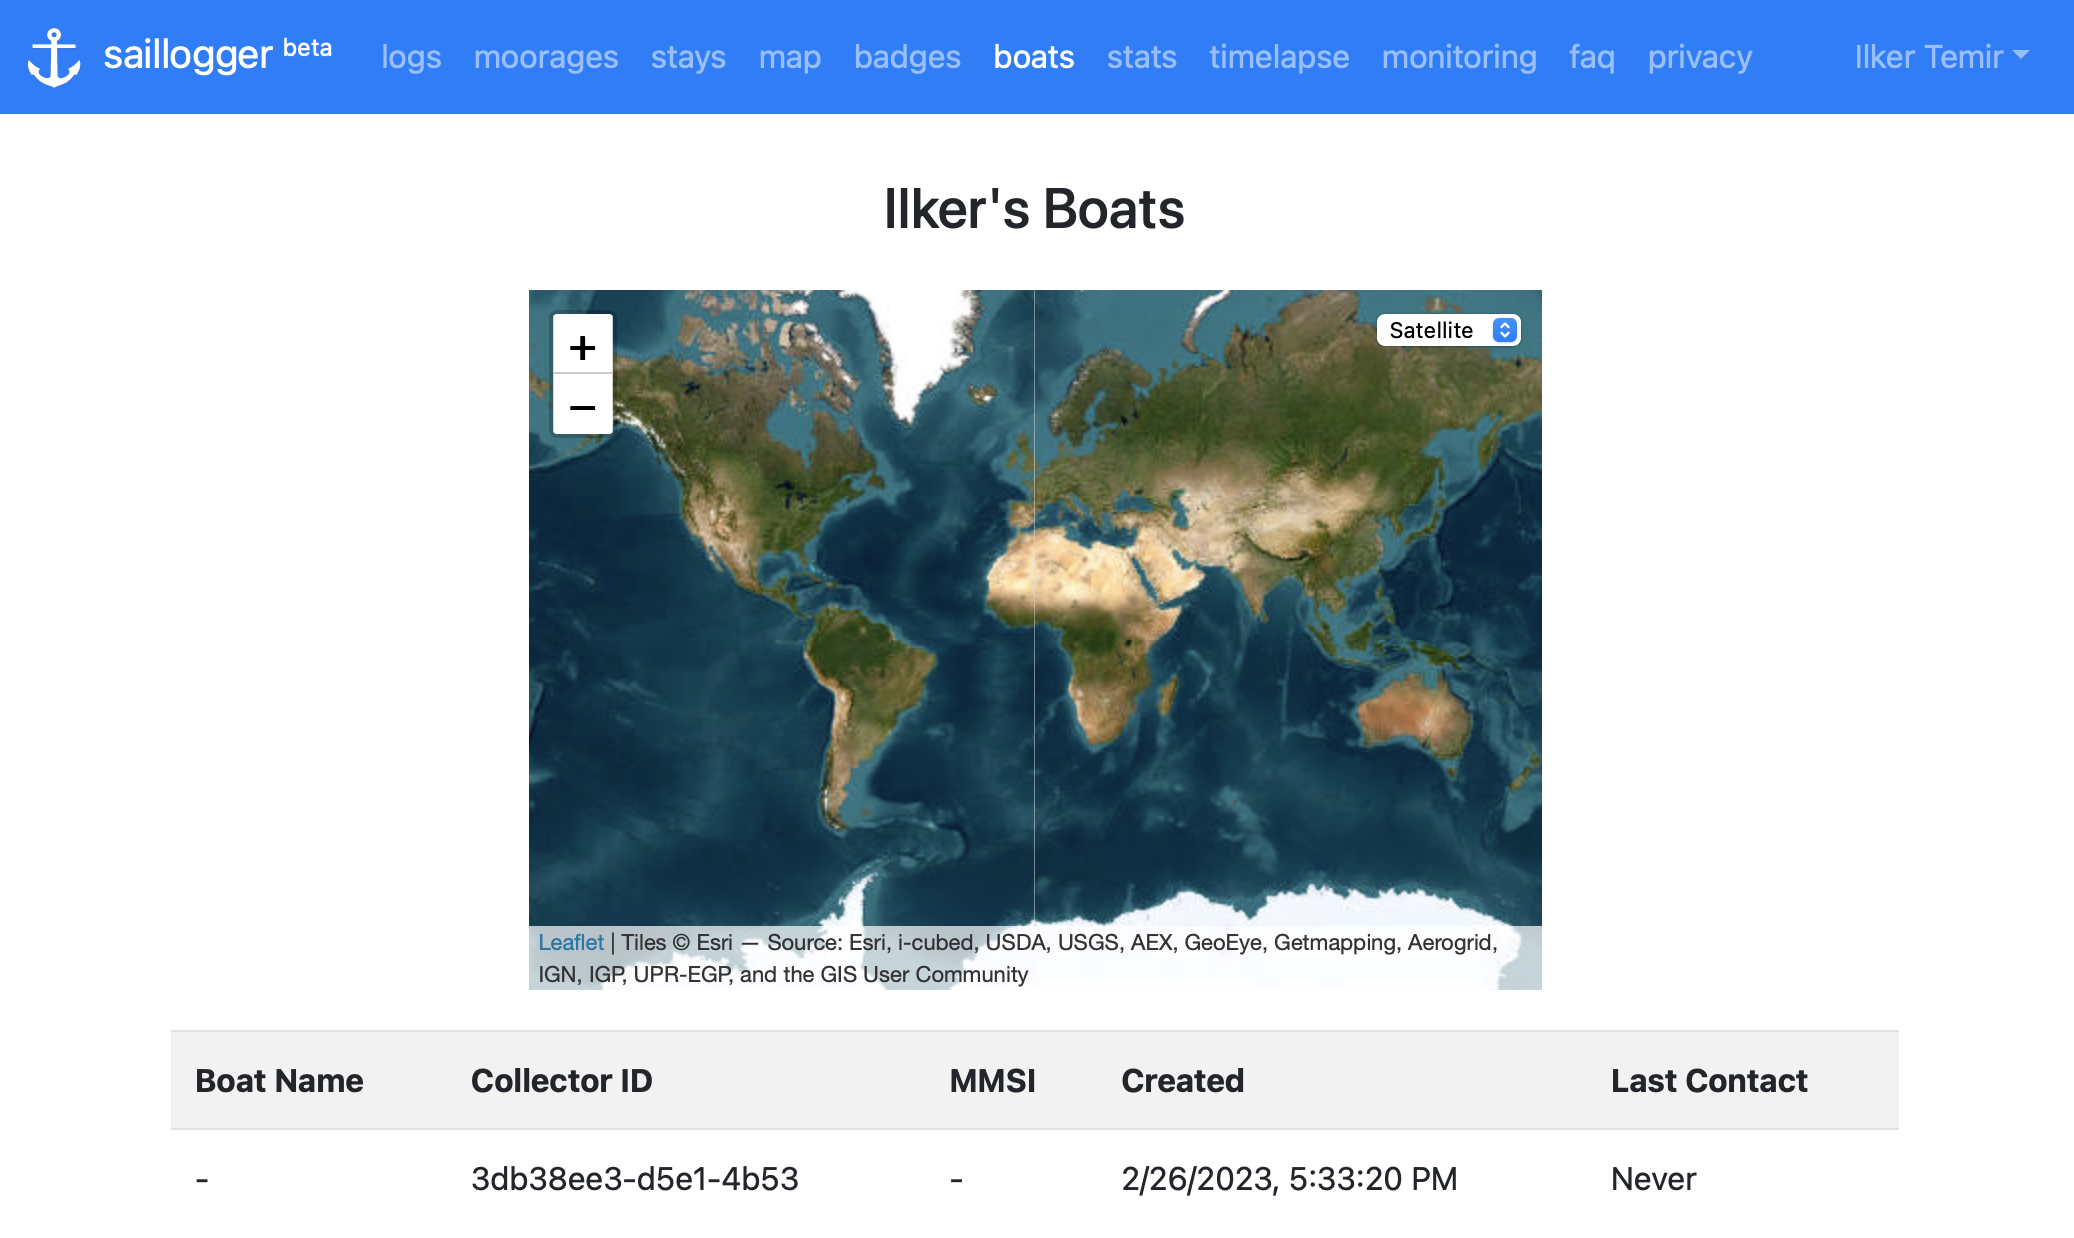
Take note of Collector ID from this screen (3db38ee3-d5e1-4b53 in the above example). This is what you will use to link your Cerbo GX to your account.
Install Saillogger Plugin on Cerbo GX
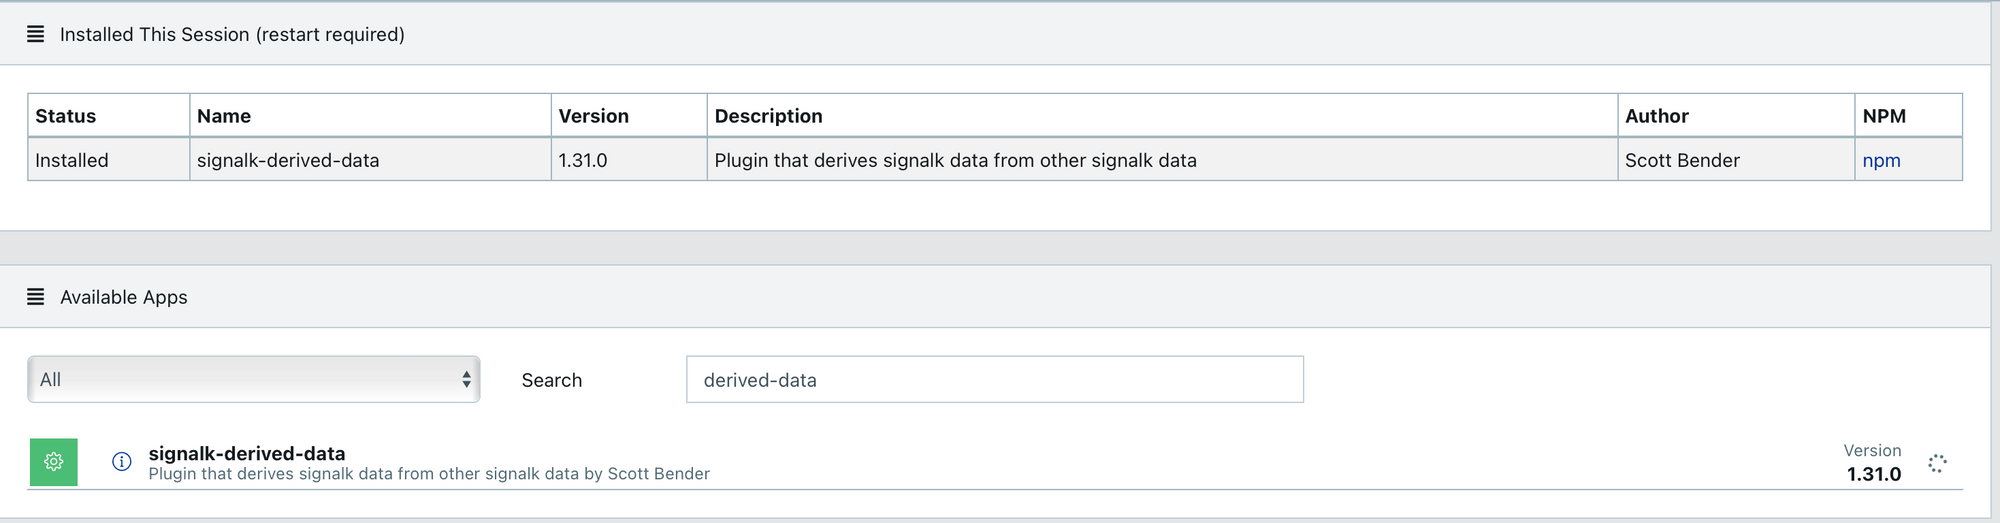
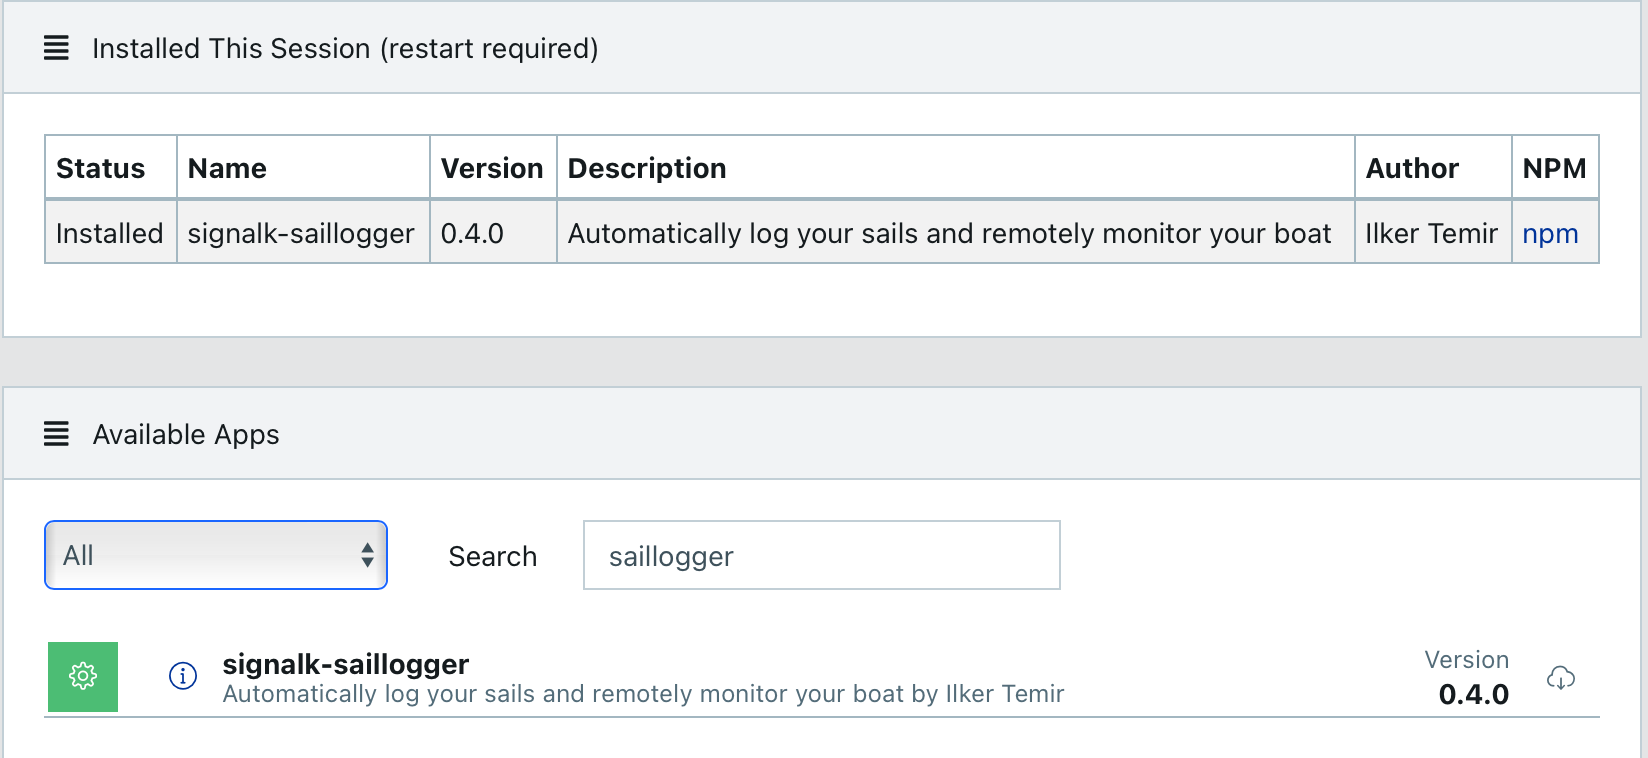
Saillogger plugin has a few prerequisites and you first need to install them. Go back to Signal K dashboard on your Cerbo GX and using Appstore -> Available menu, first install Derived-Data and then Saillogger plugins.
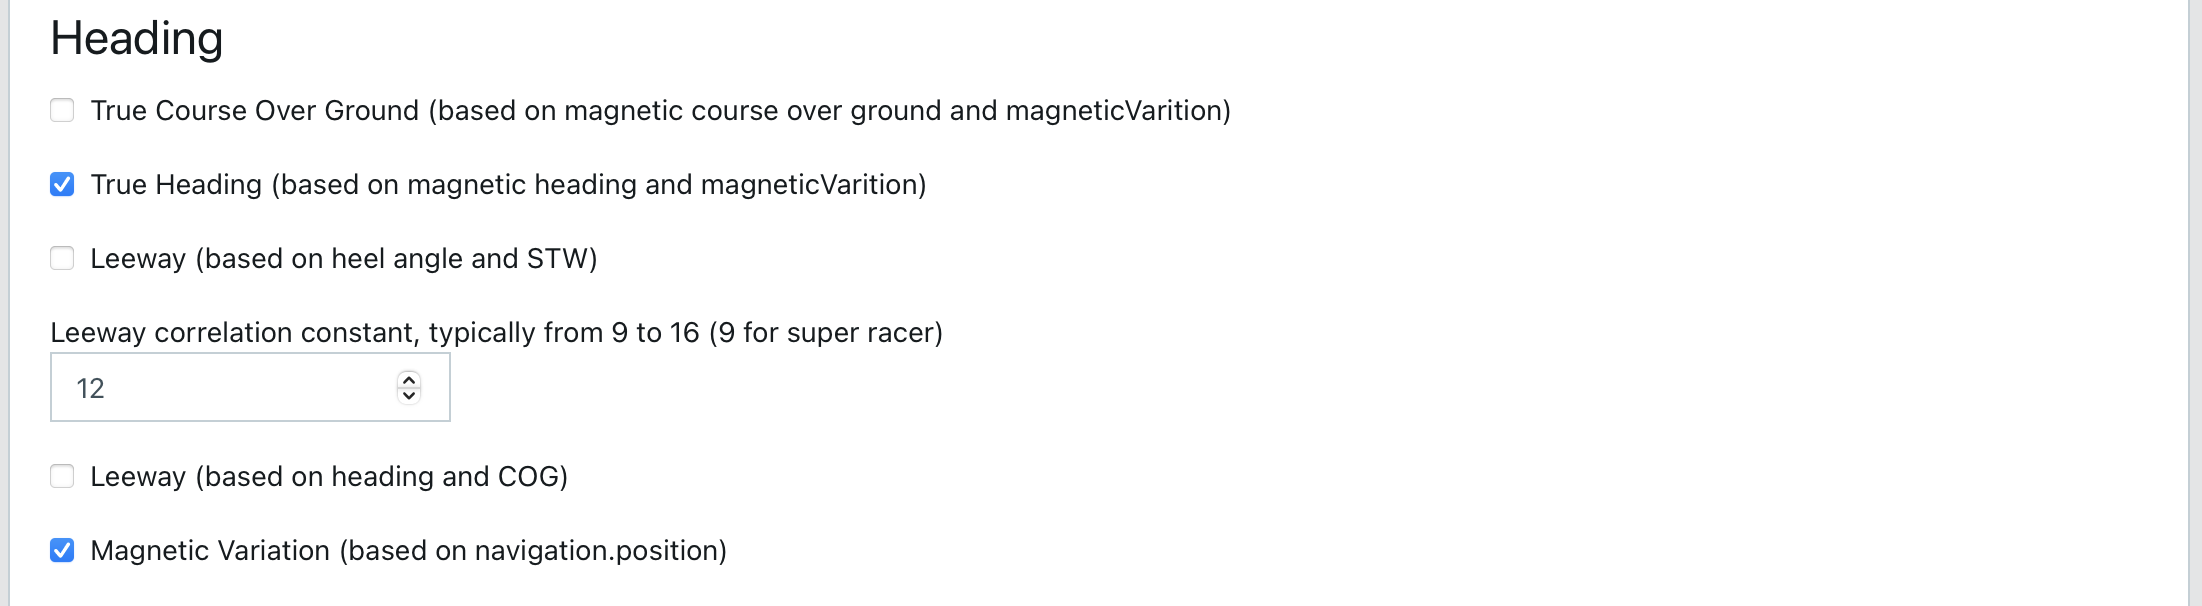
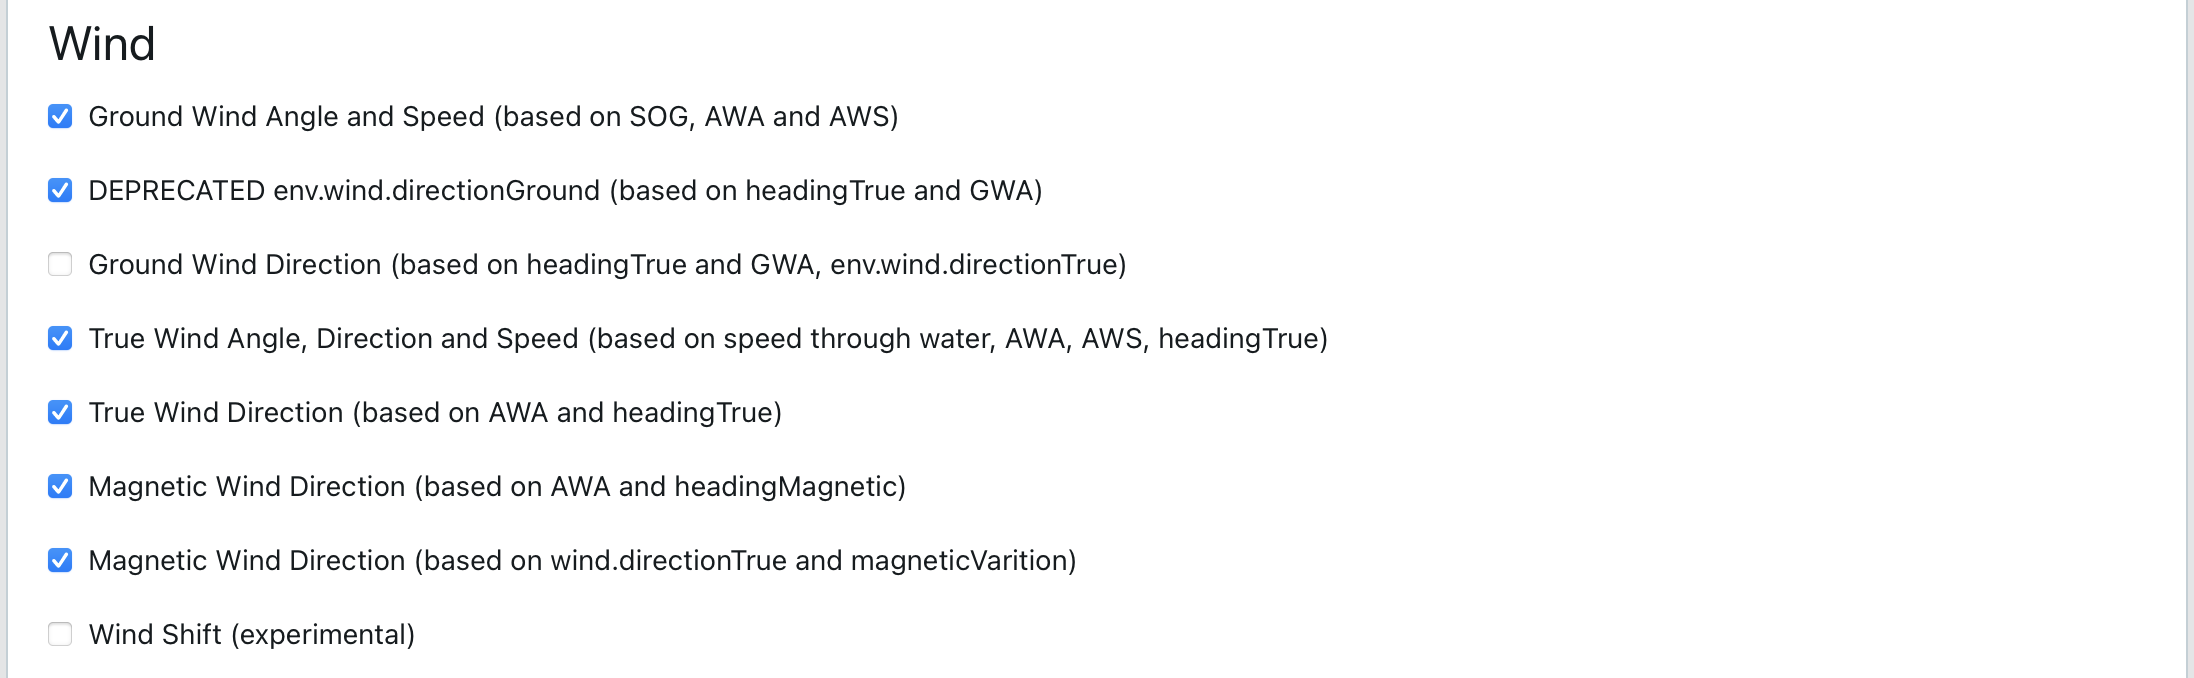
After the installation completes, restart Signal K server. When it comes back up, go to Server -> Plugin Config, select Derived Data and check the following options under Heading and Wind:
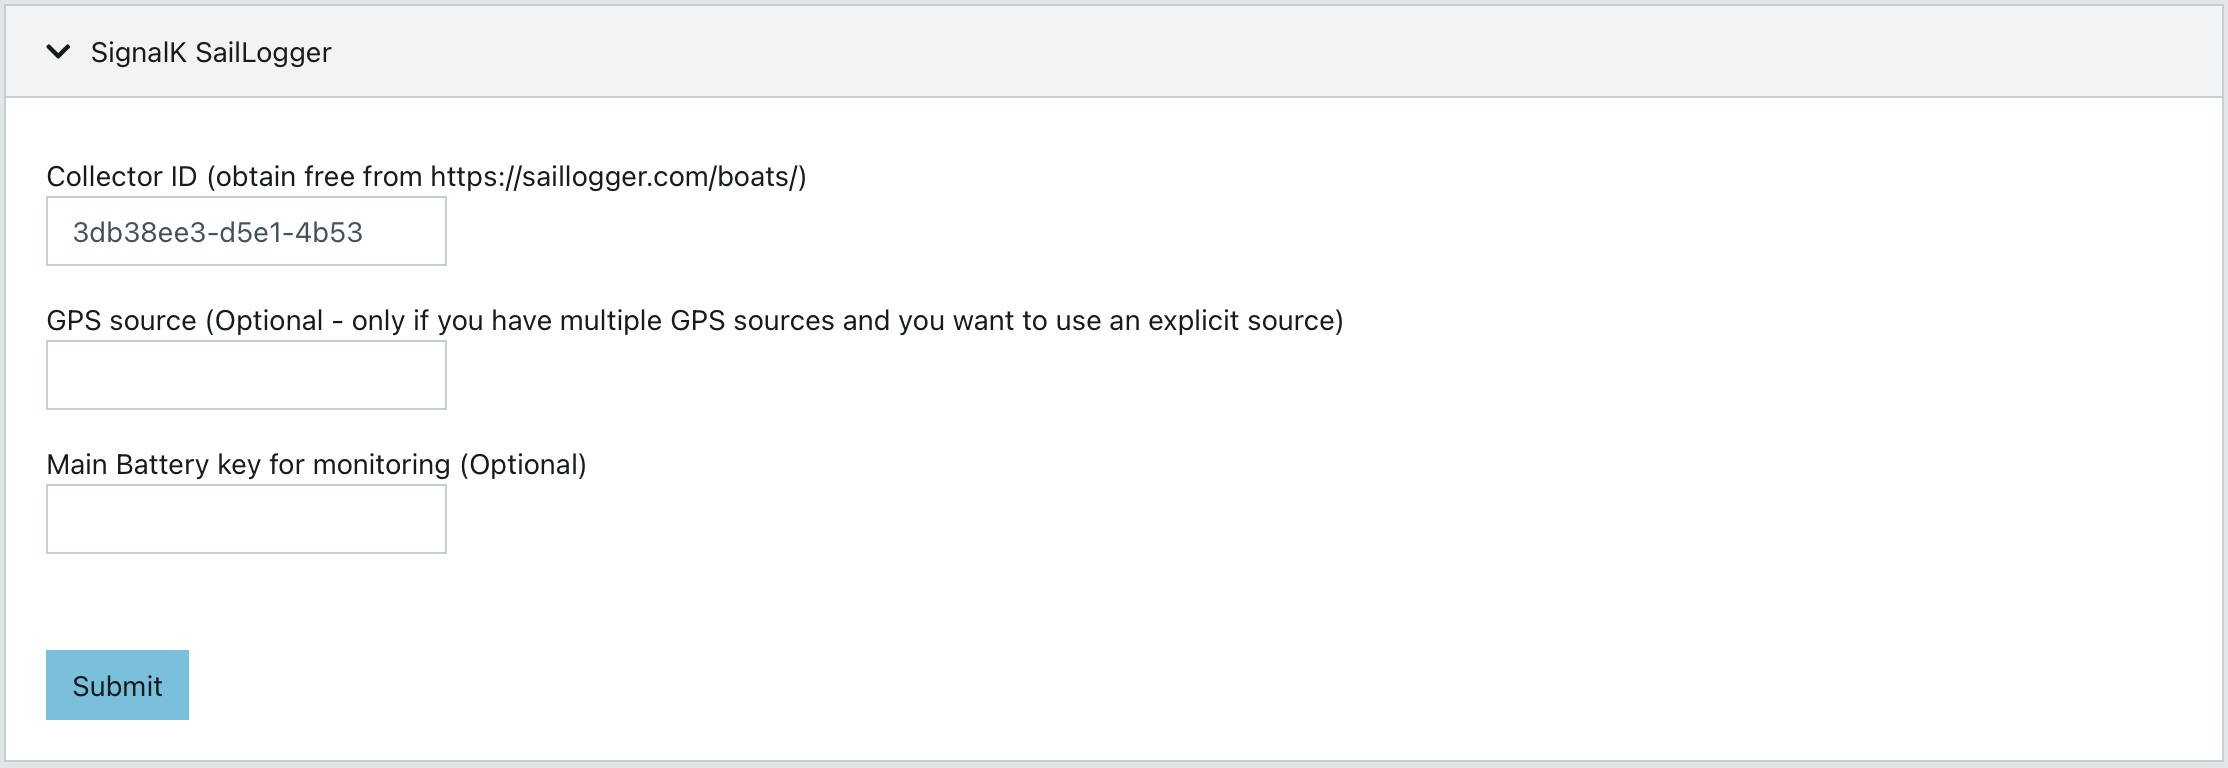
Then go to SignalK Saillogger on the same Plugin Config section and enter the Collector ID you obtained in the above step.
Restart Sailloger server once more and then just wait a few minutes and then go to Saillogger monitoring page. You will see something like this:
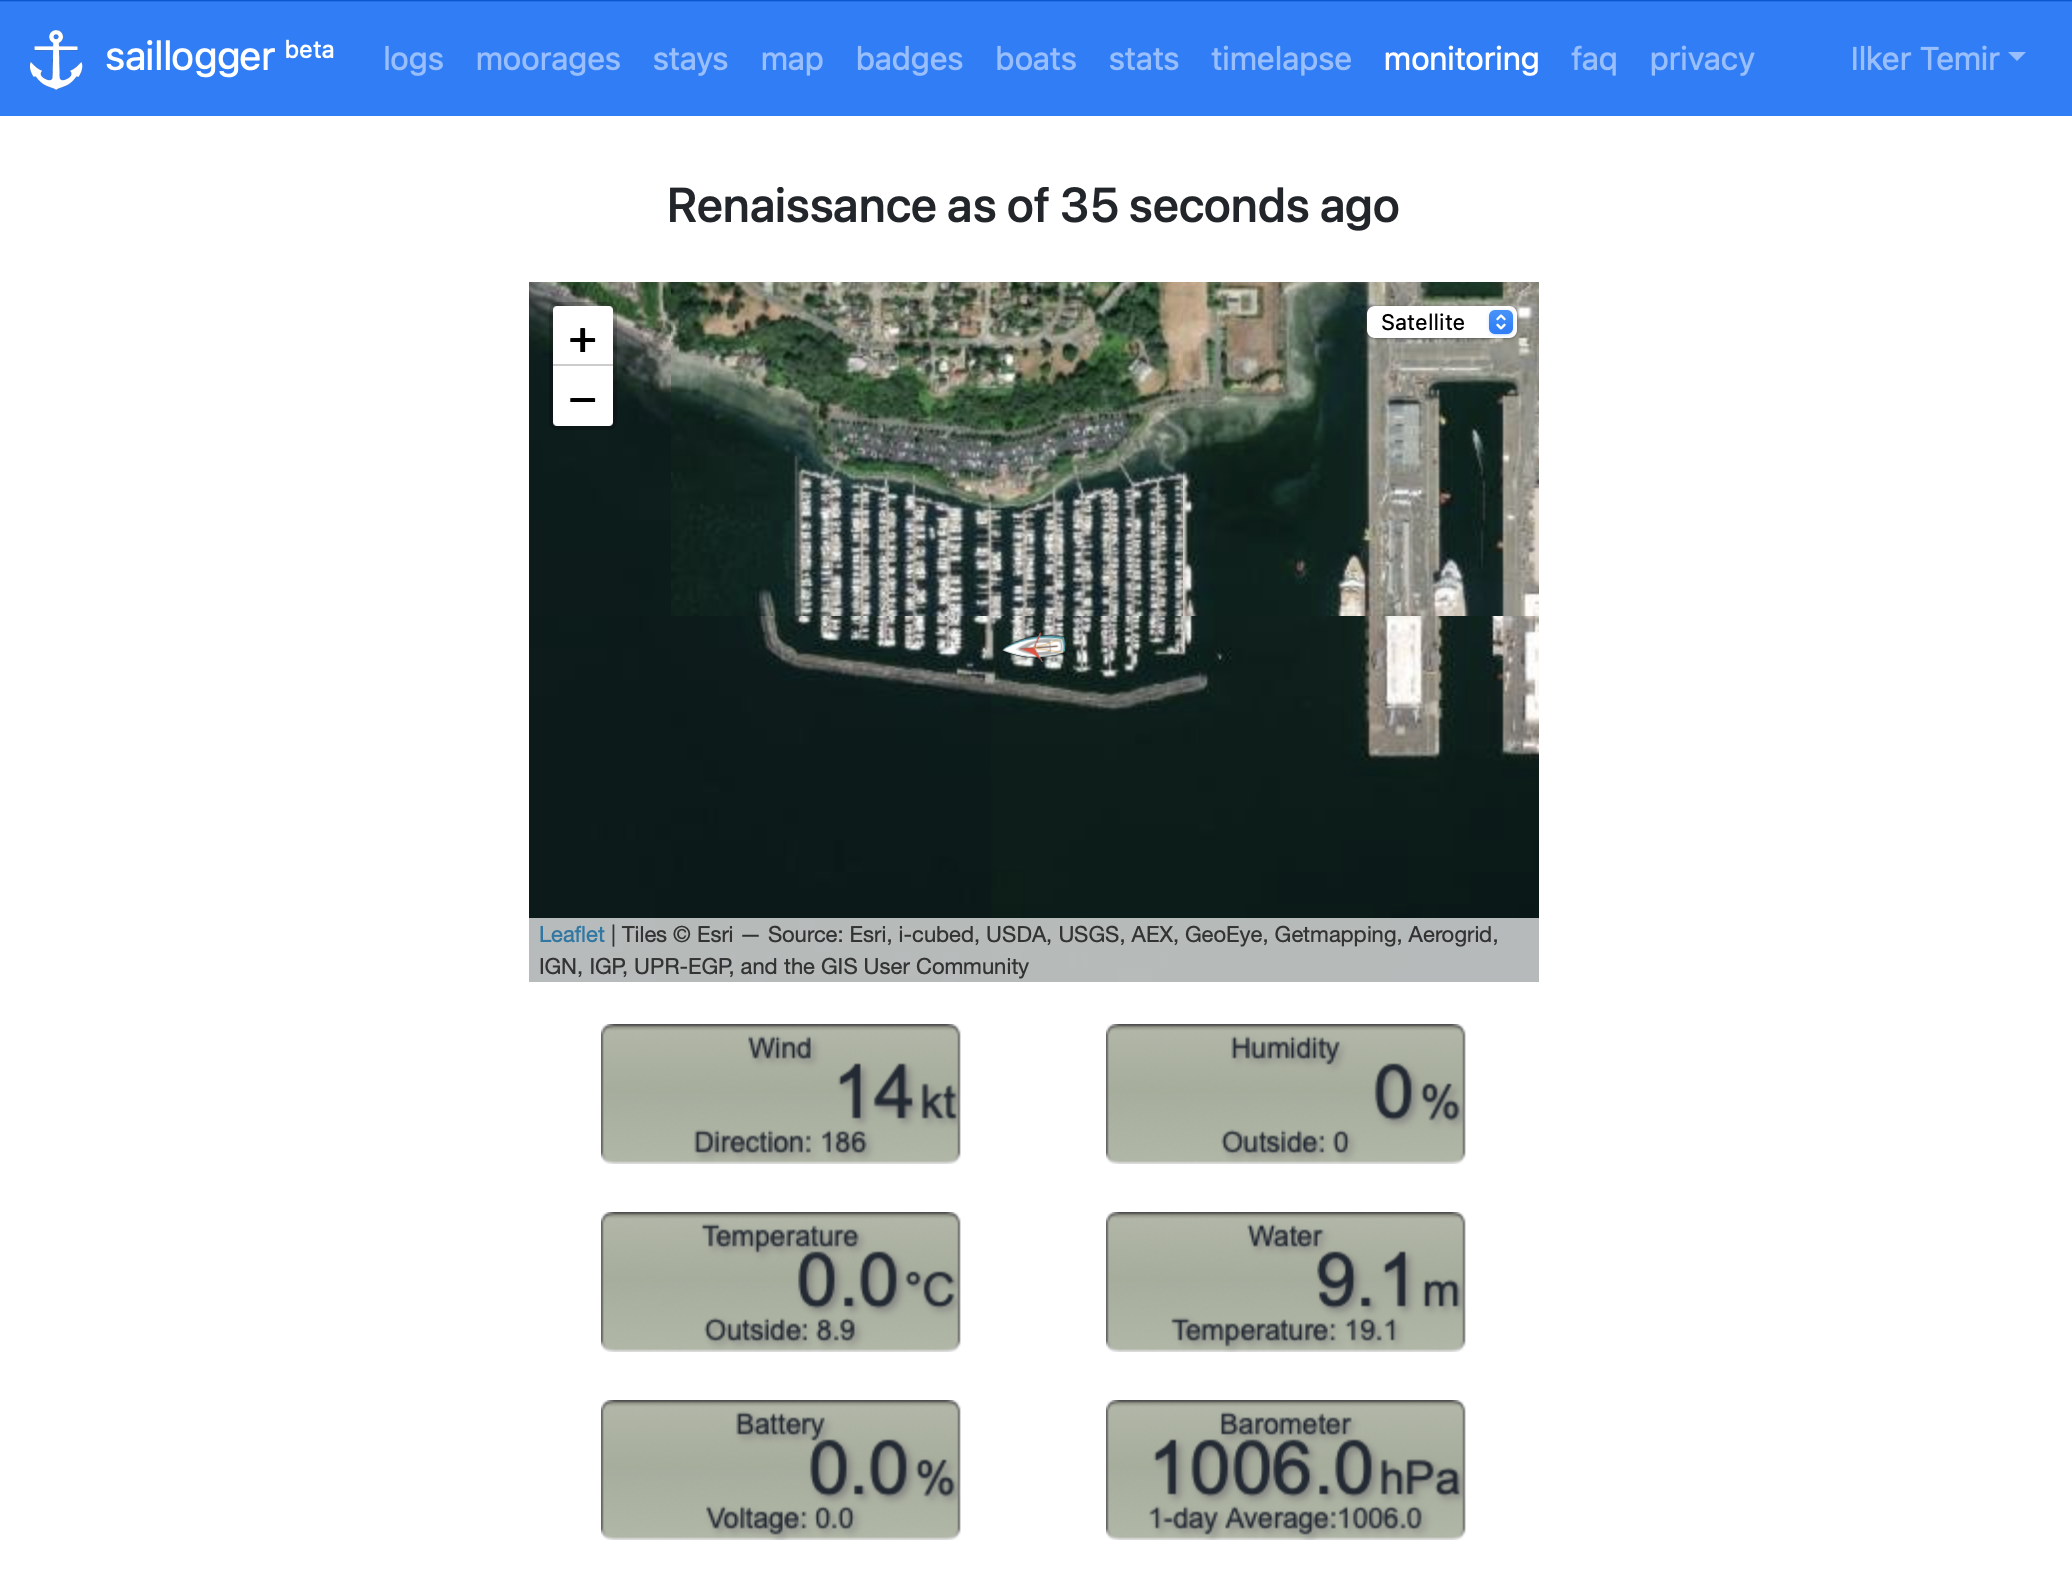
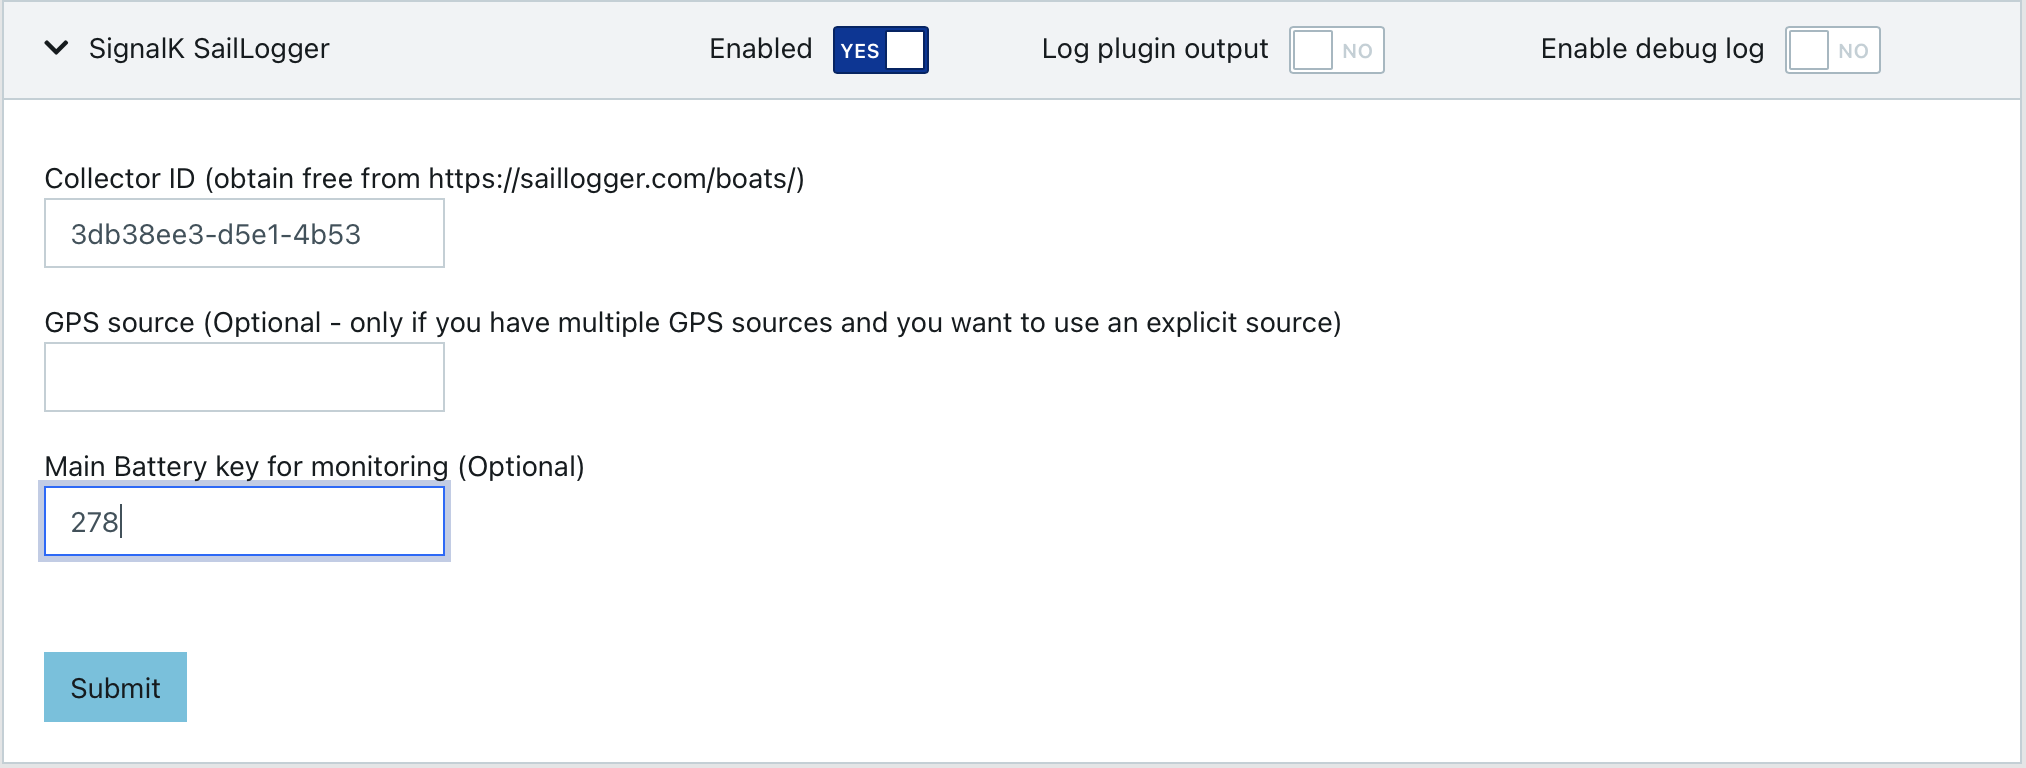
You may be wondering why the Battery is 0%, given that this information is coming from the battery monitoring system. It's odd, isn't it? Well, that's because you didn't tell Saillogger which battery to monitor. To fix this, go to the Data Browser on Signal K, select the Self context, and search for electrical:
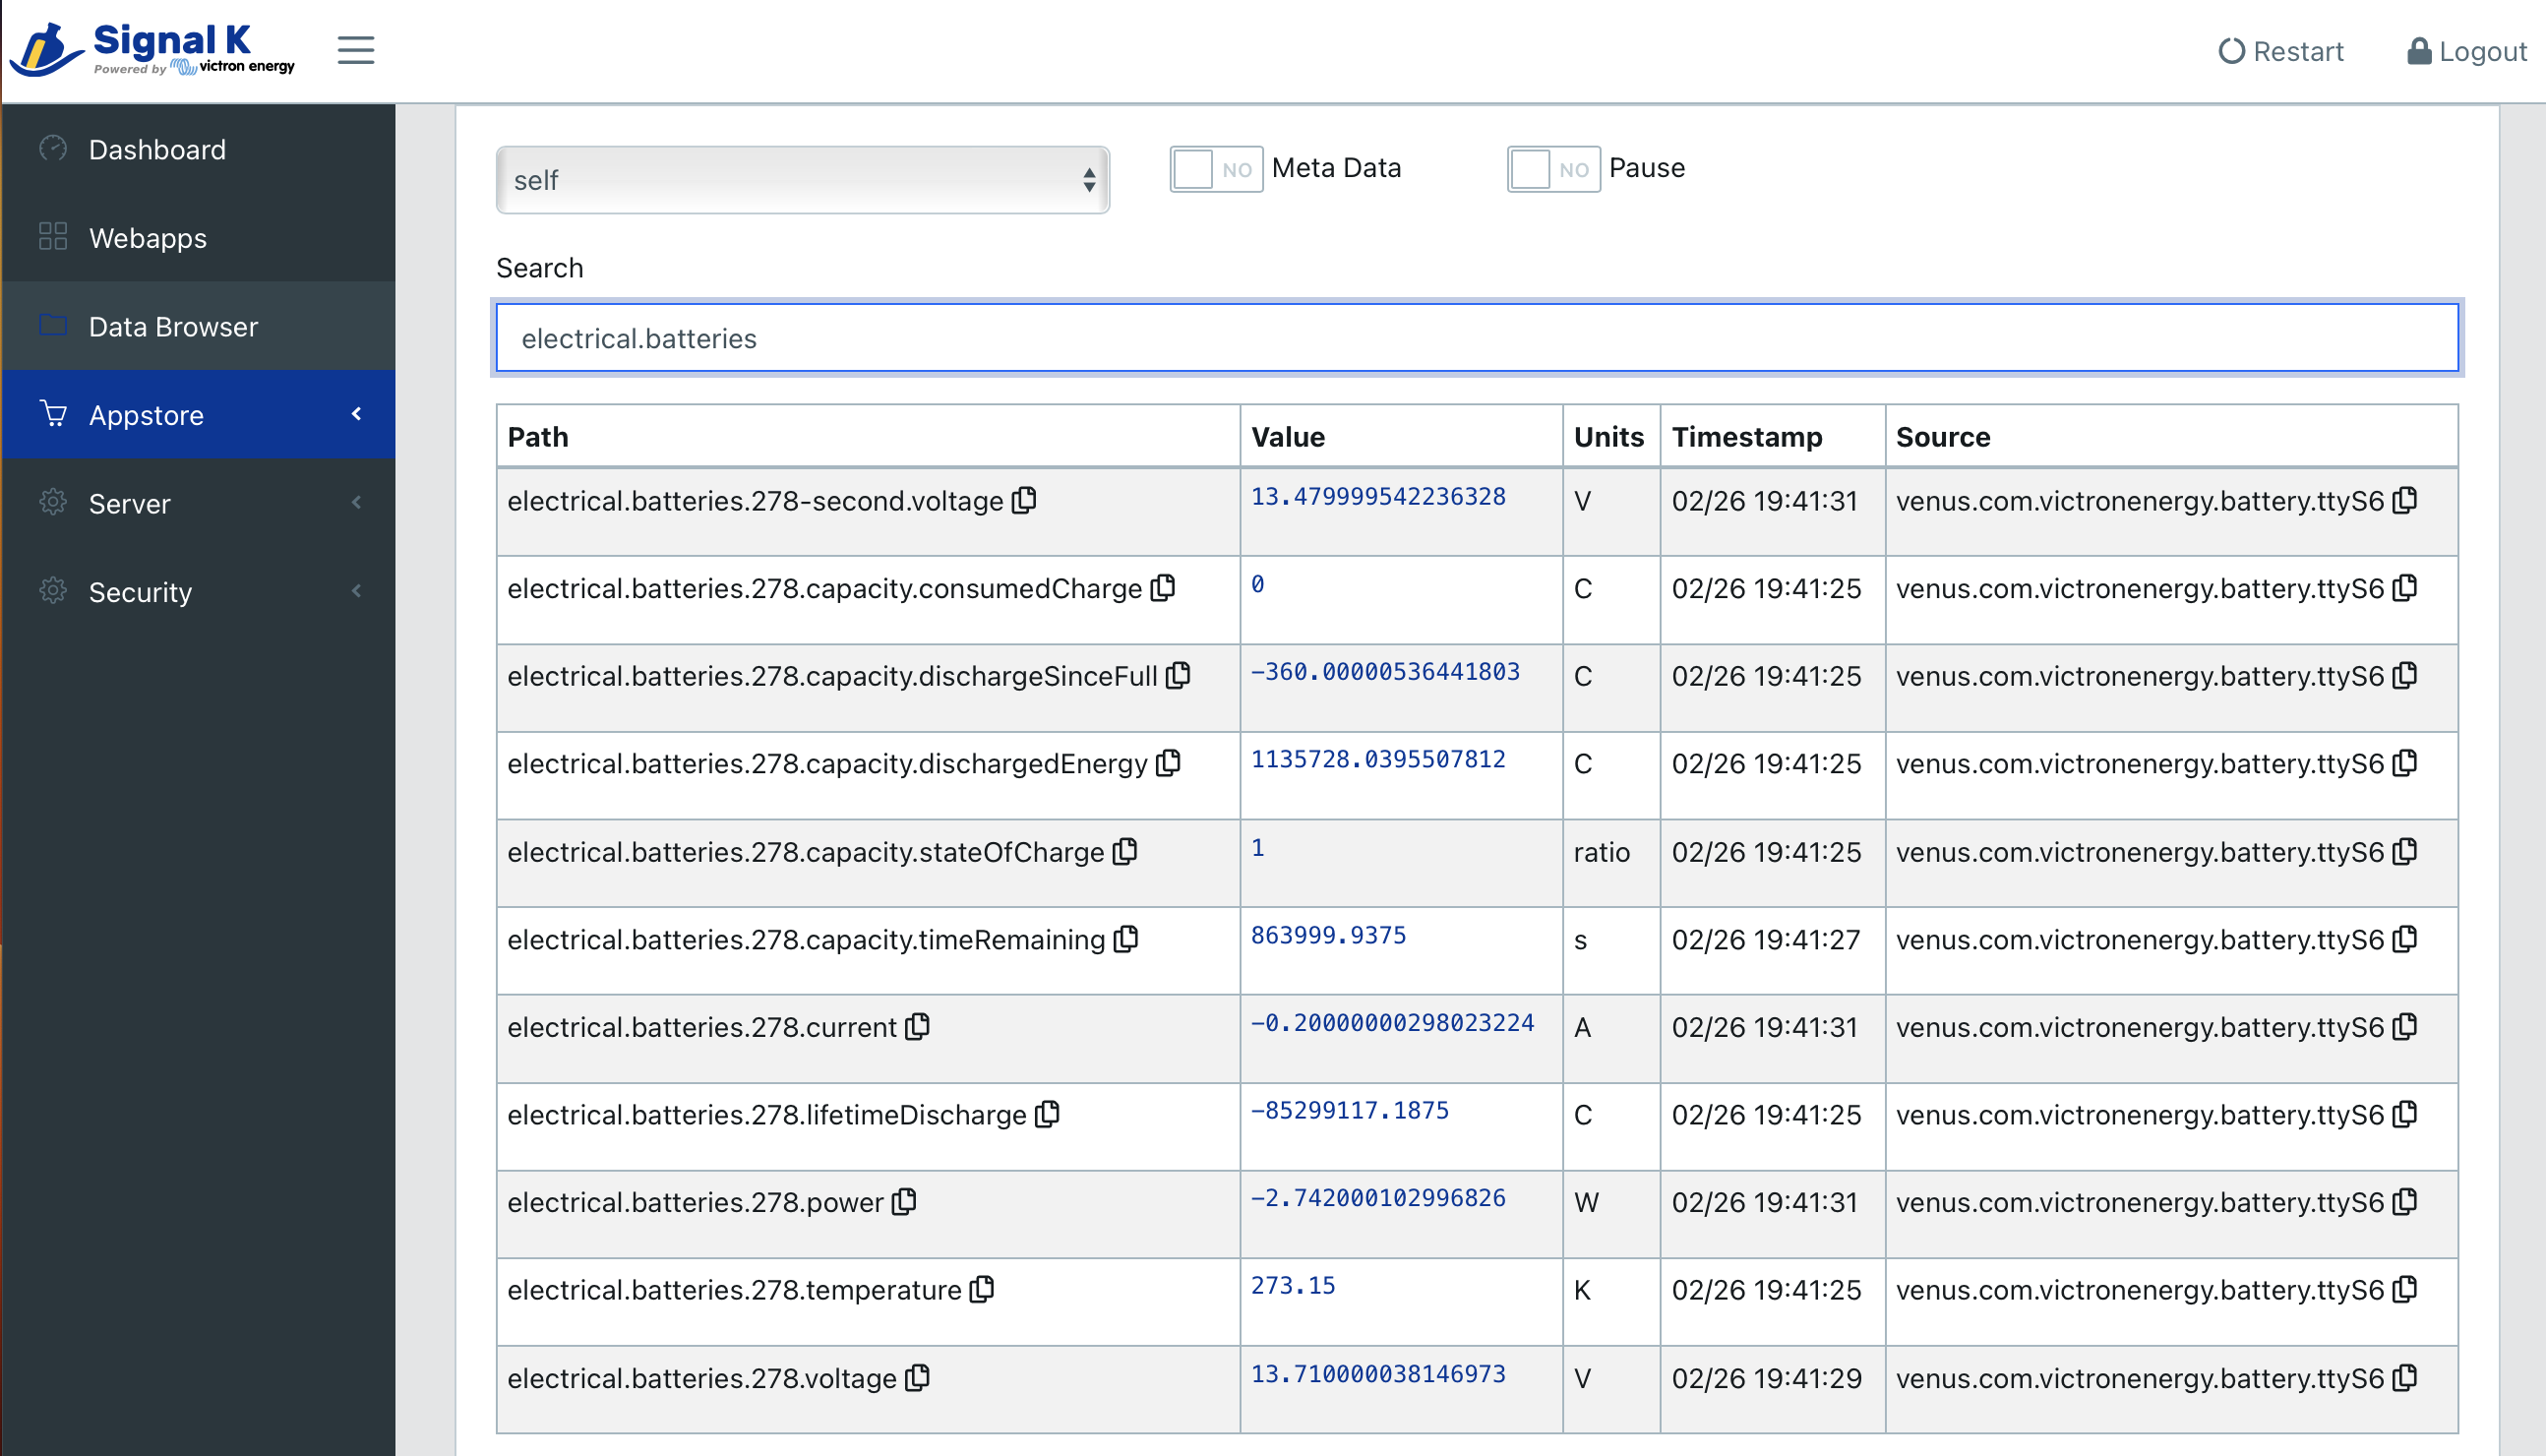
Take note of the key for battery. For example, for electrical.batteries.278.capacity.stateOfCharge, the key you are looking for is 278.
Go to Saillogger Plugin Configuration Page and enter it.
After you save the configuration, it should show up on Saillogger.com shortly afterwards.
Now you can sit back and enjoy your cruising. Your trips, places you anchor and the details of your stays will be logged automatically for you. You will be notified via e-mail a few hours after you finish your trips and your stats will be gathered automatically. Here are a few examples for us:
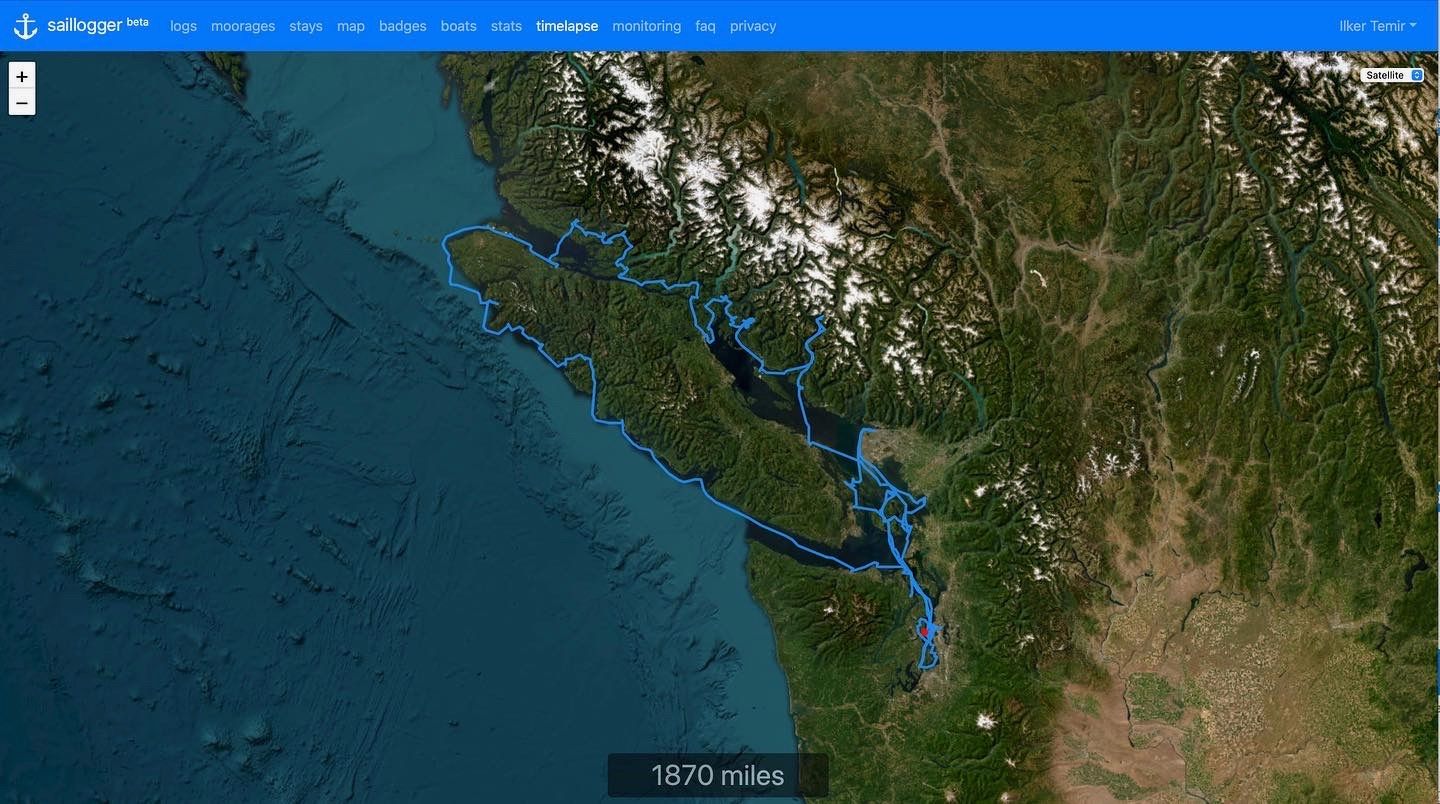
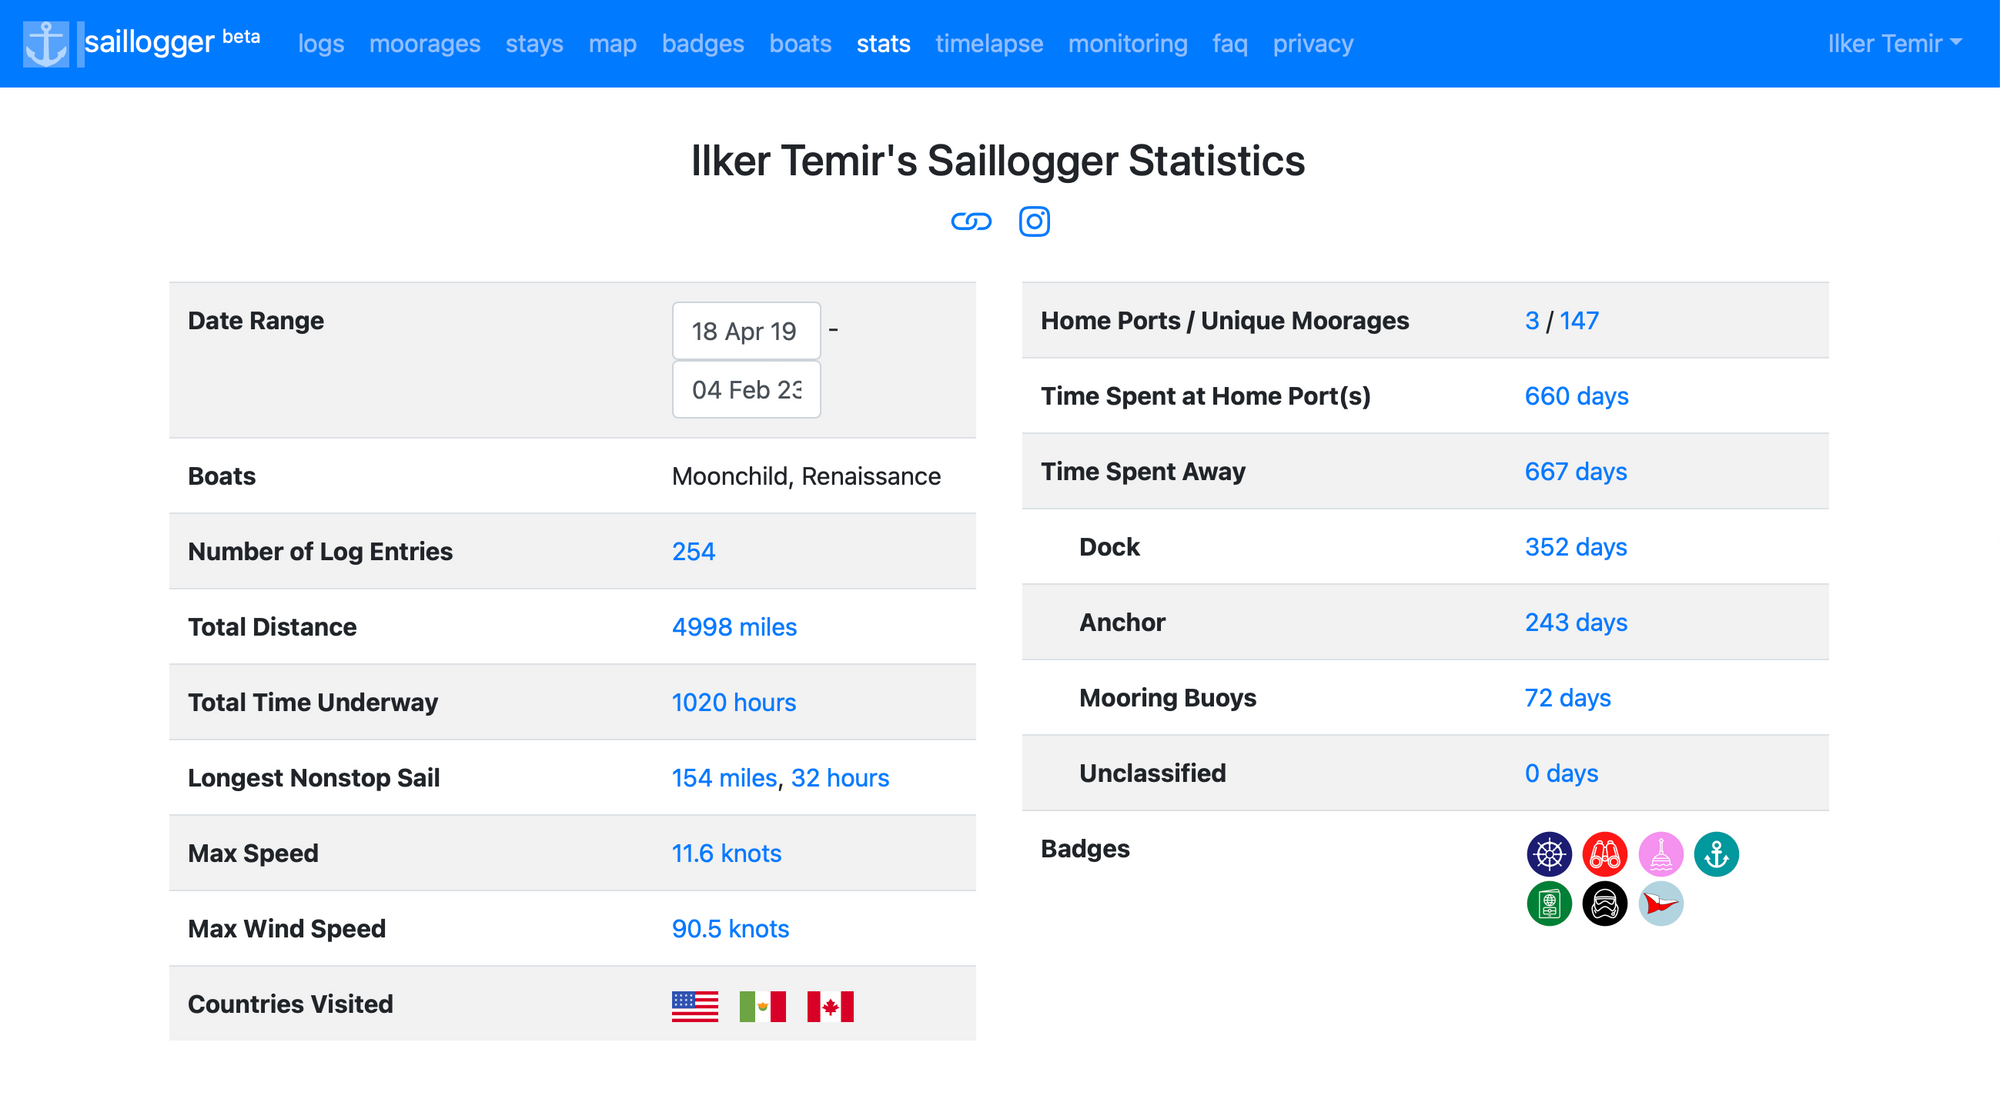
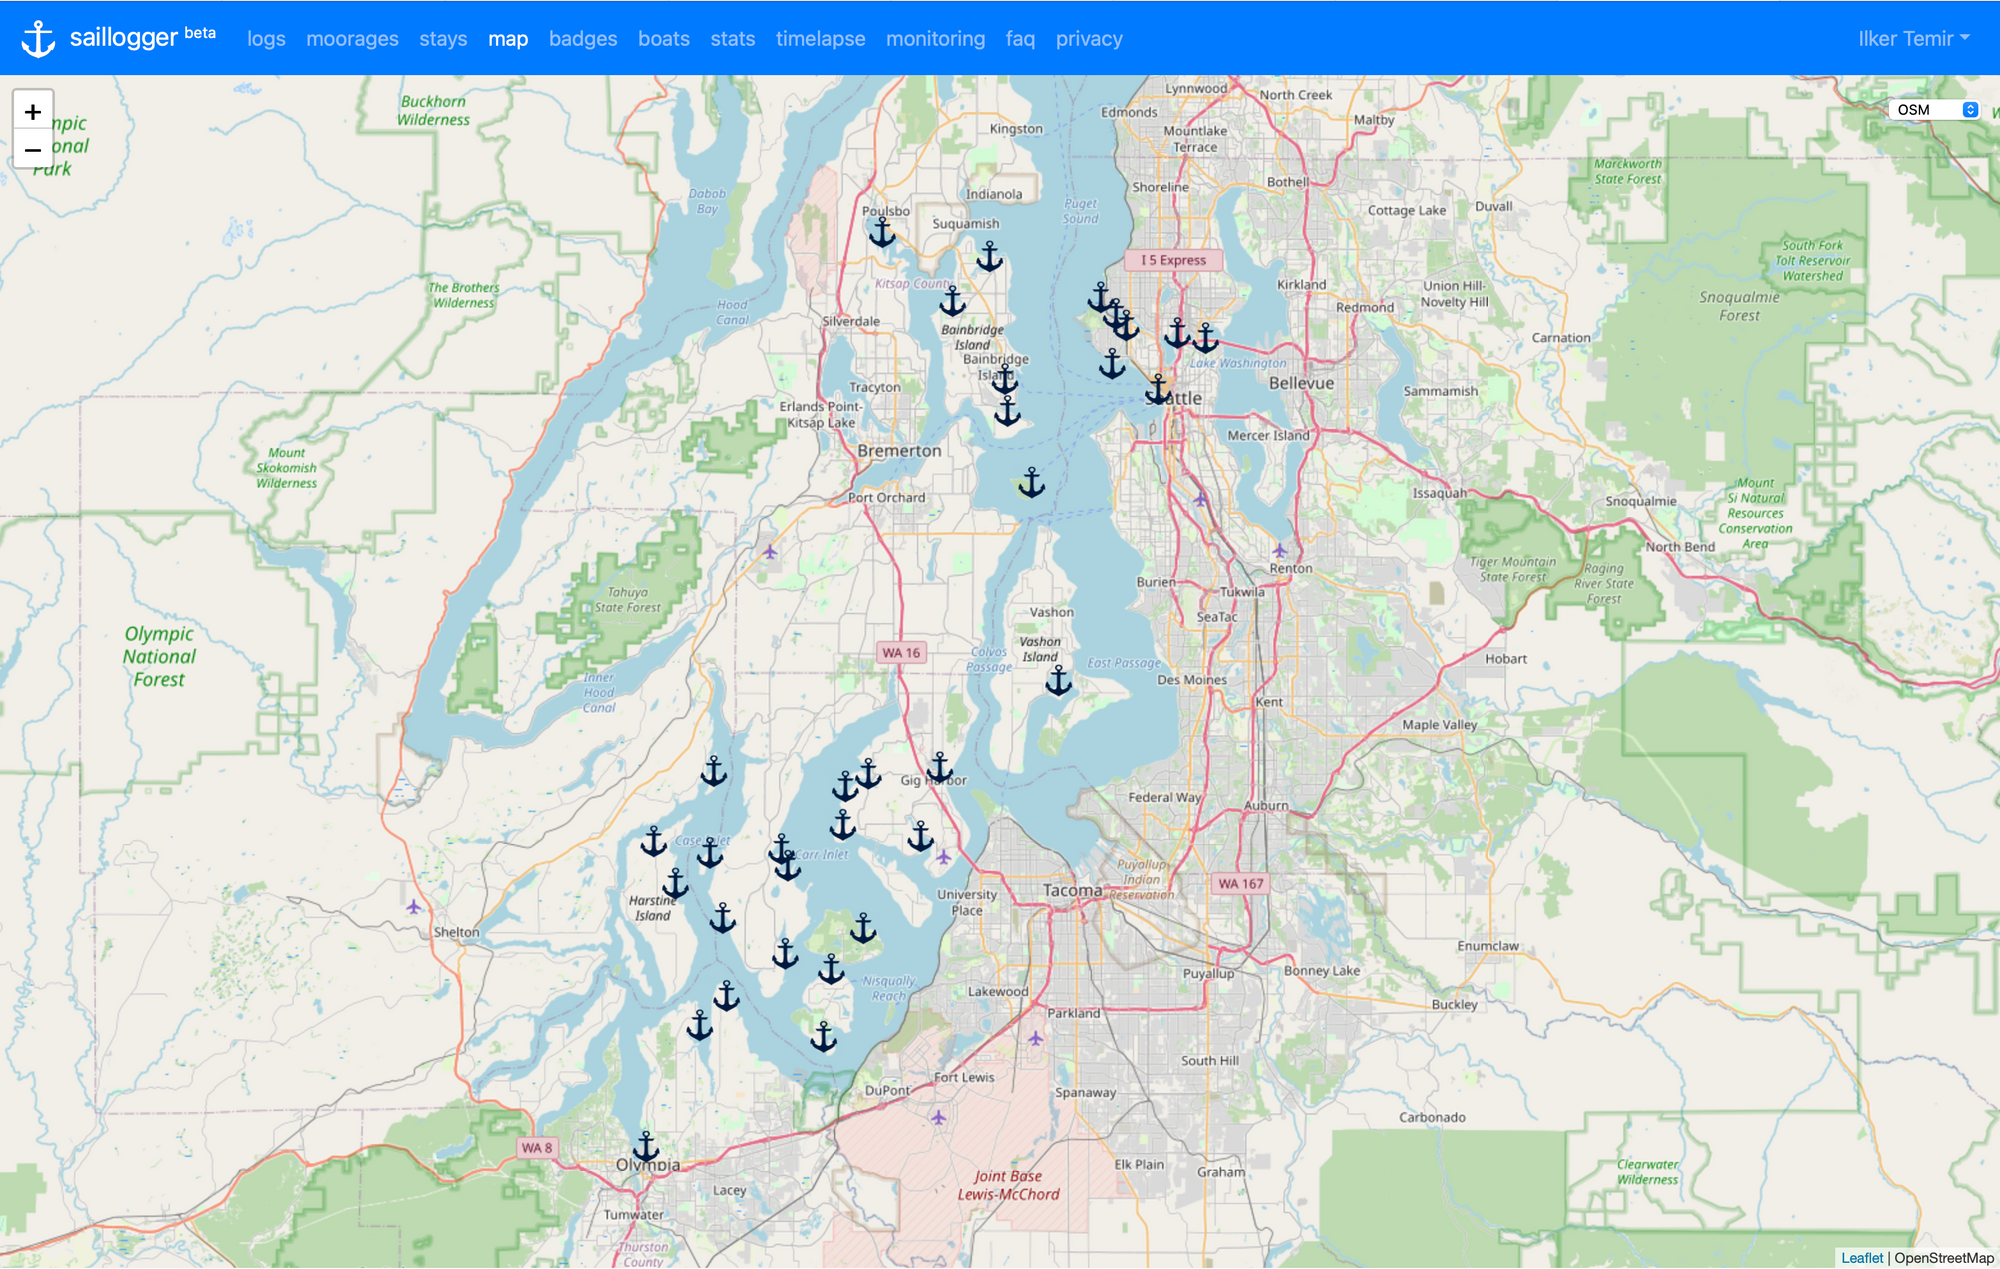
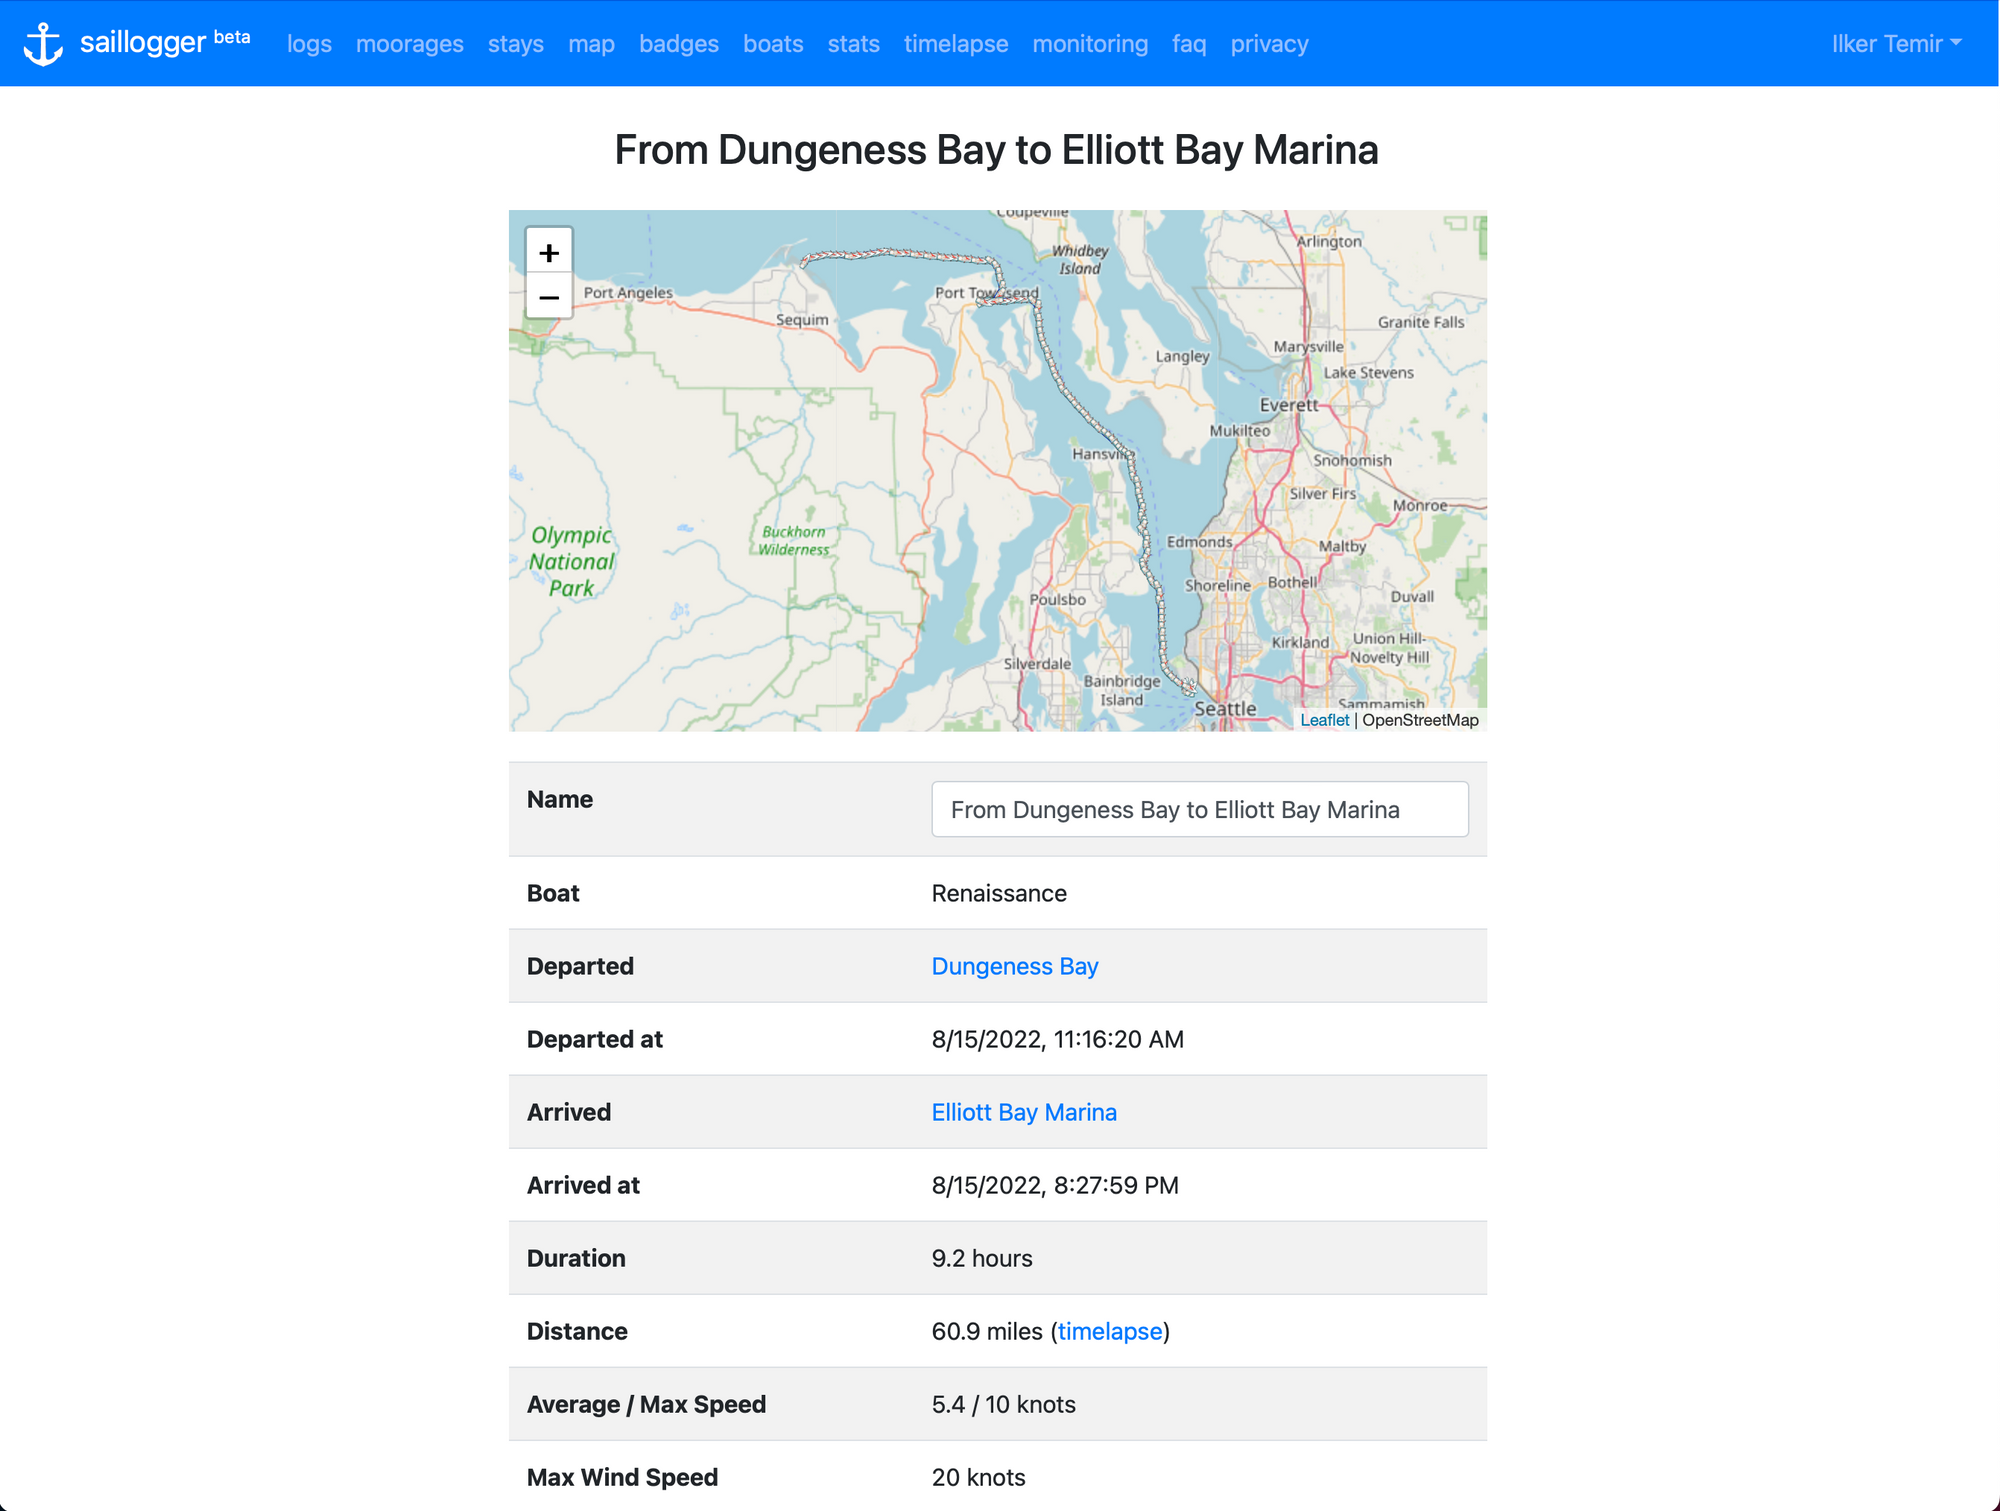
Saillogger features, all automated without requiring actions from you
Over time, Saillogger got quite a lot of features (public pages that you can share with family and friends, weather alerts, push notifications to mobile devices and more), and providing detailed instructions on all of them is beyond the scope of this article. But expect more articles on Saillogger in the near future!
MarineTraffic and Free Professional Memberships
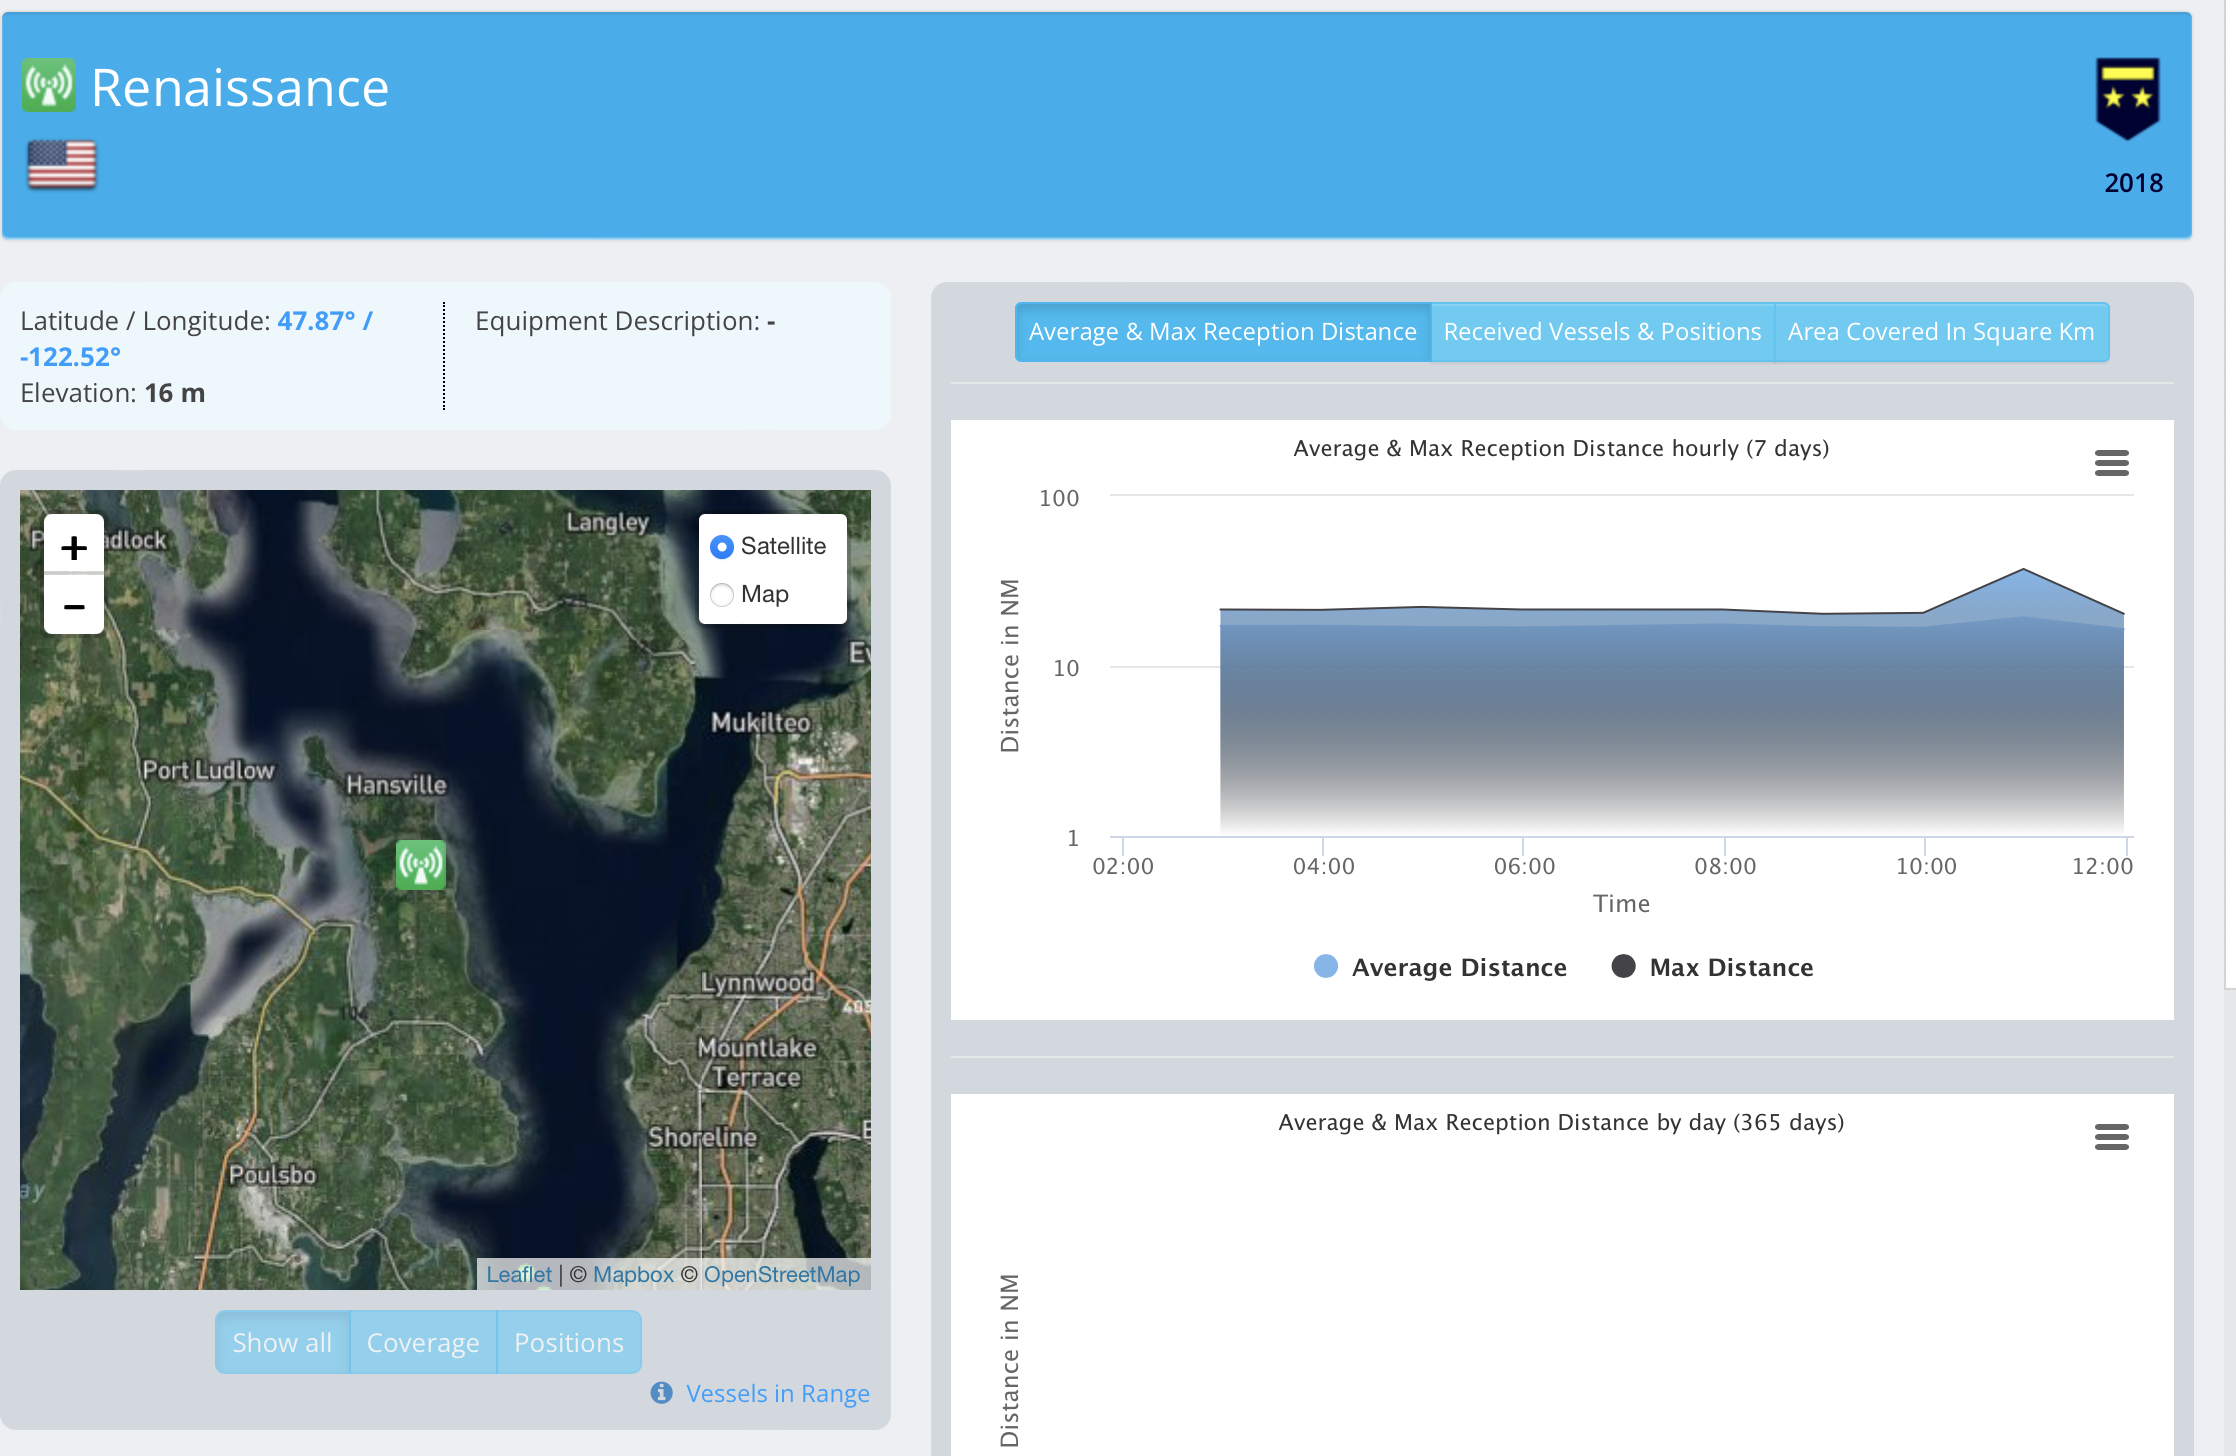
If you've ever used the MarineTraffic website or app, you know that it displays vessels around the world. It is very convenient to check what's going on around the world or at your destination long before you get there. For vessel locations, MarineTraffic mostly relies on ground stations that have AIS receivers that are also connected to the Internet. These receivers relay their information to a central hub, and MarineTraffic aggregates this information to offer their services like producing maps. They obviously offer a bunch of commercial services using this data as well - that is the business they are in.
MarineTraffic subscriptions offer more advanced features and are normally geared towards maritime businesses, making them fairly expensive for personal or hobby use. However, they also offer an option for individuals to share AIS data with them in exchange for a free professional membership. This allows them to receive more AIS data and provide better services to their users. You can find more information about this program on their website.
Now that you have a configurable platform that receives data from your boat network, if you have an AIS receiver, you can simply share it with MarineTraffic and make your boat one of their roaming stations. Depending on the availability and coverage of your station, you may be eligible for Professional or Professional Plus plans. These subscriptions are not cheap, they cost $700+ and $1400+ a year respectively. so it is pretty cool to have these features for your personal use. Now let's talk about how you can do it.
First, go to MarineTraffic.com and register an account. Verify your email address and log in. Then click on the person icon at the top right and choose "My Account" and then "My Stations". Click on "Add Receiving Station" and fill in the details. Put your boat's MMSI or Roaming MMSI if you have one. Put the height of the AIS antenna as the altitude. You can choose your boat's current location for the position, but it will change, so don't worry too much about it.
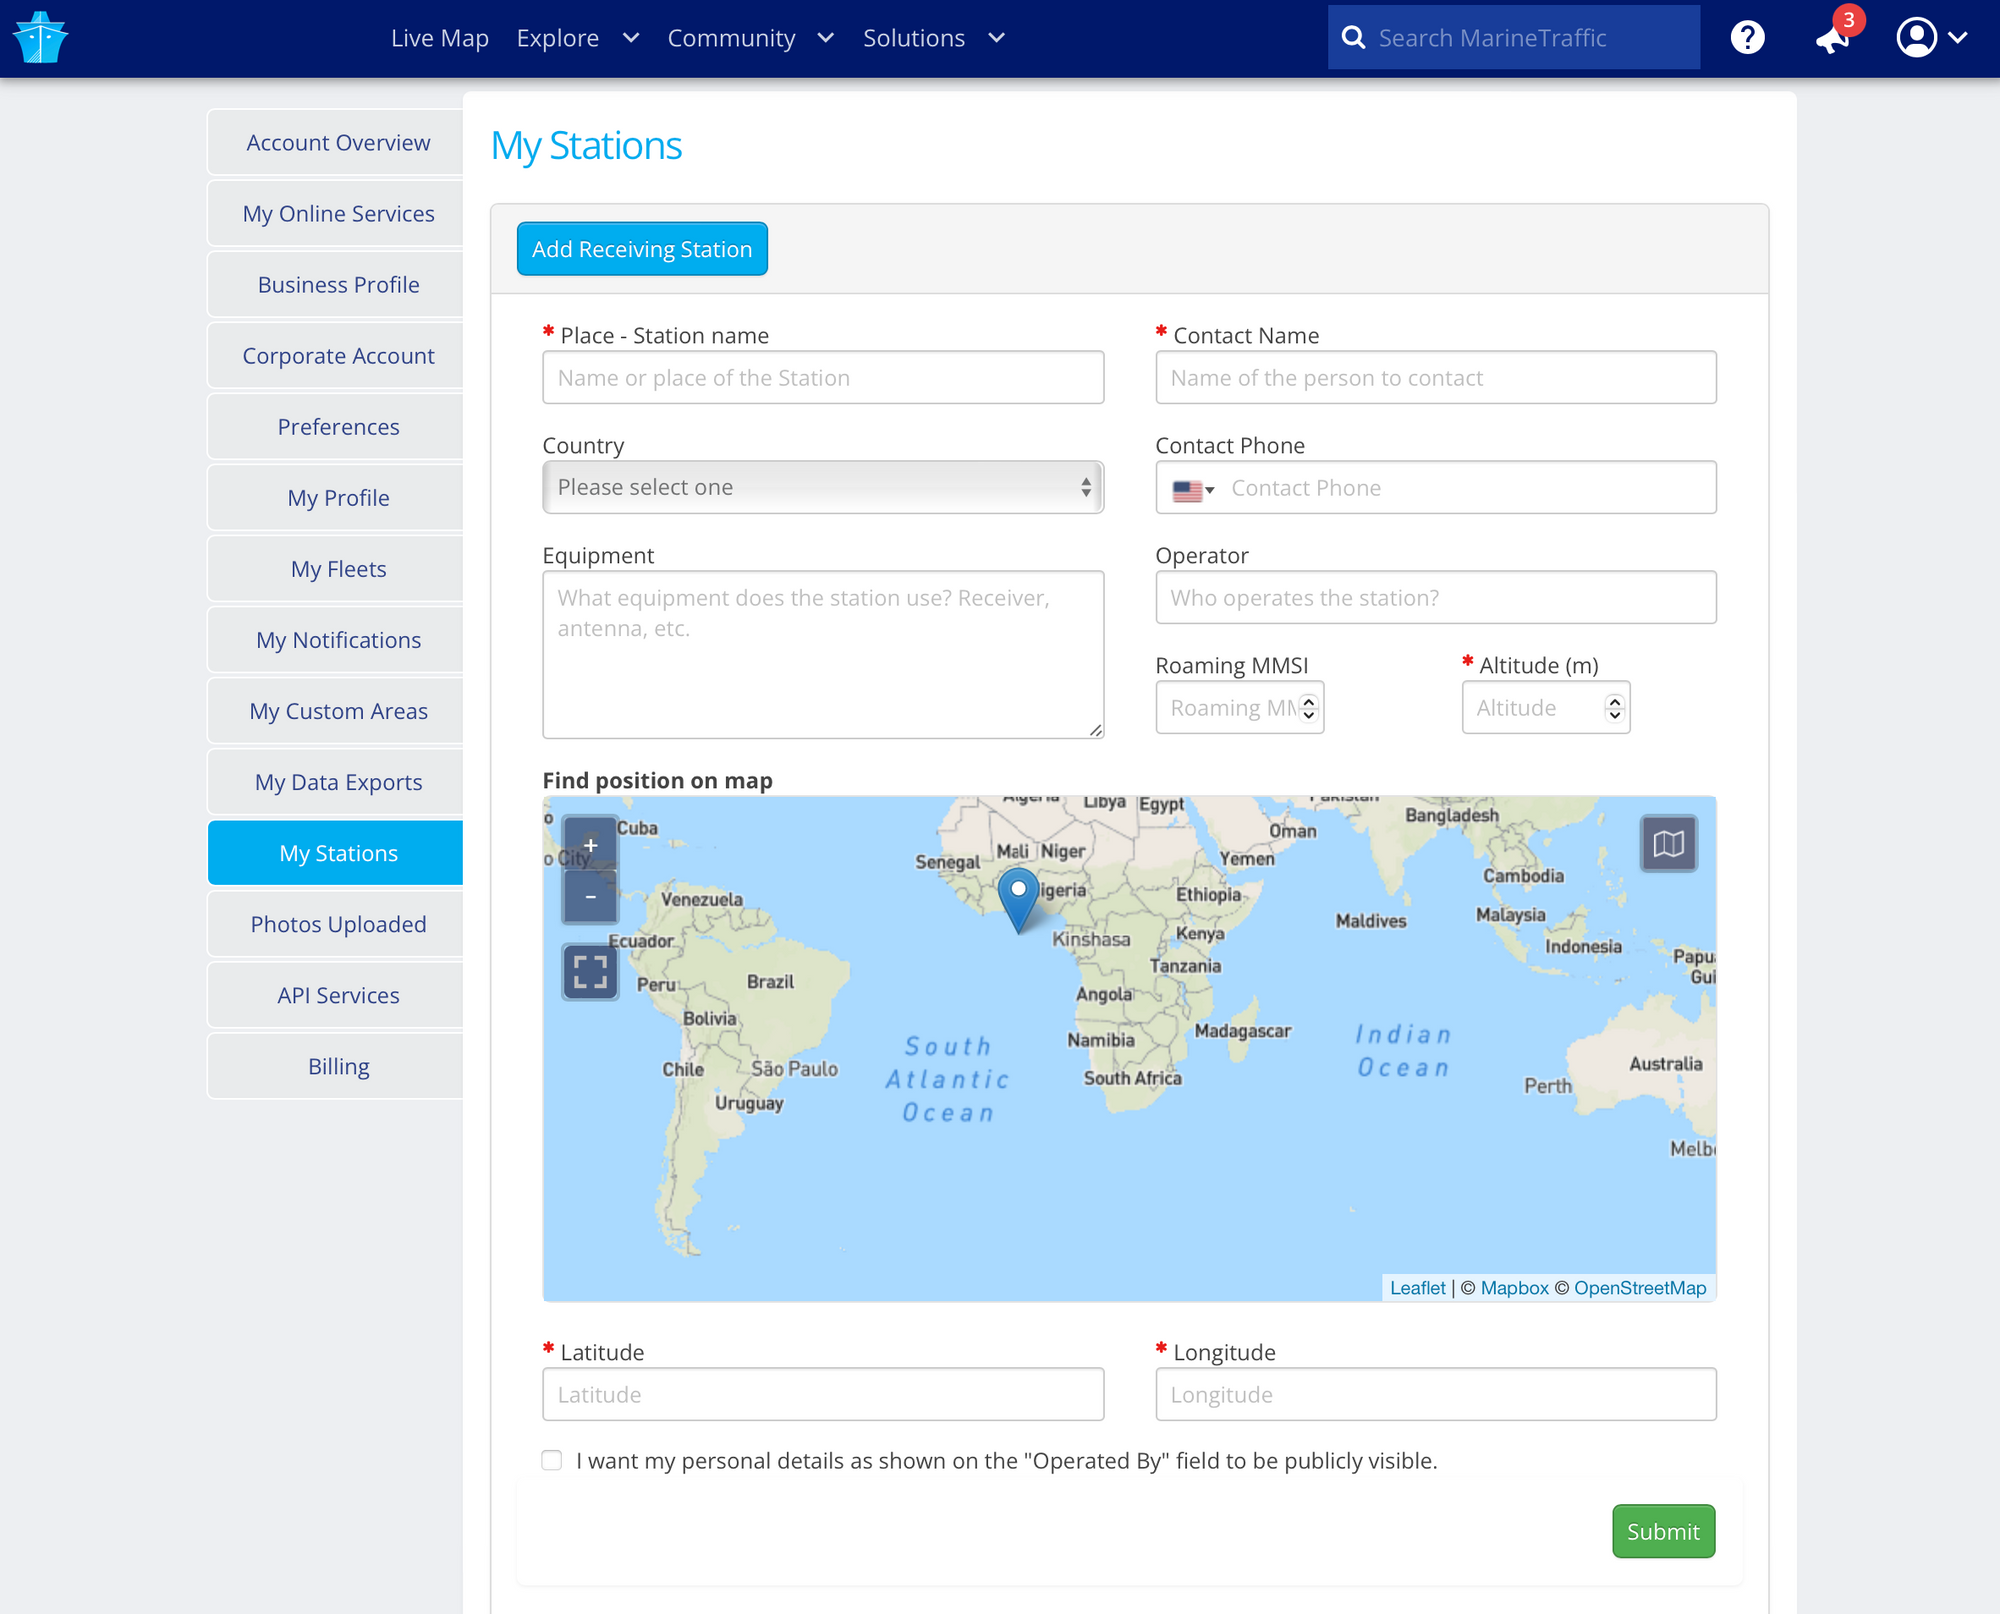
When you submit your information, MarineTraffic will present you with an IP address and port number to which you can send your feed. Don't worry if you miss it on the screen; check your email and you will see it in an email from MarineTraffic. It will look something like this: "IP address: 5.9.207.224, UDP/TCP port 6214." Make sure to note these two values before you proceed; you will need them.
Now go back to Signal K and using Appstore -> Available menu, install ais-forwarder plugin. As usual, you need to restart the Signal K server after installation completes. Then go to Server -> Plugin Config -> AIS data (NMEA0183) forwarder and configure it the following way.
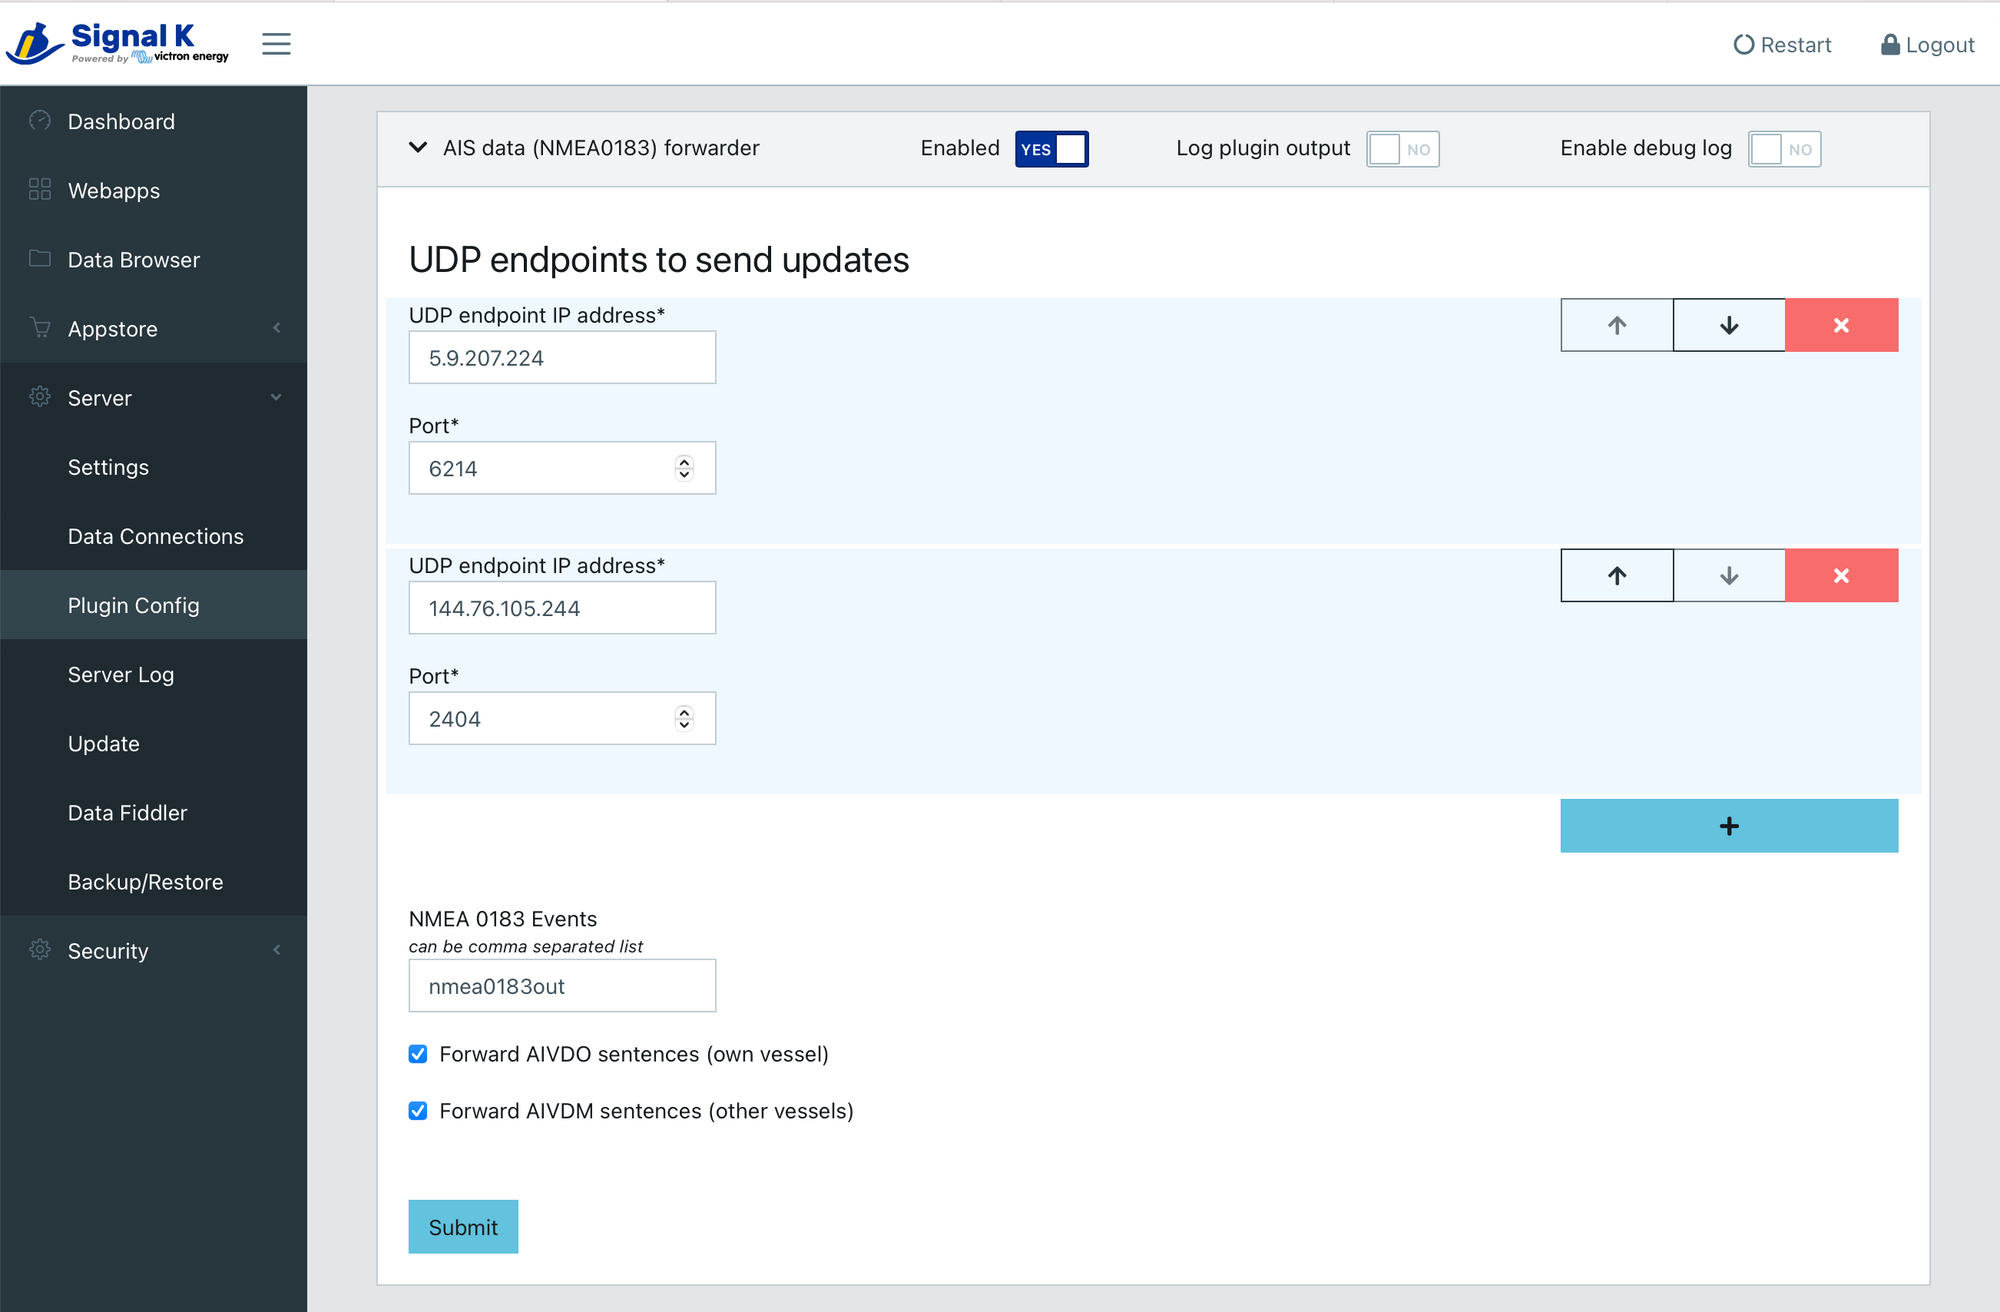
You need to press + (plus) button twice. For the first entry, enter what you captured from MarineTraffic.
For the second entry, enter 144.76.105.244 for the IP address and 2404 for the port. This second entry is optional and is for a different site called AISHub. Similar to MarineTraffic, AISHub also collects AIS data. While it is not open source per se, they share it with developers in exchange for an AIS data feed, making them more accessible for indie software developers. As one of those developers, I highly recommend it. This IP address port pair is registered under my name, and I do not benefit from this apart from making extra feeds available for everyone participating. If you want, you can register your own station for AISHub as well, but it does not provide much benefit unless you are a developer yourself.
Great! That's it! When you're ready, submit the configuration and wait for about 10-15 minutes. After that, you can check your station on MarineTraffic. If you have done everything correctly, it should be online and broadcasting your boat's AIS data to MarineTraffic and potentially to AISHub as well.
Conclusion
Victron Cerbo GX is an excellent platform with the potential to do much more than just control your electrical systems. Connecting it to NMEA 2000 and enhancing it with Signal K and an Internet connection opens up a ton of new capabilities.
Signal K itself is a rich platform with many more capabilities and add-ons than covered here. For example, you can use it as an anchor alarm, turn your boat into a weather station, automatically control your Starlink, or receive push notifications for boat alarms. However, these are not covered in detail here. You can go to the App Store to see options for downloads, but keep in mind that not all add-ons have the same level of usability or maturity. Nonetheless, there are many fun things to experiment with!
Please share your experiences and favorite plugins in the comments section below.
