For the last 9 months or so, we have been cruising British Columbia and then the Bahamas. During this time, we’ve encountered amazing cruisers and people, shared anchorages, enjoyed freshly caught fish or lobster together, exchanged stories, and made unforgettable memories.
We’ve learned a lot from others along the way, but we’ve noticed that people are equally fascinated by what we’re doing with our boat’s electronics—some kind of specialty for us.
A couple we met in a remote part of Vancouver Island were curious about how their boat kept showing up on Marine Traffic. The captain — who happened to be one of the contributors to AIS design early on! — was relieved when the mystery he was observing was resolved: we were running a Marine Traffic station in the area.
In Alaska, someone approached us at a dock, saying, “Ah, you’re the Renaissance who keeps showing up with weather reports on Windy. How do you do that?” And just recently, we met two fellow Leopard catamaran owners in the Bahamas who were very eager to learn how to get their tank level data displayed on their Victron GX displays. They were fascinated to see it in action on ours (the alternative is to turn on an MFD just to see how much water they have left or how much they have added with the latest run of the watermaker).
Others were fascinated by Saillogger, the automated logbook we kept, the monitoring capabilities we had, and wanted to have their own trackers and blogs to share with their families watching their adventures from the mainland.
One thing stood out as fairly common in these encounters. Almost all cruisers have Starlink these days. While almost no one had something like a Raspberry Pi on their boat, barring true geeks, many cruisers actually had the necessary hardware, a Victron Cerbo GX in this case. However, almost all of those who had a Cerbo GX lacked the connection to NMEA 2000, without exception. Nearly everyone seeing these in action wanted to obtain a Victron VE.Can to NMEA cable, which is fairly easy when you are in your home dock, but almost an impossibility when you are literally in the middle of nowhere during a cruising season. Waiting to get back home means missing an entire cruising season for these super cool features.
In a couple of instances, we helped other cruisers to hack some solutions. One of them was to use Starlink as a GPS source, removing the need for a cable to connect to Victron. However, this method only provides GPS functionality, which is barely sufficient for all the cool features. In a few others, they, along with us, had some cables onboard that we could cut and patch to make a temporary cable to do the job.
In this post, we are going to explain how you can create a custom Victron-to-NMEA 2000 cable. It’s a DIY solution that involves cutting an Ethernet cable and an NMEA 2000 cable to make the connection.
Making your own cable can be dangerous and may result in permanent damage to your electronics if you make an incorrect connection or cause a short circuit. This guide is meant as a concept, and you must proceed entirely at your own risk if you choose to attempt it.
What is VE.Can?
VE.Can is a communication protocol developed by Victron Energy for connecting and integrating devices within their ecosystem, primarily used in marine, automotive, and off-grid energy systems. It is based on the CAN bus (Controller Area Network) standard, a robust industrial protocol widely used for communication in vehicles and machinery. Victron uses VE.Can for communication between their own devices. While it shares similarities with NMEA 2000, another protocol based on CAN bus, the two are designed for different purposes.
One key difference is the connectors: VE.Can typically uses RJ-45 connectors (commonly referred to as Ethernet connectors, though they are not Ethernet-compliant), while NMEA 2000 employs standardized micro-C or mini connectors specifically designed for marine environments. Although both protocols leverage the CAN bus physical layer, their message structures and intended applications differ.
For this discussion, we focus primarily on the connectors, as both Victron and NMEA devices handle their respective message structures. Victron provides a cable that connects their devices to an NMEA 2000 network.
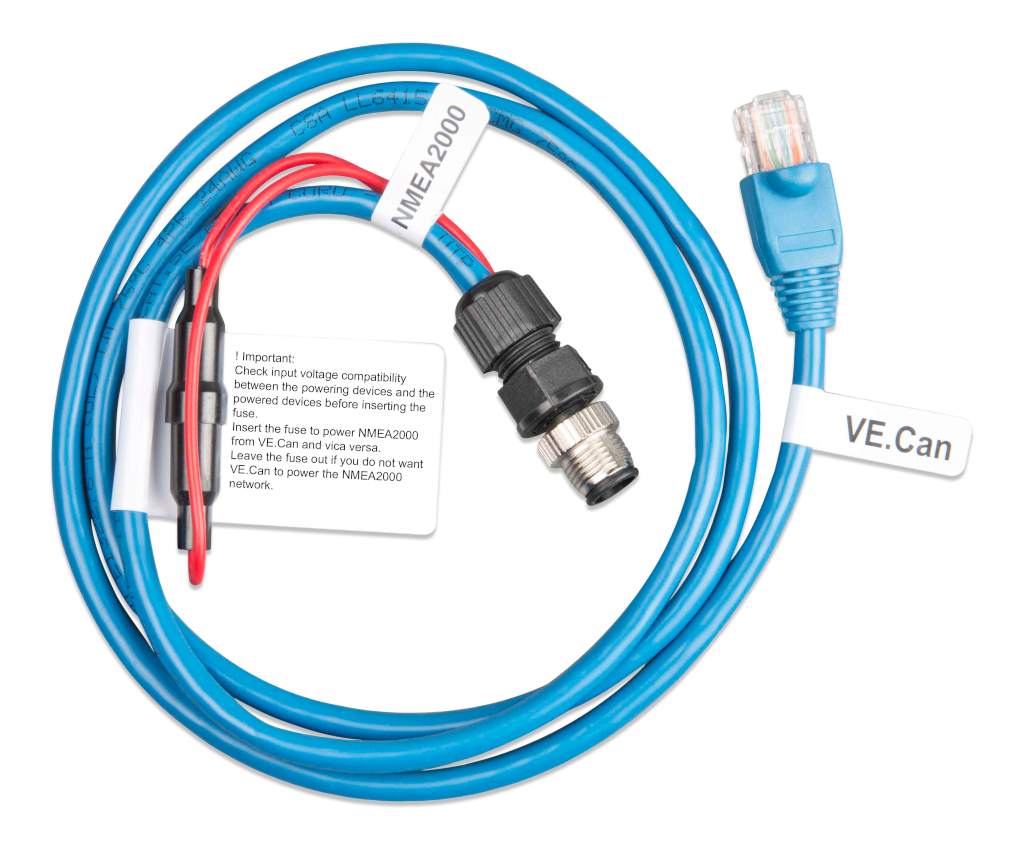
While this cable is compatible with many Victron devices, our primary interest is in connecting a Cerbo GX or Ekrano GX to NMEA 2000. Personally, I find it puzzling that Victron doesn’t make it easier to include this cable in their marine installations by default, perhaps as part of a marine bundle offering. However, that’s a decision for Victron to make.
Nearly every cruiser we met who owned a Cerbo GX wanted this cable after seeing its functionality. Yet, it is almost universally absent—most installers either didn’t understand its utility or didn’t prioritize including one.
In a nutshell, think of this cable as a bridge between your power systems and navigation systems, uniting everything into one intelligent hub: the Victron GX. And since the Victron GX is a fairly open platform, it allows you to do some super cool and customizable things on that hub (more on that below).
What really is the VE.Can to NMEA 2000 Cable?
At its core, this is a super simple cable that connects specific pins on the RJ45 connector to corresponding pins on the NMEA connector. Victron conveniently provides the pinout details for this connection in their technical manuals:
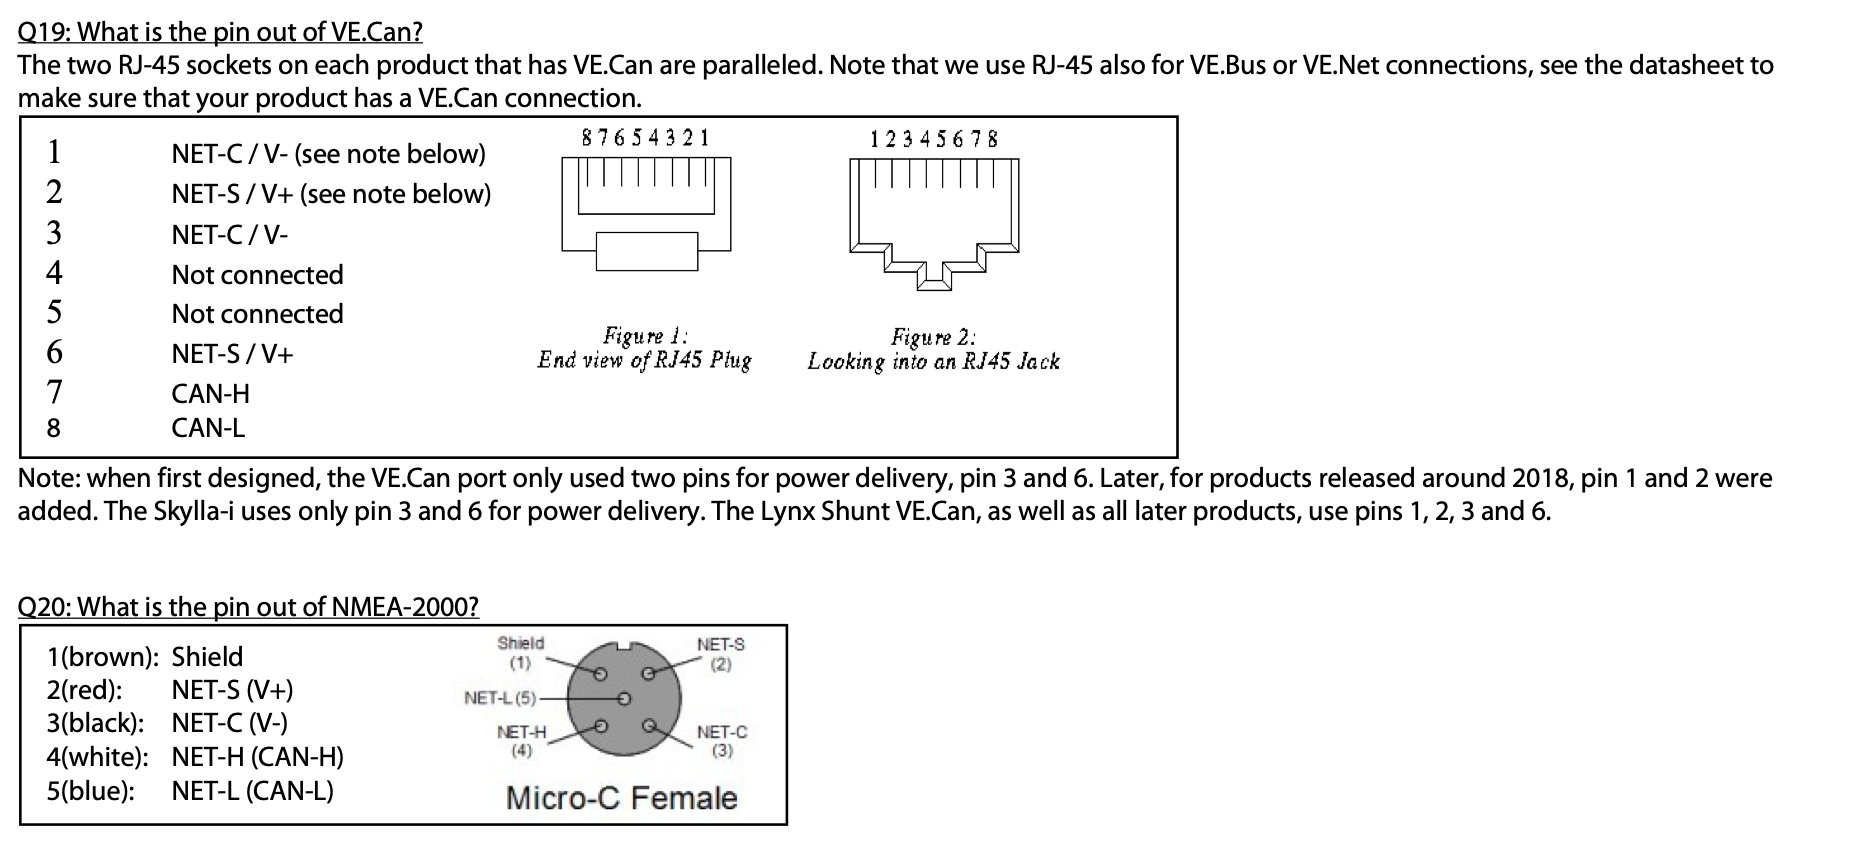
In practice, at least for communication between a Cerbo GX or Ekrano GX and NMEA (other Victron devices might behave differently), power is not relevant. Essentially, we’re only dealing with two critical pins: NET-H (CAN-H) and NET-L (CAN-L).
In simpler terms, if you have these two connectors and connect the two wires correctly—while ensuring you don’t cause a short circuit or any other issue (which can be very dangerous!)—you can make this setup work.
The importance of this while cruising lies in the fact that finding a specialized Victron cable is almost impossible in remote locations. However, many cruisers carry spare Ethernet and NMEA cables onboard. If you're willing to cut and repurpose these (admittedly expensive) cables, you can create a functional connection on the go.
In Practice...
Recently, I helped a fellow cruiser in a remote part of the Bahamas make a cable for their Cerbo GX on a Leopard catamaran, which came equipped with Raymarine electronics. Raymarine uses NMEA 2000 but with specialized connectors branded as SeatalkNG, which differ from the standard micro-C and mini connectors. Despite the unique connector, it’s still the same NMEA 2000 protocol operating behind the scenes. Thankfully, the pinout of those connectors is available from Raymarine.
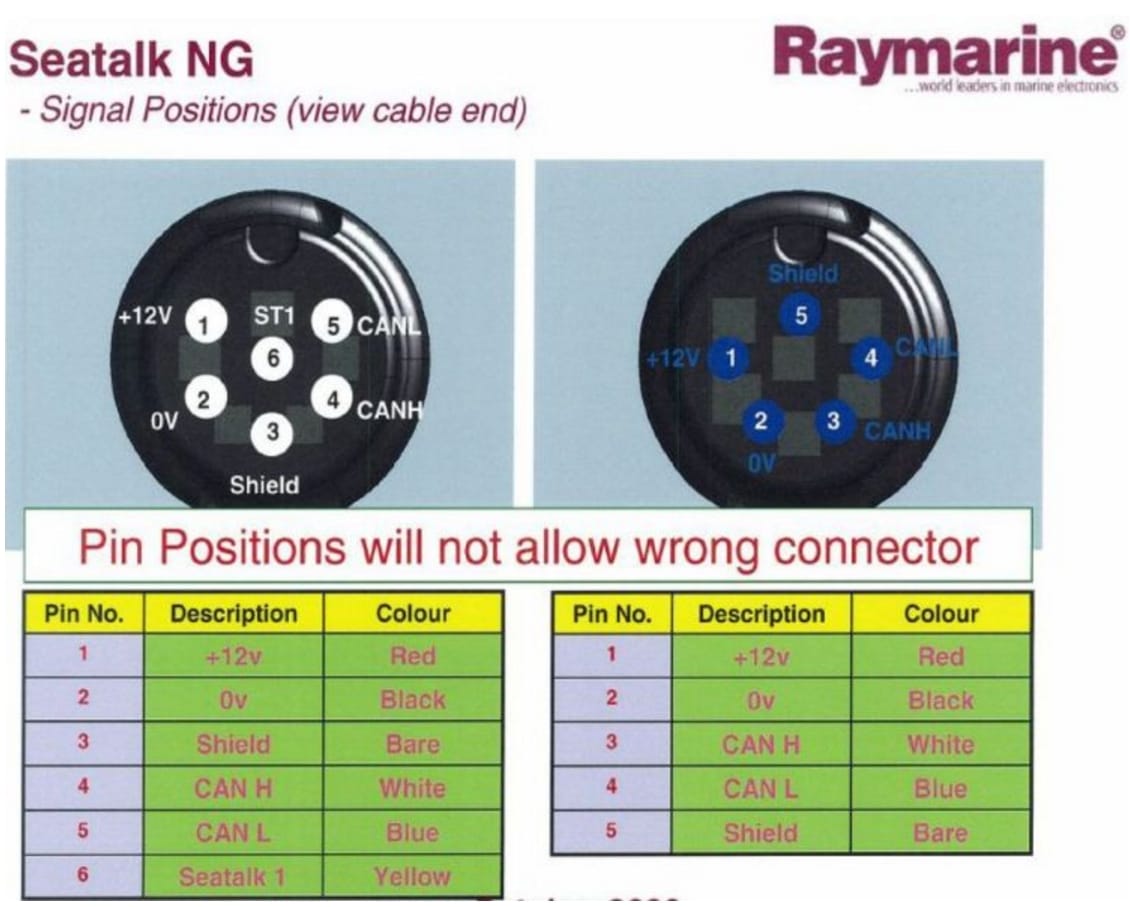
We ended up sacrificing a SeatalkNG cable and here is how it looks when you cut them:
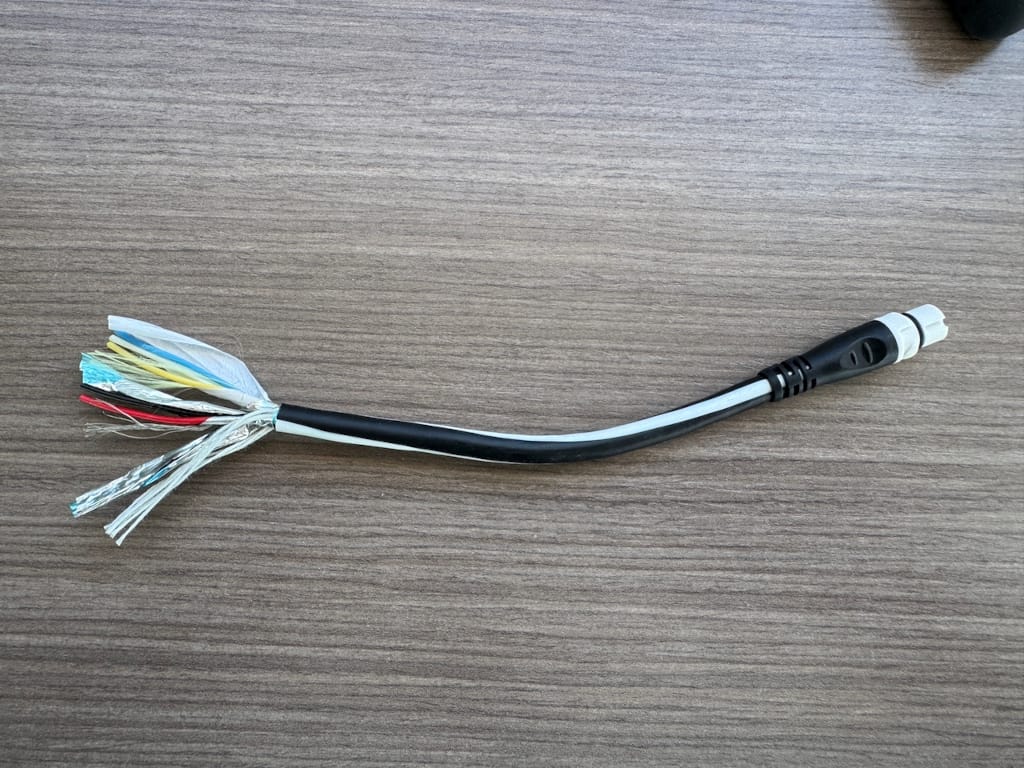
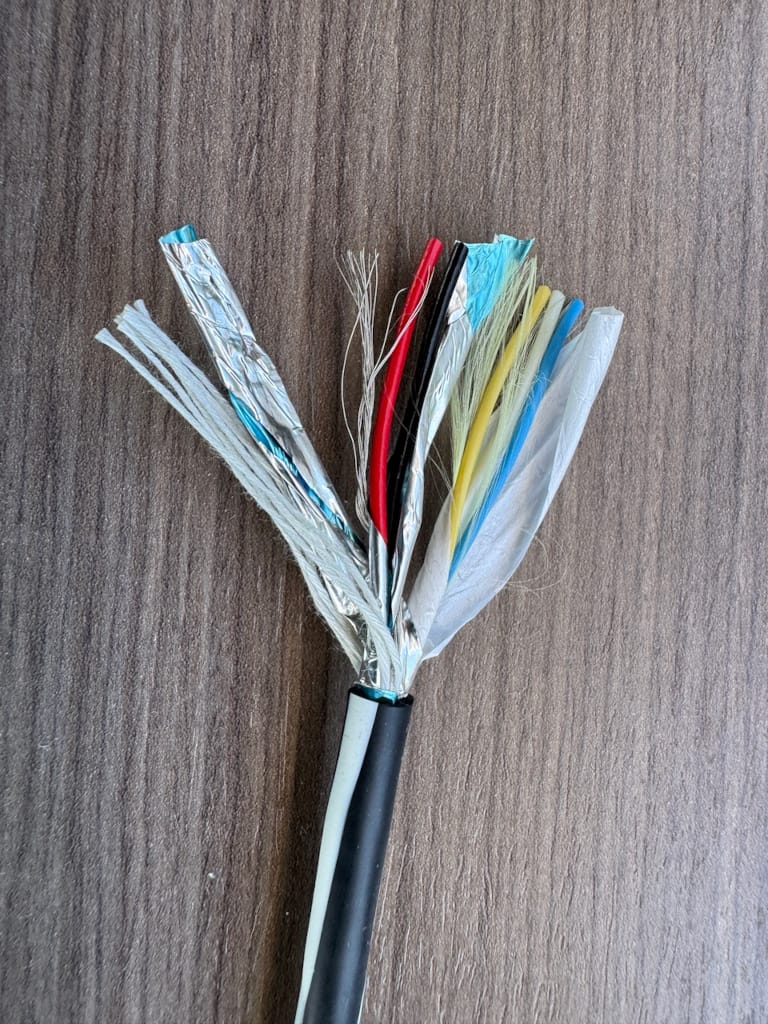
Luckily, we only need the blue and white wires here, so the rest can be set aside. However, you must pay special attention to the red and black wires (and possibly the shield), which carry power from your NMEA backbone. Accidentally shorting these wires can cause serious damage to your electronics and lead to major headaches.
To avoid a short, we cut the red and black wires to different lengths and ensured they were kept away from the shield. We’ll show you how this setup looks shortly.
Making your own cable can be dangerous and may result in permanent damage to your electronics if you make an incorrect connection or cause a short circuit. This guide is meant as a concept, and you must proceed entirely at your own risk if you choose to attempt it.
For the other end of this cable, we needed to sacrifice and cut an Ethernet cable. Ethernet cables can have either a T-568A or T-568B pinout, which differ slightly in wiring arrangement. Thankfully, for our purposes, the two pins we care about—7 and 8—are the same color on both standards.
- Pin 7 is connected to a white-brown wire.
- Pin 8 is connected to a brown wire.
Here’s a reference for the T-568B pinout:
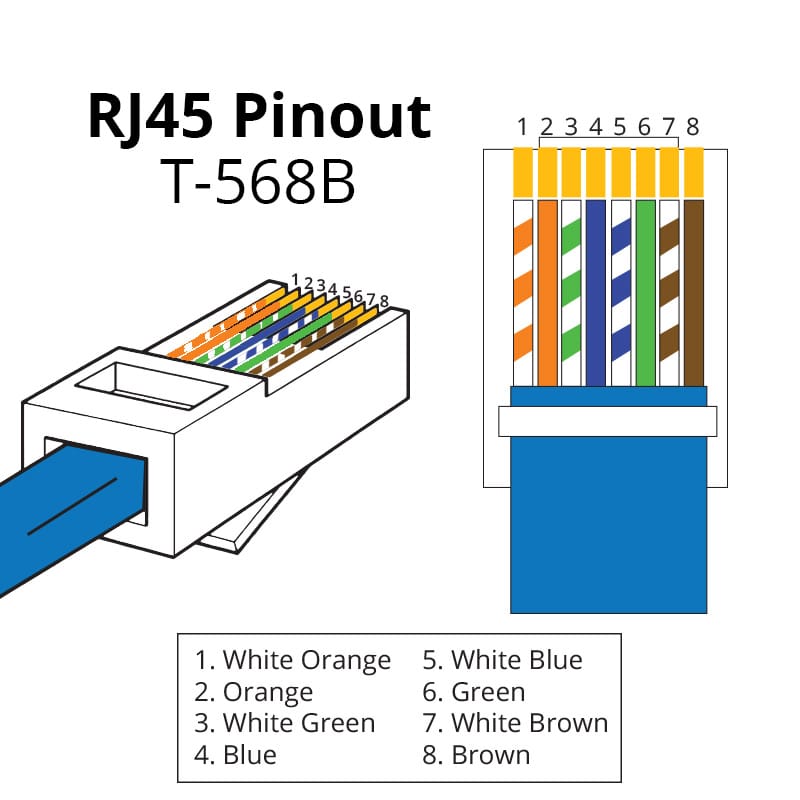
So ultimately, we only connected the blue wire to the brown wire, and the white wire to the white-brown wire. After securing the connections with some electrical tape, this is how it looked (Note: we ensured the red and black wires were completely separate from each other and the shield to avoid any risk of a short circuit.)
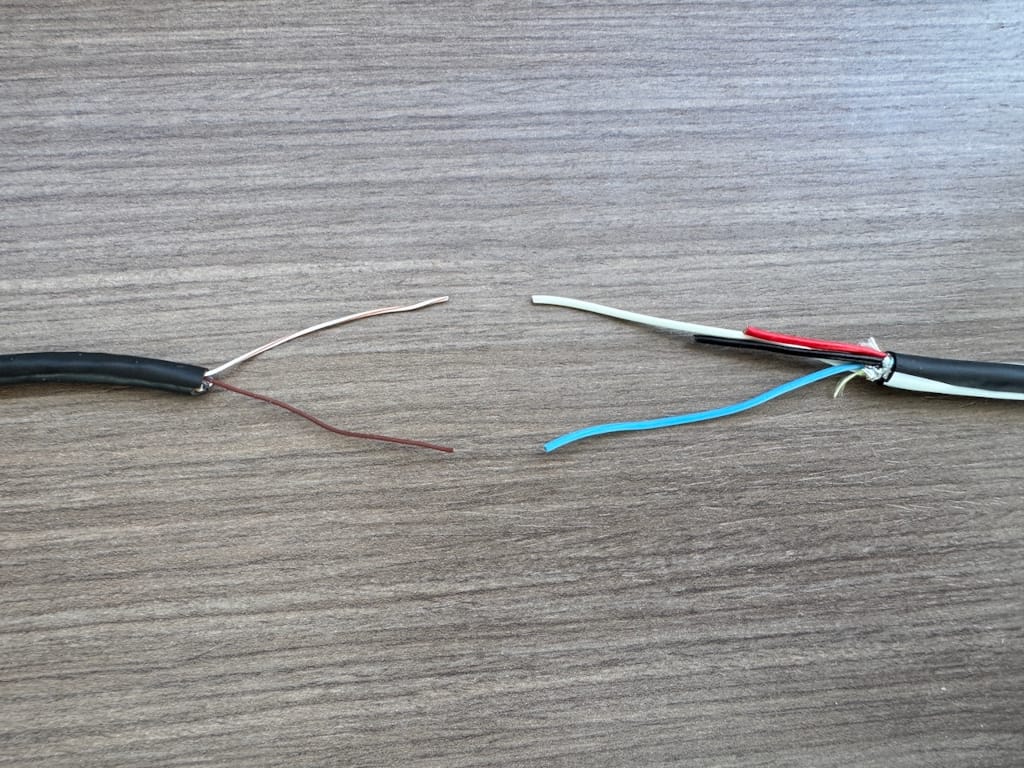
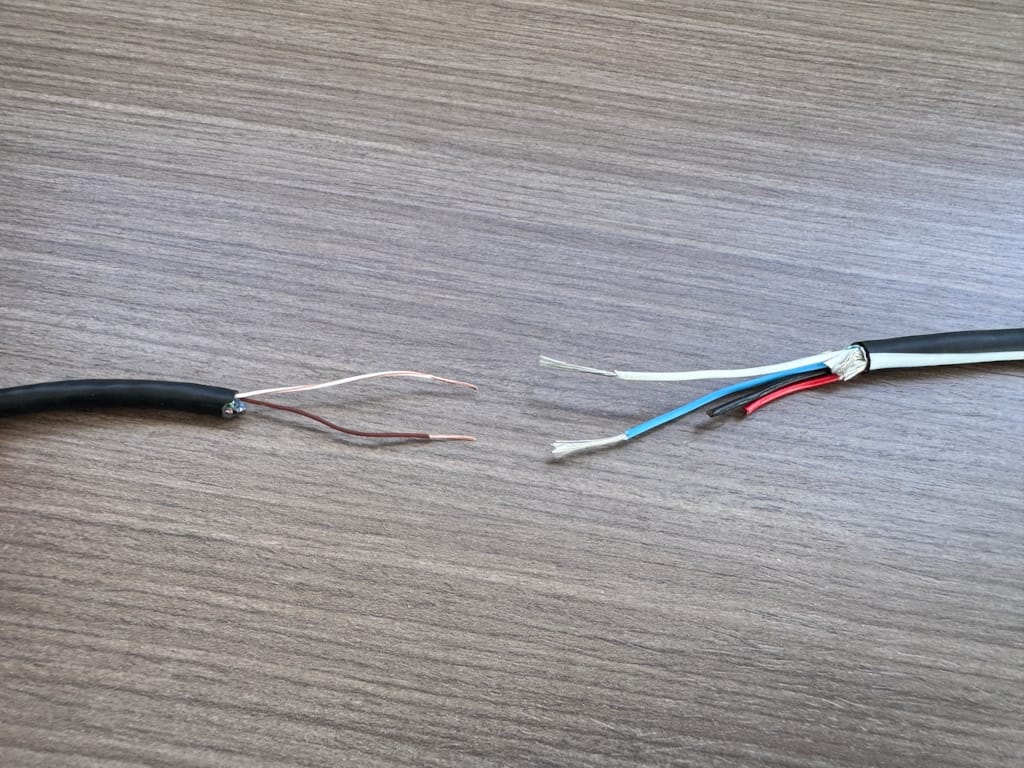
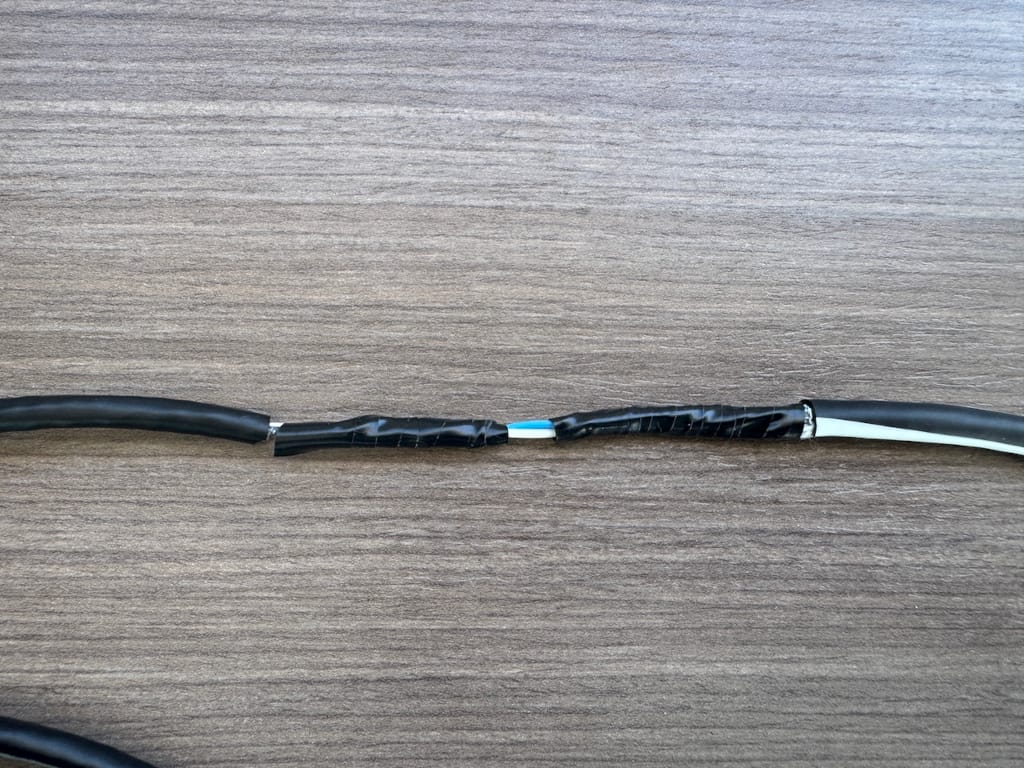
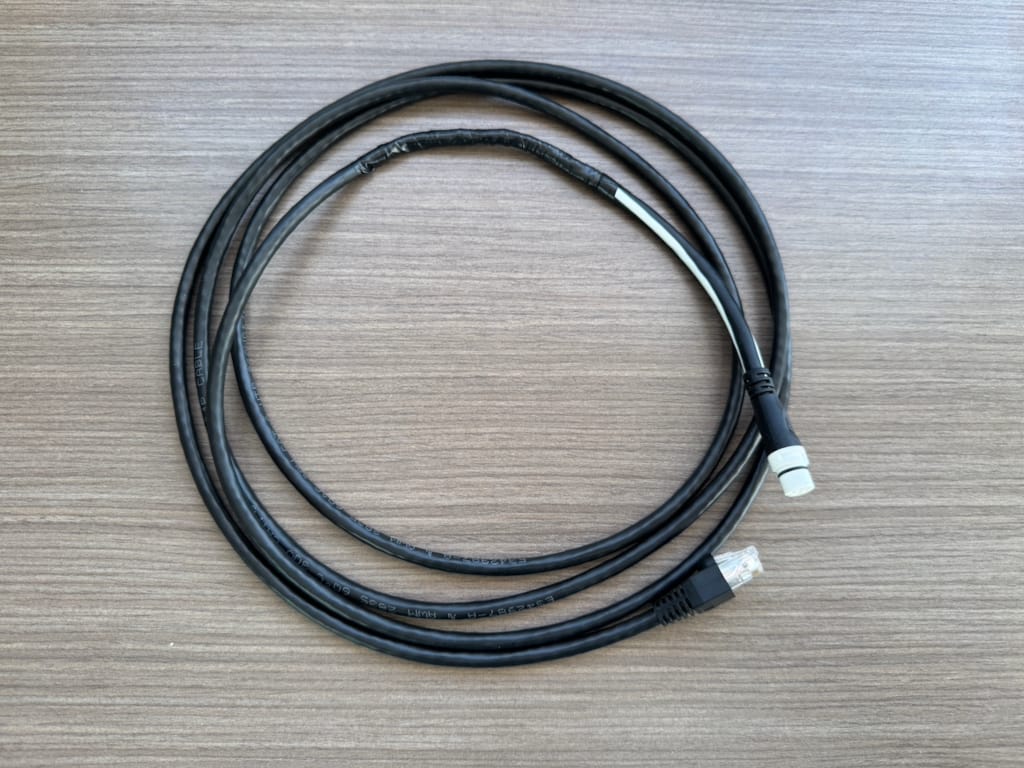
Then we proceeded to test the cable to ensure everything was working as expected and that there were no issues with the connections.
How To Test
The best way to test is by using Signal K and evaluating its actual functionality, which we will cover below. However, there are a few preliminary steps you can take on the GX display before proceeding.
Testing on GX Display
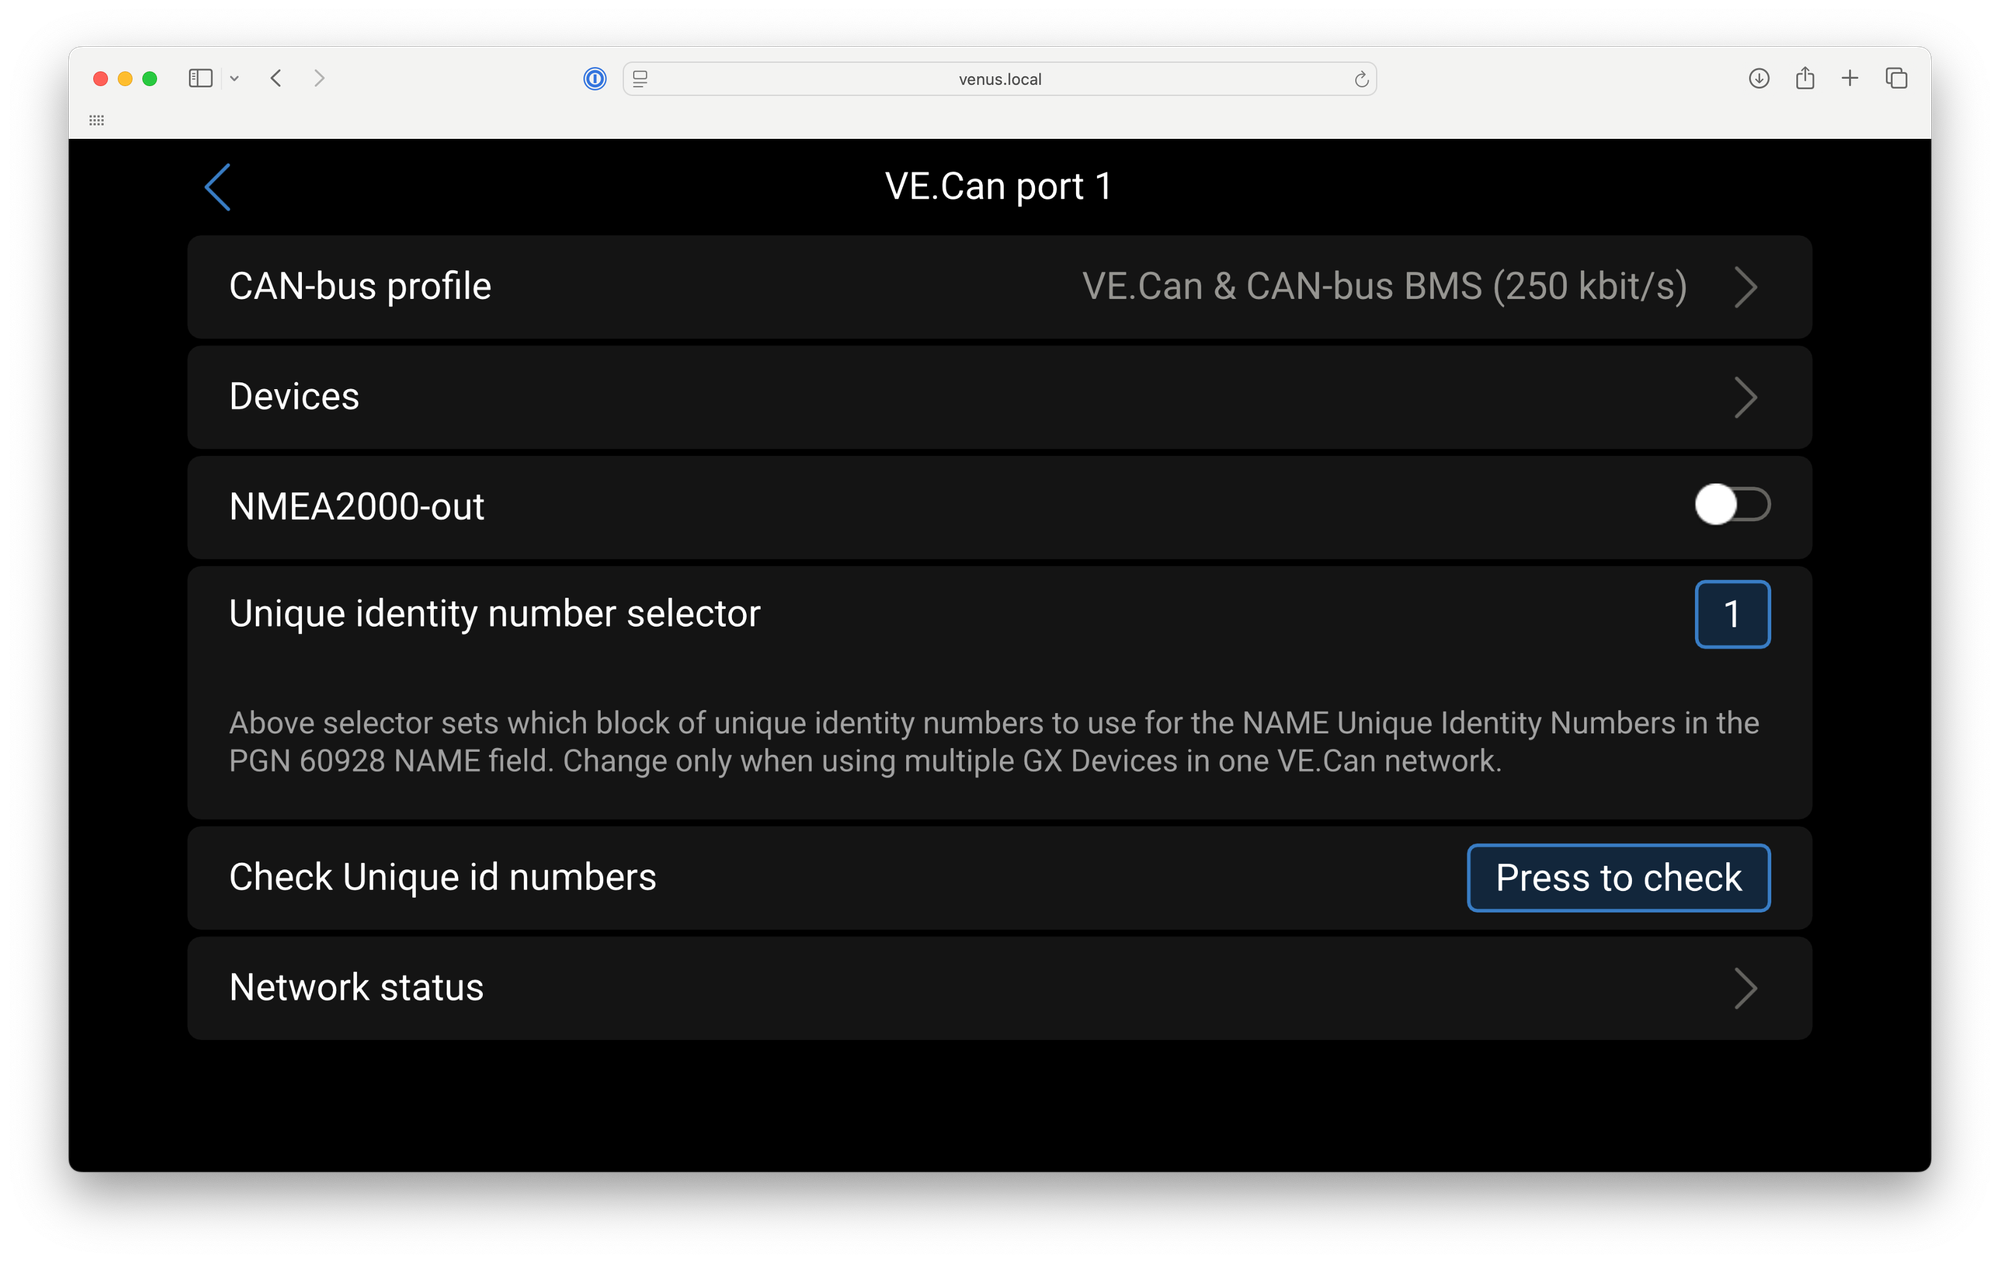
- Navigate to Settings → Services → VE.Can Port.
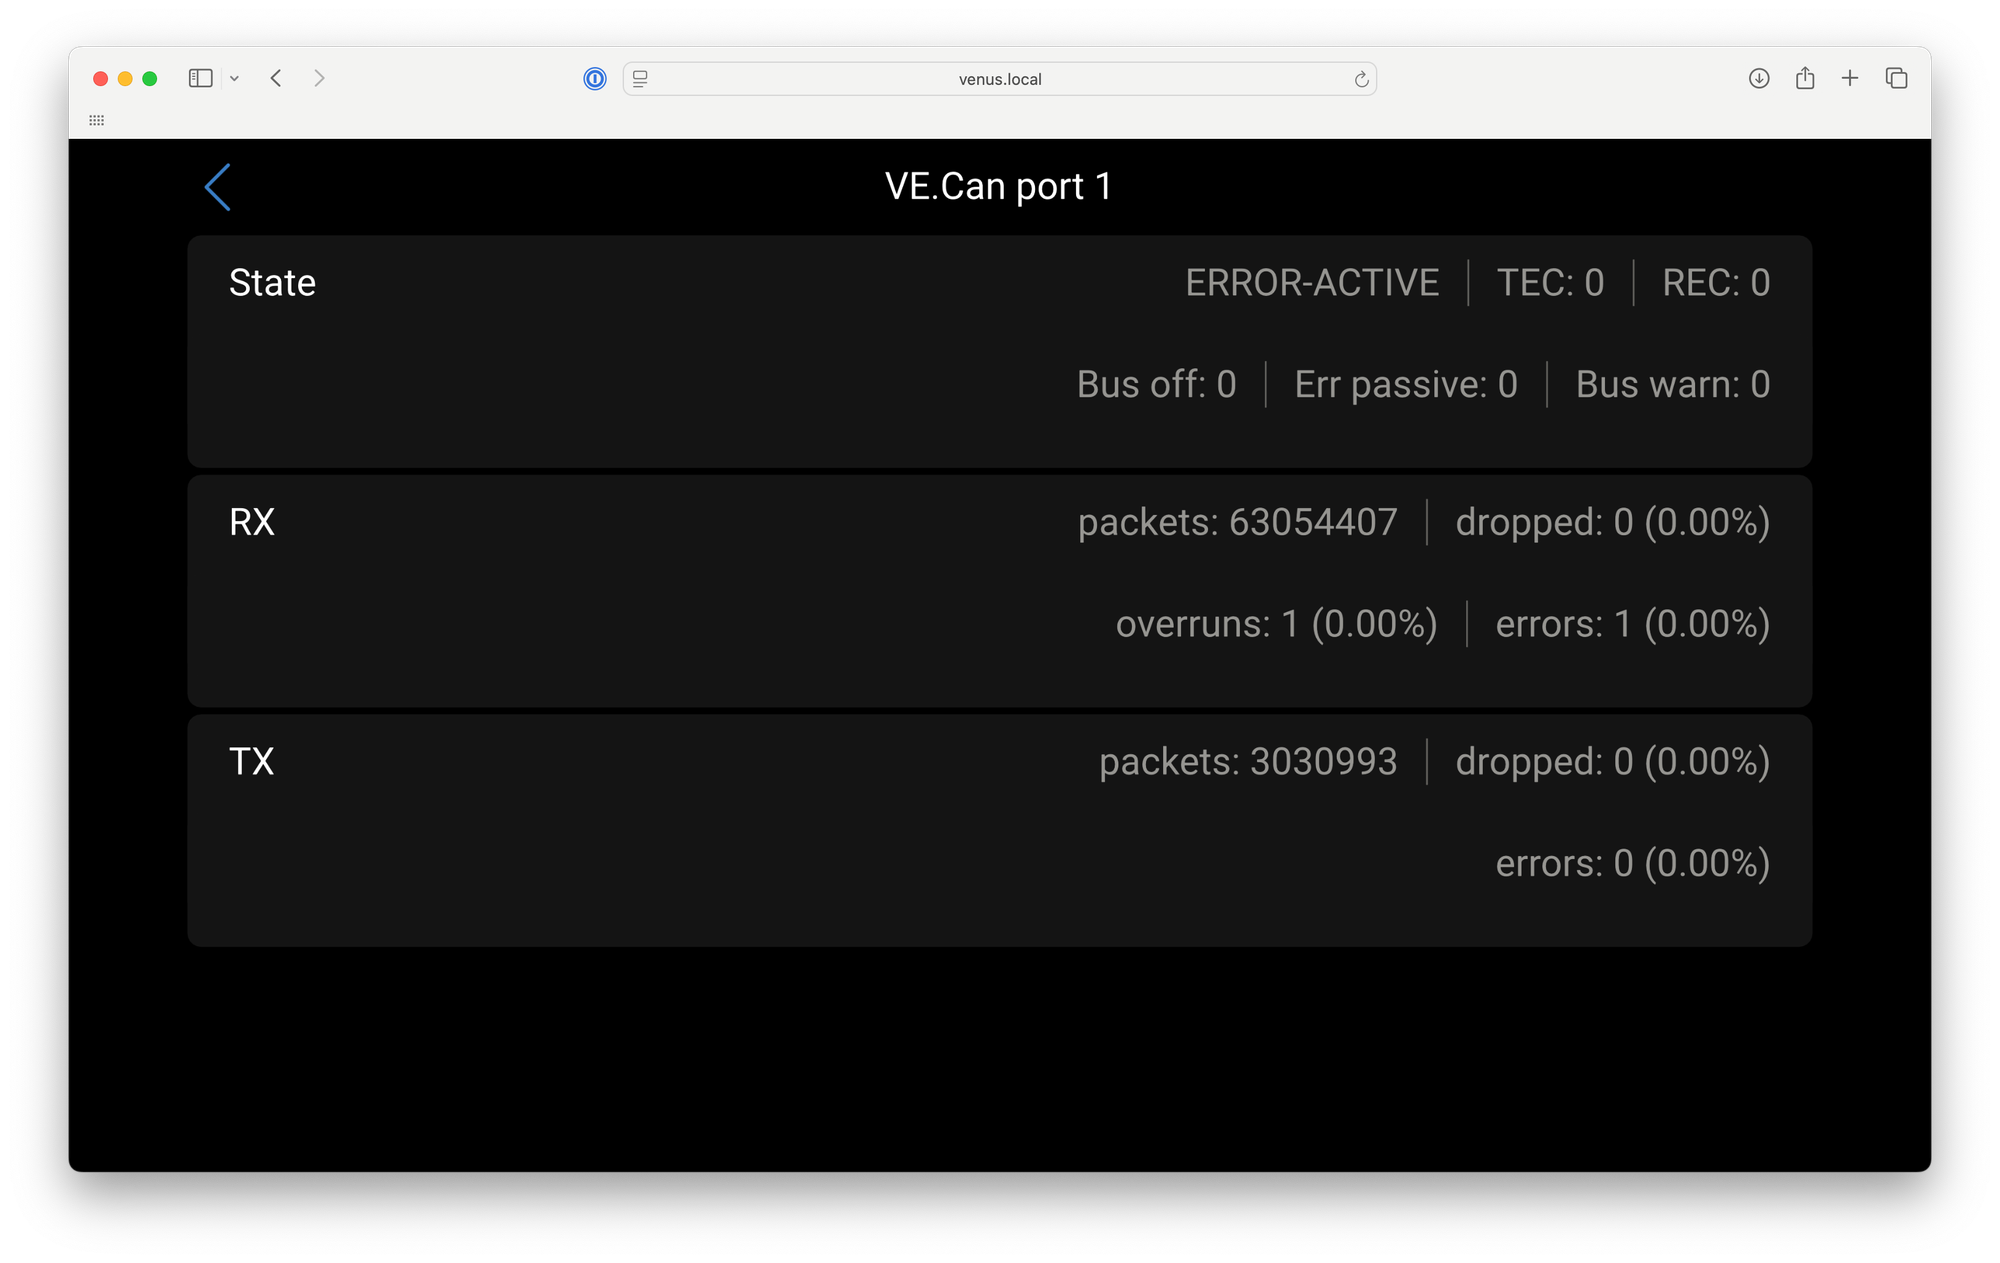
- First, check the Network Status. It should display ERROR-ACTIVE. While this state name might suggest an issue, it is actually the correct and expected state. (This terminology could certainly be made more intuitive.)
- Be aware of potential conflicts.
- If your GX device already has another VE.Can connection, such as one linked to a Quattro or another Victron device, the status might be misleading.
- Verify devices on the network.
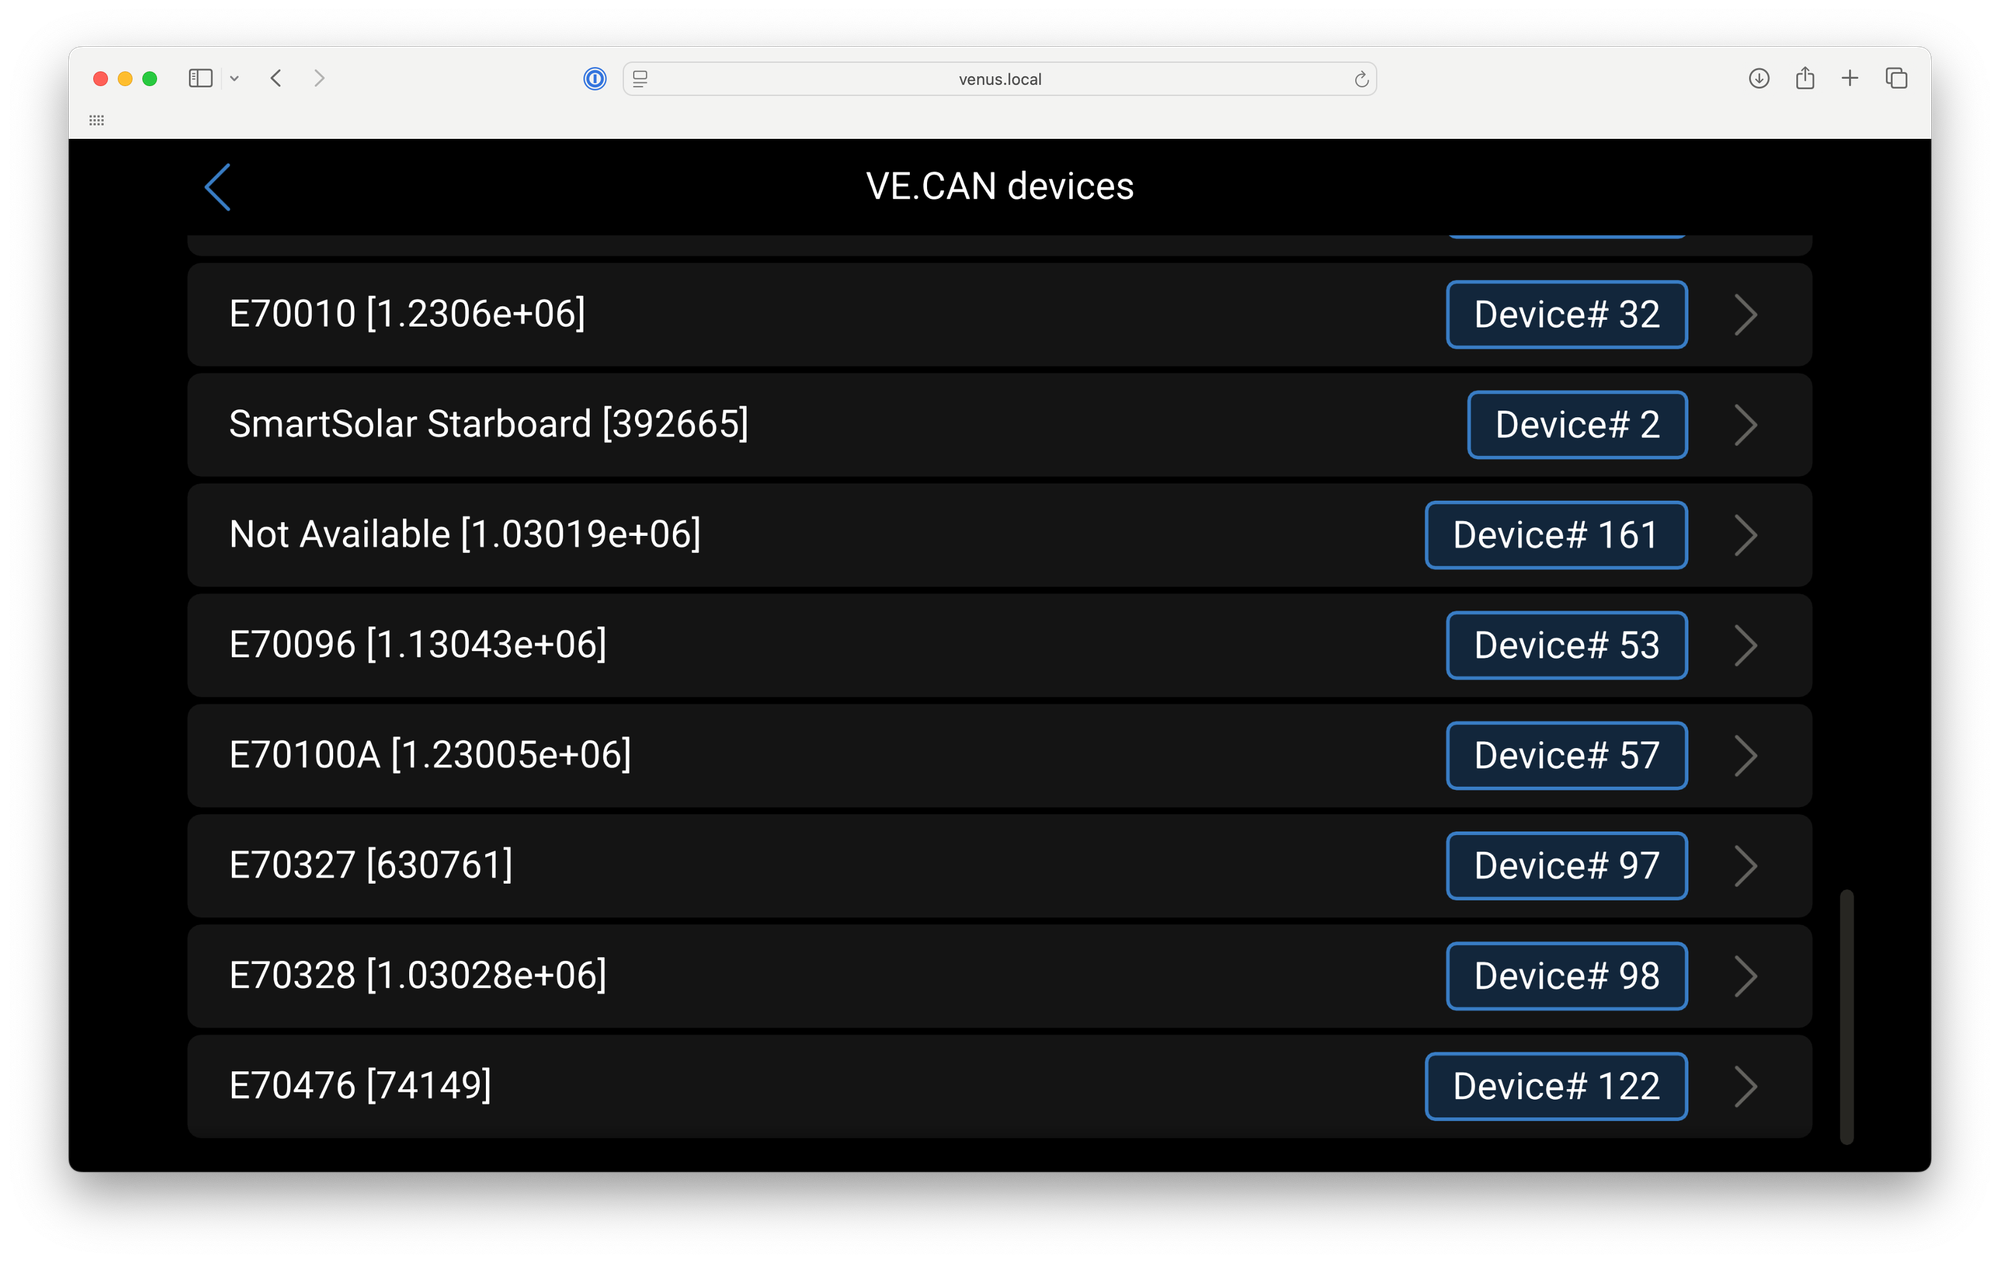
- Go to the Devices screen and review the list. You should see devices from your NMEA network.
Below is an example of how it looks in practice with the new UI:
Testing with Signal K
Signal K is the platform that powers marine extensions for Victron devices. The primary purpose of this cable is its use with Signal K, so the best approach is to dive right into testing it.
We have already provided detailed instructions on how to enable Signal K on Victron GX series devices in previous articles and video tutorials. To avoid repetition, we recommend checking out the step-by-step instructions in our YouTube video tutorial or referring to a related post here on the blog.
Going Forward
We hope you found this article helpful and informative. To share even more insights, we’ve started publishing detailed technical guides, video tutorials, and demos on our YouTube channel.
Some of these tutorials are inspired by Saillogger—the cutting-edge logging and monitoring solution we’ve been developing for ourselves and other modern boaters. With Saillogger, we aim to redefine the boating experience by offering sophisticated features for seamless tracking and advanced NMEA monitoring. While some tutorials explore Saillogger’s powerful capabilities, we also publish general guides, like the one linked above.
Here’s a glimpse of upcoming tutorials:
- Using Starlink with Victron GX devices
- Displaying NMEA data on Victron GX displays
If these topics spark your interest, be sure to subscribe to our YouTube channel, as we won’t be announcing these updates on the blog.
